

Introduction
Imagine indulging in a dessert that combines the rich, flaky layers of baklava with the creamy, luscious texture of cheesecake. This Baklava Cheesecake is not just a treat for the taste buds; it’s a stunning centerpiece that will leave your guests in awe this Thanksgiving. The blend of flavors—warm spices, honey, and nuts—creates a delightful fusion that honors both classic desserts, making it an unforgettable addition to your holiday spread.
I discovered this recipe while searching for ways to incorporate traditional flavors into modern desserts. It quickly became a family favorite, bringing joy and sweetness to our Thanksgiving gatherings. Perfect for those looking to impress without spending all day in the kitchen, this cheesecake is a showstopper that will have everyone coming back for seconds!
What’s great about this recipe is its versatility. While it captures the essence of baklava, you can tweak it to suit your tastes, whether you prefer more honey, different nuts, or added spices. Let’s explore why this Baklava Cheesecake deserves a spot on your holiday table and how to create it flawlessly!
Why You’ll Love This Recipe
- Unique Flavor Profile: The combination of classic baklava flavors with creamy cheesecake creates a dessert that’s both familiar and exciting.
- Eye-Catching Presentation: The layered look of the cheesecake mimics baklava, making it visually stunning for your holiday feast.
- Easy to Prepare: Despite its impressive appearance, this cheesecake is straightforward to make, even for novice bakers.
- Make-Ahead Option: This cheesecake can be prepared in advance, allowing you to enjoy more time with your guests on the big day.
- Customizable: Feel free to experiment with the nut blend, spices, and sweetness to make it your own.
Preparation Time and Servings
- Total Time: 1 hour 30 minutes (20 minutes prep, 1 hour baking, plus chilling time)
- Servings: This recipe serves 12 generous slices.
- Nutrition Facts: Calories per slice: 400, Protein: 8g, Carbs: 36g, Fat: 28g.
Ingredients
Crust
- 1 ½ cups phyllo dough: The traditional base for baklava, adding a crispy texture.
- ½ cup unsalted butter, melted: Helps to crisp the phyllo layers.
- ½ cup finely chopped walnuts: Adds flavor and crunch.
Cheesecake Filling
- 3 (8 oz) packages cream cheese, softened: The creamy base for the cheesecake.
- 1 cup granulated sugar: For sweetness.
- 1 teaspoon vanilla extract: Enhances the overall flavor.
- 3 large eggs: Provides structure and richness.
- 1 teaspoon ground cinnamon: Adds warmth and spice.
Topping
- ½ cup honey: Sweet and sticky, perfect for drizzling.
- 1 cup finely chopped mixed nuts (walnuts, pistachios, almonds): Adds texture and crunch.
- 1 teaspoon ground cinnamon: For an extra layer of flavor.
- 1 tablespoon melted butter: To help the topping stick together.
Step-by-Step Instructions
STEP 1: CRUST
- Preheat the Oven: Start by preheating your oven to 350°F (175°C). This will ensure your cheesecake bakes evenly.
- Prepare the Phyllo Dough: If using frozen phyllo dough, thaw it according to package instructions. Once thawed, take out 10 sheets and cover them with a damp cloth to prevent drying out.
- Assemble the Crust: In a large mixing bowl, combine the melted butter and chopped walnuts. Brush a 9-inch springform pan with melted butter. Layer five sheets of phyllo dough in the bottom of the pan, brushing each sheet with melted butter before adding the next. Sprinkle a little of the walnut mixture between some layers for added texture.
- Add More Layers: Continue layering with the remaining phyllo sheets, brushing each with melted butter, until all sheets are used. Make sure to press the layers firmly into the bottom of the pan and up the sides.
- Bake the Crust: Bake the phyllo crust in the preheated oven for about 10-15 minutes, or until golden brown. Once done, remove it from the oven and let it cool slightly while you prepare the filling.
STEP 2: FILLING
- Mix the Cream Cheese: In a large mixing bowl, beat the softened cream cheese until smooth and creamy, using an electric mixer on medium speed.
- Add Sugar and Spices: Gradually add the granulated sugar and continue to beat until fully incorporated. Mix in the vanilla extract and ground cinnamon.
- Incorporate the Eggs: Add the eggs one at a time, beating well after each addition. Ensure the mixture is smooth and free of lumps.
STEP 3: ASSEMBLE
- Pour the Filling: Pour the cheesecake filling over the baked phyllo crust, spreading it evenly with a spatula.
- Bake the Cheesecake: Place the springform pan back in the oven and bake for about 50-60 minutes, or until the edges are set and the center has a slight jiggle.
- Cool the Cheesecake: Once baked, turn off the oven and crack the door open slightly, allowing the cheesecake to cool gradually. This helps prevent cracking. After about 1 hour, remove the cheesecake from the oven and let it cool completely at room temperature.
STEP 4: CHILL & TOP
- Refrigerate: Once cooled, cover the cheesecake with plastic wrap and refrigerate for at least 4 hours, or overnight if possible.
- Prepare the Topping: In a small bowl, combine the finely chopped mixed nuts, cinnamon, and melted butter. Stir until well combined.
- Drizzle with Honey: Before serving, drizzle honey over the chilled cheesecake, then sprinkle the nut mixture on top for an extra crunch.
STEP 5: SERVE & ENJOY
- Slice and Serve: Carefully run a knife around the edge of the springform pan before releasing it. Slice the cheesecake into 12 pieces and serve chilled.
- Garnish: For an elegant touch, consider garnishing each slice with a sprinkle of ground cinnamon or a few whole nuts.
How to Serve
- Pair with Coffee or Tea: This cheesecake pairs beautifully with a cup of strong coffee or fragrant tea. The bitterness of coffee balances the sweetness of the cheesecake perfectly.
- Add Fresh Fruit: Serve with fresh berries or citrus slices for a refreshing contrast to the rich cheesecake. Pomegranate seeds can also add a lovely pop of color and flavor.
- Drizzle More Honey: A little extra honey on individual slices can elevate the flavors even further. Consider infusing the honey with spices like cinnamon or vanilla for an extra twist.
Additional Tips
- Thaw Properly: Ensure phyllo dough is completely thawed for easy handling. Phyllo can be tricky to work with, but proper thawing will make it more pliable.
- Avoid Overmixing: Be careful not to overmix the cheesecake filling to prevent air bubbles. Mix just until smooth for the best texture.
- Use a Water Bath: For a creamier texture, consider baking the cheesecake in a water bath. This helps to regulate the temperature and keeps the cheesecake moist.
- Let it Chill: Patience is key—allow the cheesecake to chill completely for the best flavor and texture. The flavors will meld beautifully as it sets.
- Experiment with Flavors: Feel free to add spices like nutmeg or cardamom to the filling for a unique twist. You could also incorporate citrus zest for brightness.
Recipe Variations
- Nut Variations: Use a mix of your favorite nuts or substitute pistachios for a vibrant green color. You could also try macadamia nuts for a richer flavor.
- Flavored Honey: Try infusing honey with spices like cinnamon or vanilla for added flavor. You can also consider using flavored syrups for a unique taste.
- Chocolate Drizzle: For a decadent touch, drizzle melted chocolate over the top before serving. Dark chocolate pairs beautifully with the sweet, nutty flavors.
- Fruit Topping: Top with poached or fresh fruit, such as figs or pomegranate seeds, for an extra burst of flavor. Fresh mint can also add a lovely garnish.
- Nut-Free Option: If allergies are a concern, you can replace nuts with crushed graham crackers for a similar texture without the allergens.
Freezing and Storage
- Storage: Leftover cheesecake can be stored in the refrigerator for up to 5 days in an airtight container. To keep it fresh, place a piece of wax paper between the cheesecake and the cover.
- Freezing: You can freeze the cheesecake for up to 3 months. Wrap it tightly in plastic wrap and then in aluminum foil. This will help protect it from freezer burn.
- Thawing: To thaw, move the cheesecake to the refrigerator overnight before serving. This gradual thawing helps retain the texture.
Special Equipment
- Springform Pan: Essential for easy removal of the cheesecake. A high-quality springform pan will prevent leaks and ensure a clean release.
- Electric Mixer: Makes mixing the filling effortless. A hand mixer or stand mixer works well for achieving a smooth consistency.
- Sharp Knife: For slicing the cheesecake neatly. Wipe the knife between cuts for clean edges.
- Parchment Paper: You can line the bottom of the springform pan with parchment paper for easier removal, though it’s not necessary if your pan is non-stick.
FAQ Section
Can I use low-fat cream cheese?
Yes, low-fat cream cheese can be used, though it may affect the creaminess slightly. Full-fat cream cheese provides the richest flavor and texture.
What can I use instead of walnuts?
Feel free to substitute with pecans, pistachios, or almonds for a different flavor profile. Each nut will bring its unique taste to the dessert.
Can I make this ahead of time?
Absolutely! This cheesecake can be made up to 2 days in advance and stored in the refrigerator. This also allows the flavors to develop more.
How do I know when the cheesecake is done?
The edges should be set, and the center should have a slight jiggle. It will firm up as it cools, so don’t worry if it seems a bit soft when you take it out of the oven.
Can I use store-bought crust?
Yes, a pre-made graham cracker or cookie crust can be used if you prefer a quicker option. However, the phyllo crust adds a unique texture that complements the cheesecake beautifully.
Can I add more honey to the filling?
You can, but be cautious not to add too much liquid, as it may alter the texture of the cheesecake. Consider drizzling extra honey on top instead.
Conclusion
I hope you’re inspired to try this Baklava Cheesecake! It’s a delightful twist on a classic dessert that will bring warmth and sweetness to your Thanksgiving table. Whether you serve it as the grand finale to your feast or as a sweet treat for family gatherings, this cheesecake is sure to impress.
As you prepare to share this dessert with loved ones, remember that cooking is about bringing people together. The joy of creating something special for your friends and family is what makes any meal memorable. Don’t forget to share your results! I would love to see how your Baklava Cheesecake turns out—feel free to leave a comment or tag me on social media with your delicious creations. Enjoy your baking!
Print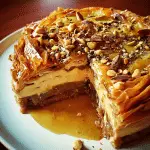
Baklava Cheesecake: A Decadent Thanksgiving Dessert
- Total Time: 1 hour 30 minutes
Description
Experience the harmonious blend of flavors and textures in Baklava Cheesecake, a unique dessert that brings together the rich, creamy indulgence of cheesecake and the delightful crunch of traditional baklava. This luscious cheesecake is built on a buttery phyllo pastry crust and is infused with the warm spices of cinnamon and nutmeg. Topped with a sweet and nutty mixture of walnuts and honey, each slice is a celebration of Middle Eastern flavors, making it an extraordinary addition to any festive table. Perfect for those who love a twist on classic desserts, this Baklava Cheesecake is sure to become a beloved favorite.
Ingredients
For the Crust
- 1 ½ cups phyllo dough: The traditional base for baklava, adding a crispy texture.
- ½ cup unsalted butter, melted: Helps to crisp the phyllo layers.
- ½ cup finely chopped walnuts: Adds flavor and crunch.
For the Cheesecake Filling
- 3 (8 oz) packages cream cheese, softened: The creamy base for the cheesecake.
- 1 cup granulated sugar: For sweetness.
- 1 teaspoon vanilla extract: Enhances the overall flavor.
- 3 large eggs: Provides structure and richness.
- 1 teaspoon ground cinnamon: Adds warmth and spice.
For the Topping
- ½ cup honey: Sweet and sticky, perfect for drizzling.
- 1 cup finely chopped mixed nuts (walnuts, pistachios, almonds): Adds texture and crunch.
- 1 teaspoon ground cinnamon: For an extra layer of flavor.
- 1 tablespoon melted butter: To help the topping stick together.
Instructions
STEP 1: PREPARE THE CRUST
- Preheat the Oven: Start by preheating your oven to 350°F (175°C). This will ensure your cheesecake bakes evenly.
- Prepare the Phyllo Dough: If using frozen phyllo dough, thaw it according to package instructions. Once thawed, take out 10 sheets and cover them with a damp cloth to prevent drying out.
- Assemble the Crust: In a large mixing bowl, combine the melted butter and chopped walnuts. Brush a 9-inch springform pan with melted butter. Layer five sheets of phyllo dough in the bottom of the pan, brushing each sheet with melted butter before adding the next. Sprinkle a little of the walnut mixture between some layers for added texture.
- Add More Layers: Continue layering with the remaining phyllo sheets, brushing each with melted butter, until all sheets are used. Make sure to press the layers firmly into the bottom of the pan and up the sides.
- Bake the Crust: Bake the phyllo crust in the preheated oven for about 10-15 minutes, or until golden brown. Once done, remove it from the oven and let it cool slightly while you prepare the filling.
STEP 2: MAKE THE CHEESECAKE FILLING
- Mix the Cream Cheese: In a large mixing bowl, beat the softened cream cheese until smooth and creamy, using an electric mixer on medium speed.
- Add Sugar and Spices: Gradually add the granulated sugar and continue to beat until fully incorporated. Mix in the vanilla extract and ground cinnamon.
- Incorporate the Eggs: Add the eggs one at a time, beating well after each addition. Ensure the mixture is smooth and free of lumps.
STEP 3: ASSEMBLE THE CHEESECAKE
- Pour the Filling: Pour the cheesecake filling over the baked phyllo crust, spreading it evenly with a spatula.
- Bake the Cheesecake: Place the springform pan back in the oven and bake for about 50-60 minutes, or until the edges are set and the center has a slight jiggle.
- Cool the Cheesecake: Once baked, turn off the oven and crack the door open slightly, allowing the cheesecake to cool gradually. This helps prevent cracking. After about 1 hour, remove the cheesecake from the oven and let it cool completely at room temperature.
STEP 4: CHILL AND TOP
- Refrigerate: Once cooled, cover the cheesecake with plastic wrap and refrigerate for at least 4 hours, or overnight if possible.
- Prepare the Topping: In a small bowl, combine the finely chopped mixed nuts, cinnamon, and melted butter. Stir until well combined.
- Drizzle with Honey: Before serving, drizzle honey over the chilled cheesecake, then sprinkle the nut mixture on top for an extra crunch.
STEP 5: SERVE AND ENJOY
- Slice and Serve: Carefully run a knife around the edge of the springform pan before releasing it. Slice the cheesecake into 12 pieces and serve chilled.
- Garnish: For an elegant touch, consider garnishing each slice with a sprinkle of ground cinnamon or a few whole nuts.
- Prep Time: 20 minutes
- Baking Time: 1 hour
Nutrition
- Calories: 400 kcal
- Fat: 28g
- Carbohydrates: 36g
- Protein: 8g


