
Introduction
Chick Cupcakes are an adorable and delicious treat that bring the joy of Easter and spring celebrations into the world of baking. These cupcakes are not only soft and moist but are also decorated in a cute, chick-inspired design that will make anyone smile. The combination of a light, fluffy vanilla cupcake base with a vibrant, buttercream frosting decorated to look like little chicks creates a playful and sweet dessert that’s perfect for the season.
Whether you’re hosting a springtime gathering, an Easter party, or just looking for a fun way to celebrate the season, these Chick Cupcakes will steal the show. With simple ingredients and easy-to-follow steps, you’ll be able to whip up these charming cupcakes in no time, adding a little sunshine and sweetness to any occasion. This guide walks you through every step of the recipe to ensure that your Chick Cupcakes turn out as cute and delicious as possible.
Why You’ll Love Chick Cupcakes
- Adorable Design: The chick decoration is sure to impress and delight both kids and adults alike. These cupcakes are the perfect festive treat for Easter or any spring celebration.
- Delicious Flavor: The light and fluffy vanilla cupcake base pairs perfectly with creamy, buttery frosting. The combination is both rich and subtle, ensuring that the cupcakes are delicious without being overwhelming.
- Fun and Easy to Make: The chick decorations, while cute, are simple to achieve. With just a few tips and tricks, you’ll have a batch of cupcakes that look professional yet are easy enough for beginner bakers.
- Versatile for Different Occasions: Whether you’re making them for a family gathering, school party, or special occasion, these cupcakes are versatile and festive, fitting perfectly into any celebration.
- Perfect for Kids: Kids will love the fun design, and they can even get involved in decorating the cupcakes, making it a great activity for little bakers.
Preparation and Cooking Time
- Total Time: 1 hour 30 minutes
- Preparation Time: 20 minutes
- Cooking Time: 20-25 minutes
- Servings: Approximately 12 cupcakes
- Calories per Serving: Around 220-250 calories per cupcake, depending on frosting and portion sizes.
Nutrition Facts (Per Serving)
- Calories: 220-250 kcal
- Fat: 12-15g
- Carbohydrates: 28-32g
- Protein: 2g
- Fiber: 1g
- Sugar: 18-22g
Ingredients
For the Vanilla Cupcakes:
- 1 ½ cups all-purpose flour
- 1 ½ teaspoons baking powder
- ¼ teaspoon salt
- ½ cup unsalted butter, softened
- 1 cup granulated sugar
- 2 large eggs
- 1 teaspoon vanilla extract
- ½ cup whole milk
For the Buttercream Frosting:
- 1 cup unsalted butter, softened
- 4 cups powdered sugar
- 2 teaspoons vanilla extract
- 2-3 tablespoons heavy cream (or milk for a thinner consistency)
- Yellow food coloring (gel or liquid)
- Black food coloring (gel or liquid, for eyes)
- Orange food coloring (gel or liquid, for beaks)
- Optional: mini chocolate chips or black icing for eyes
Special Equipment
While making Chick Cupcakes doesn’t require any specialized equipment, the following tools will help ensure smooth preparation and the best possible results:
- Electric Mixer: An electric mixer (stand or hand-held) is essential for beating the butter and sugar together to create a fluffy, smooth batter. It’s also very helpful for making the buttercream frosting, ensuring it’s light and airy.
- Cupcake Tin: A standard 12-cup cupcake tin is needed to bake the cupcakes. Make sure to line the tin with cupcake liners to avoid sticking and to make cleanup easier.
- Piping Bags and Tips: Use a piping bag fitted with a round tip to decorate the cupcakes with frosting. A larger round tip will allow you to create the fluffy texture of the chick’s feathers, while a small round tip is perfect for adding the eyes and beaks.
- Cooling Rack: After baking the cupcakes, it’s important to cool them on a wire rack. This ensures they cool evenly and helps prevent them from becoming soggy.
- Measuring Cups and Spoons: Accurate measurements are key to the success of this recipe. Use proper measuring tools to ensure consistency and the best flavor.
- Bowl for Mixing: Use large mixing bowls to combine your dry ingredients and to mix the wet ingredients. Stainless steel or glass bowls work best for baking.
Step-by-Step Instructions
1. Prepare the Cupcake Batter
Preheat your oven to 350°F (175°C). Line a 12-cup muffin tin with cupcake liners. This will help prevent the cupcakes from sticking to the pan and make cleanup easier.
In a medium-sized bowl, whisk together the flour, baking powder, and salt. This helps to evenly distribute the dry ingredients and ensures the cupcakes will rise evenly during baking.
In a separate large mixing bowl, use an electric mixer to cream the softened butter and granulated sugar together until light and fluffy. This process should take about 2-3 minutes. Creaming the butter and sugar together is important for incorporating air into the batter, which helps create a light and airy cupcake.
Add the eggs one at a time, beating well after each addition. Mix in the vanilla extract. The eggs provide structure and moisture to the batter, while the vanilla enhances the flavor.
Gradually add the dry ingredients to the wet mixture, alternating with the milk. Start and finish with the dry ingredients. Mix each addition until just combined. Be careful not to overmix, as this can make the cupcakes dense.
2. Fill the Cupcake Tin
Scoop the batter into the prepared cupcake tin. Fill each cupcake liner about 2/3 of the way full to allow space for the cupcakes to rise as they bake. If you have a cookie scoop, it makes portioning the batter much easier and ensures uniform cupcakes.
Smooth the tops of the batter with a spatula to ensure even baking. Be sure to leave enough space between the cupcakes to allow for expansion during baking.
3. Bake the Cupcakes
Bake the cupcakes in the preheated oven for 20-25 minutes or until a toothpick inserted into the center of a cupcake comes out clean. The tops should be golden brown and slightly firm to the touch.
Once the cupcakes are baked, remove them from the oven and allow them to cool in the tin for 5 minutes. After that, transfer the cupcakes to a wire rack to cool completely before frosting. Cooling the cupcakes completely is important to prevent the frosting from melting when applied.
4. Make the Buttercream Frosting
While the cupcakes are cooling, prepare the buttercream frosting. In a large mixing bowl, beat the softened butter with an electric mixer until it is smooth and creamy. Gradually add the powdered sugar, one cup at a time, mixing well between each addition.
Add the vanilla extract and 2 tablespoons of heavy cream (or milk). Beat the mixture until light and fluffy. If the frosting is too thick, add the remaining tablespoon of heavy cream or milk to achieve your desired consistency. If it’s too thin, add a little more powdered sugar until it thickens up.
To achieve the chick’s yellow color, add yellow food coloring to the frosting, mixing until the color is uniform. For the brightest color, gel food coloring works best, but liquid food coloring will work as well. Be sure to add the color gradually until you reach your desired shade of yellow.
5. Frost the Cupcakes
Once the cupcakes are completely cool, it’s time to decorate them. Fill a piping bag fitted with a large round tip with the yellow buttercream frosting.
Start by piping a swirl of frosting on top of each cupcake, creating a fluffy, mound-like appearance that mimics the texture of a chick’s feathers. You can pipe the frosting in a circular motion, building up the layers to give it a soft, rounded look.
If desired, you can also use the remaining frosting to pipe additional details around the chick’s body, such as little wings or feathers.
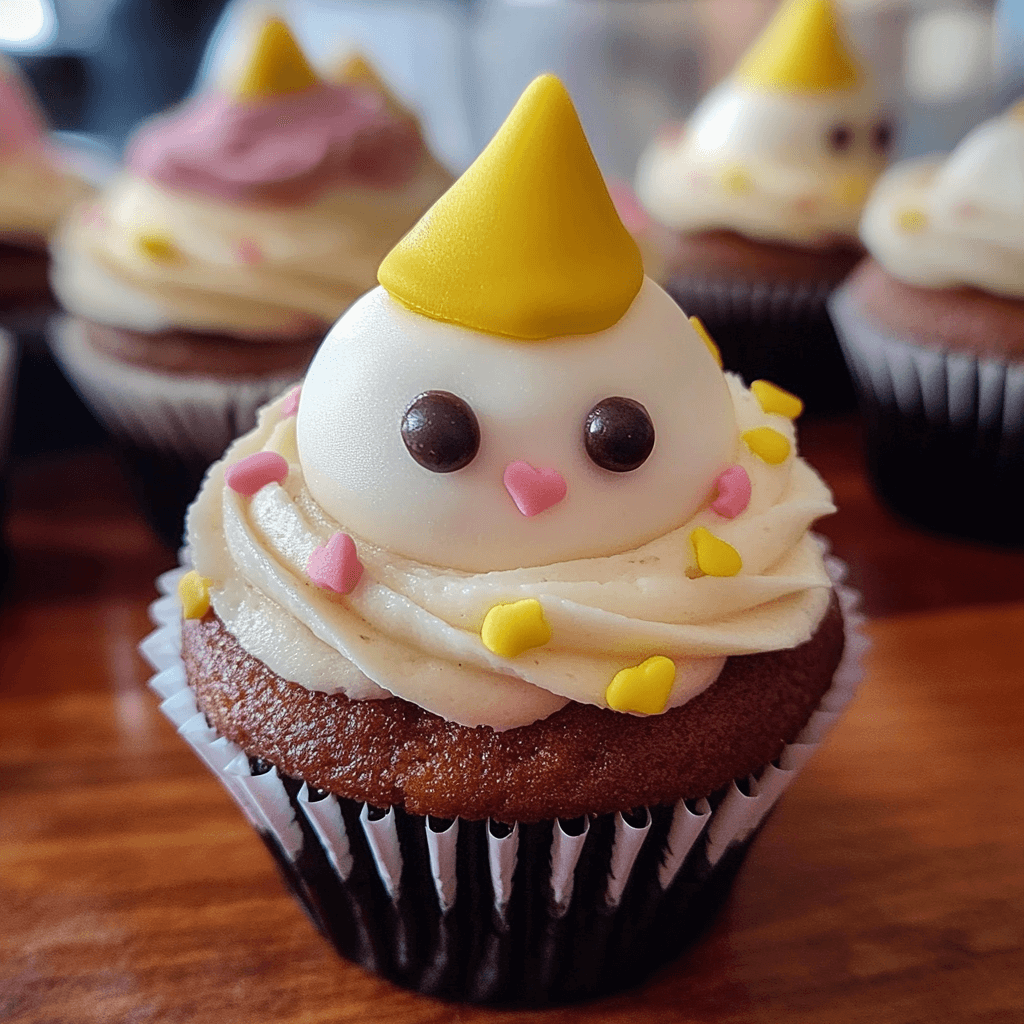
6. Add the Chick Details
To create the chick’s face, use orange food coloring (or orange buttercream frosting) to pipe small triangles for the beak. Place two small black dots (using black food coloring or black icing) for the eyes. You can also use mini chocolate chips or small candy eyes for a quicker, more adorable effect.
If you want to make the chicks even cuter, consider adding small edible decorations, like a little candy or sprinkles, for extra detail.
7. Serve and Enjoy
Once the cupcakes are fully decorated, they’re ready to be served! These cupcakes are perfect for spring celebrations like Easter, baby showers, or birthday parties. They’re sure to delight guests of all ages with both their charming appearance and their delicious flavor.

Tips for Perfect Chick Cupcakes
- Don’t Overmix the Batter: When mixing the batter, make sure to stop once everything is just combined. Overmixing can result in dense cupcakes that don’t rise as nicely.
- Room Temperature Ingredients: Be sure to use room temperature butter and eggs for the best results. Cold ingredients can result in a lumpy batter that’s difficult to mix.
- Customize the Decoration: Feel free to get creative with the decorations. You can add little bow ties, hats, or other accessories to make your chicks unique. Colored sugar or sprinkles can also add extra fun.
- Let the Cupcakes Cool Completely: Frosting warm cupcakes will cause the frosting to melt, so it’s crucial to let the cupcakes cool completely before decorating.
Variations of Chick Cupcakes
- Chocolate Chick Cupcakes: Swap out the vanilla cupcake base for a chocolate cupcake recipe to give these cupcakes an extra layer of richness. Pairing chocolate with the yellow frosting will make for a fun contrast.
- Carrot Cake Chick Cupcakes: For a seasonal twist, try making carrot cake cupcakes with cream cheese frosting. Add the same cute chick decorations to make them perfect for spring.
- Cupcake Chick Pops: Instead of traditional cupcakes, make chick cupcake pops. Simply insert a cake pop stick into the bottom of each cupcake before frosting, then decorate as usual. This makes them perfect for kids to hold and enjoy.
- Gluten-Free Chick Cupcakes: For a gluten-free version, swap the all-purpose flour for a 1:1 gluten-free baking flour blend. Make sure to check that the frosting ingredients are gluten-free as well.
Storage and Shelf Life
Chick Cupcakes are best enjoyed fresh, but they can be stored for later. Keep the cupcakes in an airtight container at room temperature for up to 3-4 days. If you need to store them for longer, you can refrigerate them for up to a week, although the frosting may harden slightly.
For long-term storage, freeze the cupcakes. Allow them to cool completely, then place them in an airtight container or freezer-safe bag. Frozen cupcakes can last for up to 2-3 months. To thaw, simply let them sit at room temperature for about an hour.
Side Dishes and Pairings for Chick Cupcakes
- Spring Fruit Salad: Pair your chick cupcakes with a refreshing spring fruit salad. The light, tangy flavors of the fruit complement the sweetness of the cupcakes.
- Lemonade or Iced Tea: A cold glass of lemonade or iced tea is the perfect beverage to accompany your sweet cupcakes. The tartness of the lemonade pairs beautifully with the creamy frosting.
- Vanilla Ice Cream: Chick Cupcakes and vanilla ice cream make a delicious dessert combination, adding a creamy, chilled contrast to the sweetness of the cupcakes.

Chick Cupcake Recipe
- Total Time: 1 hour 30 minutes
Description
These cheerful, fun cupcakes are decorated to look like adorable little chicks! With a light, moist cake base and a sweet, fluffy frosting, they’re a perfect Easter treat for kids and adults alike.
Ingredients
For the Vanilla Cupcakes:
- 1 ½ cups all-purpose flour
- 1 ½ teaspoons baking powder
- ¼ teaspoon salt
- ½ cup unsalted butter, softened
- 1 cup granulated sugar
- 2 large eggs
- 1 teaspoon vanilla extract
- ½ cup whole milk
For the Buttercream Frosting:
- 1 cup unsalted butter, softened
- 4 cups powdered sugar
- 2 teaspoons vanilla extract
- 2–3 tablespoons heavy cream (or milk for a thinner consistency)
- Yellow food coloring (gel or liquid)
- Black food coloring (gel or liquid, for eyes)
- Orange food coloring (gel or liquid, for beaks)
- Optional: mini chocolate chips or black icing for eyes
Instructions
Preheat your oven to 350°F (175°C). Line a 12-cup muffin tin with cupcake liners. This will help prevent the cupcakes from sticking to the pan and make cleanup easier.
In a medium-sized bowl, whisk together the flour, baking powder, and salt. This helps to evenly distribute the dry ingredients and ensures the cupcakes will rise evenly during baking.
In a separate large mixing bowl, use an electric mixer to cream the softened butter and granulated sugar together until light and fluffy. This process should take about 2-3 minutes. Creaming the butter and sugar together is important for incorporating air into the batter, which helps create a light and airy cupcake.
Add the eggs one at a time, beating well after each addition. Mix in the vanilla extract. The eggs provide structure and moisture to the batter, while the vanilla enhances the flavor.
Gradually add the dry ingredients to the wet mixture, alternating with the milk. Start and finish with the dry ingredients. Mix each addition until just combined. Be careful not to overmix, as this can make the cupcakes dense.
Scoop the batter into the prepared cupcake tin. Fill each cupcake liner about 2/3 of the way full to allow space for the cupcakes to rise as they bake. If you have a cookie scoop, it makes portioning the batter much easier and ensures uniform cupcakes.
Smooth the tops of the batter with a spatula to ensure even baking. Be sure to leave enough space between the cupcakes to allow for expansion during baking.
Bake the cupcakes in the preheated oven for 20-25 minutes or until a toothpick inserted into the center of a cupcake comes out clean. The tops should be golden brown and slightly firm to the touch.
Once the cupcakes are baked, remove them from the oven and allow them to cool in the tin for 5 minutes. After that, transfer the cupcakes to a wire rack to cool completely before frosting. Cooling the cupcakes completely is important to prevent the frosting from melting when applied.
While the cupcakes are cooling, prepare the buttercream frosting. In a large mixing bowl, beat the softened butter with an electric mixer until it is smooth and creamy. Gradually add the powdered sugar, one cup at a time, mixing well between each addition.
Add the vanilla extract and 2 tablespoons of heavy cream (or milk). Beat the mixture until light and fluffy. If the frosting is too thick, add the remaining tablespoon of heavy cream or milk to achieve your desired consistency. If it’s too thin, add a little more powdered sugar until it thickens up.
To achieve the chick’s yellow color, add yellow food coloring to the frosting, mixing until the color is uniform. For the brightest color, gel food coloring works best, but liquid food coloring will work as well. Be sure to add the color gradually until you reach your desired shade of yellow.
Once the cupcakes are completely cool, it’s time to decorate them. Fill a piping bag fitted with a large round tip with the yellow buttercream frosting.
Start by piping a swirl of frosting on top of each cupcake, creating a fluffy, mound-like appearance that mimics the texture of a chick’s feathers. You can pipe the frosting in a circular motion, building up the layers to give it a soft, rounded look.
If desired, you can also use the remaining frosting to pipe additional details around the chick’s body, such as little wings or feathers.
To create the chick’s face, use orange food coloring (or orange buttercream frosting) to pipe small triangles for the beak. Place two small black dots (using black food coloring or black icing) for the eyes. You can also use mini chocolate chips or small candy eyes for a quicker, more adorable effect.
If you want to make the chicks even cuter, consider adding small edible decorations, like a little candy or sprinkles, for extra detail.
Once the cupcakes are fully decorated, they’re ready to be served! These cupcakes are perfect for spring celebrations like Easter, baby showers, or birthday parties. They’re sure to delight guests of all ages with both their charming appearance and their delicious flavor.
- Prep Time: 20 minutes
- Cook Time: 20-25 minutes
Nutrition
- Calories: 220-250 kcal
- Fat: 12-15g
- Carbohydrates: 28-32g
- Protein: 2g
Conclusion
Chick Cupcakes are the perfect treat to celebrate spring, Easter, or any occasion that calls for a little sweetness and fun. With their adorable chick design, soft vanilla cupcake base, and creamy buttercream frosting, they are sure to be a hit at any event. Simple to make yet irresistibly cute, these cupcakes will bring joy to both kids and adults alike. Enjoy baking and sharing these charming cupcakes with friends and family—you’re sure to create sweet memories with every bite!


