
Introduction
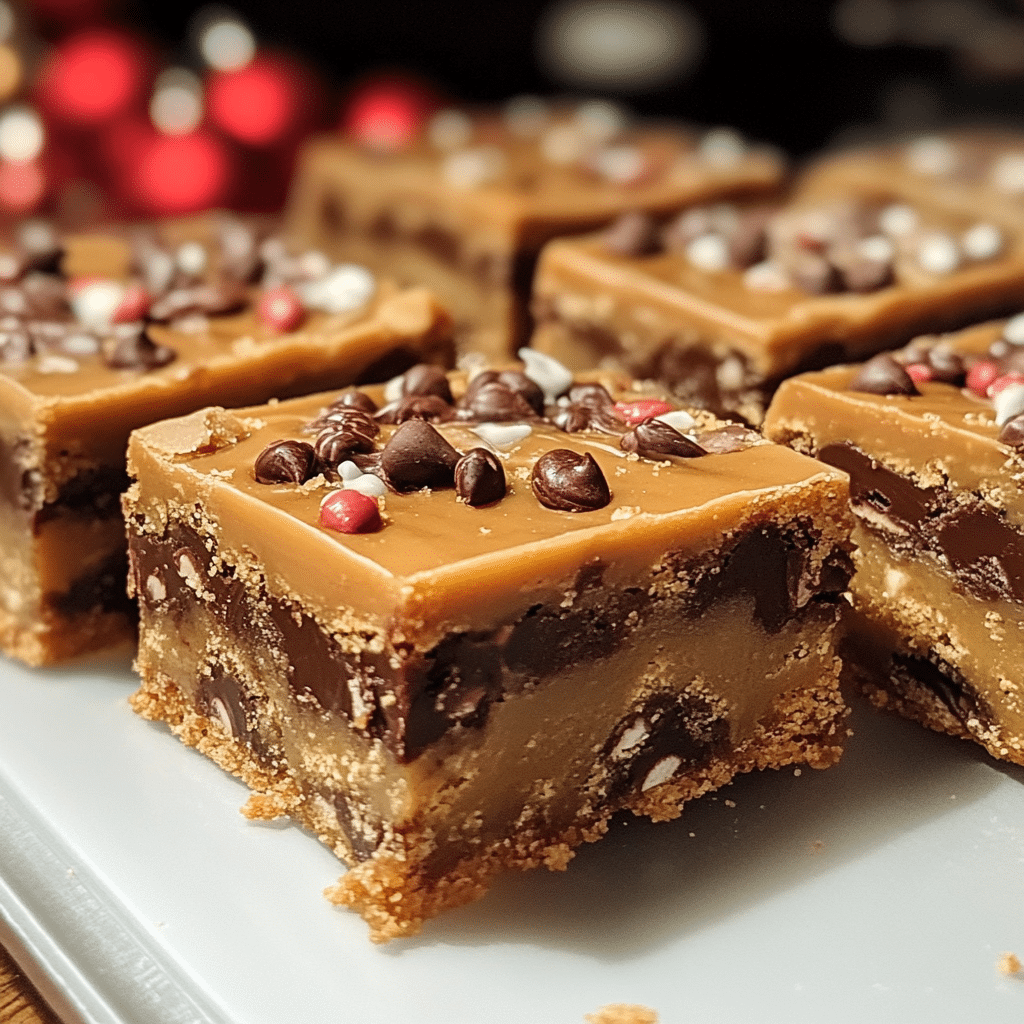
The holiday season is a time for indulging in sweet treats, and what better way to celebrate than with a tray of festive Christmas cookie bars? These cookie bars combine all the best aspects of holiday baking—rich flavors, vibrant colors, and a simple, straightforward preparation. Whether you’re hosting a holiday party, looking to add a fun dessert to your Christmas dinner, or simply want to have a cozy holiday treat to share with family and friends, Christmas cookie bars are the perfect solution.
One of the things I love most about Christmas cookie bars is how easy they are to make compared to traditional cut-out cookies. There’s no rolling, no cookie cutters, and no need to worry about spreading dough on multiple baking sheets. Simply layer the dough in a pan, bake, and slice into perfect bars. It’s a fun and stress-free way to enjoy the flavors of Christmas, and the vibrant colors make these bars a beautiful addition to your holiday spread.
In this article, I’ll walk you through everything you need to know about making Christmas cookie bars, from why you’ll love the recipe to step-by-step instructions, tips for making the perfect cookie bars, and creative variations to make them uniquely yours. Let’s get started!
Why You’ll Love This Recipe
Easy to Make: No rolling out dough or cutting shapes, just mix, bake, and slice. These cookie bars come together in a snap, making them perfect for busy holiday bakers.
Festive and Colorful: The inclusion of holiday sprinkles, red and green M&M’s, or white chocolate chips creates a vibrant and colorful treat that’s perfect for the season.
Rich and Decadent: With layers of chocolate, a buttery base, and a sweet topping, these cookie bars offer a decadent dessert experience that everyone will love.
Perfect for Gifting: These bars are easy to slice and package, making them a great option for holiday gift-giving. You can easily wrap them up and share them with neighbors, friends, or colleagues.
Customizable: You can adjust the add-ins to suit your preferences. Add nuts, candy canes, or even a drizzle of caramel for an extra touch of holiday magic.
Preparation Time and Servings
- Total Time: 1 hour 10 minutes (20 minutes prep, 30 minutes baking, 20 minutes cooling)
- Servings: This recipe yields about 24 bars (depending on the size of the cuts).
- Nutrition Facts:
- Calories per serving: 250
- Protein: 3g
- Carbs: 35g
- Fat: 12g
- Fiber: 1g
Ingredients
- 2 1/2 cups all-purpose flour: The base for the cookie dough, giving the bars structure.
- 1/2 teaspoon baking powder: Helps the cookie bars rise slightly, giving them a soft, cake-like texture.
- 1/2 teaspoon salt: Balances the sweetness and enhances the flavors of the other ingredients.
- 1 cup unsalted butter, softened: Adds richness and flavor to the dough.
- 1 cup granulated sugar: The primary sweetener for the cookie base.
- 1/2 cup brown sugar, packed: Adds moisture and depth of flavor.
- 2 large eggs: Bind the dough together and add structure.
- 1 teaspoon vanilla extract: Enhances the flavor of the cookie dough with a touch of warmth.
- 1 cup semi-sweet chocolate chips: Adds a rich chocolate flavor to the bars.
- 1/2 cup holiday M&M’s or colorful sprinkles: For a festive touch and vibrant color.
- 1/2 cup white chocolate chips: Adds a creamy, sweet contrast to the darker chocolate chips.
Step-by-Step Instructions
STEP 1: PREHEAT THE OVEN
Preheat your oven to 350°F (175°C) and line a 9×13-inch baking pan with parchment paper. If you don’t have parchment paper, you can lightly grease the pan with butter or nonstick spray, but parchment paper will make removing the bars easier once they’ve cooled.
STEP 2: MIX THE DRY INGREDIENTS
In a medium-sized bowl, whisk together the flour, baking powder, and salt. This ensures that the baking powder is evenly distributed, which helps the bars rise uniformly. Set this mixture aside while you work on the wet ingredients.
STEP 3: CREAM THE BUTTER AND SUGARS
In a large bowl, beat together the softened butter, granulated sugar, and brown sugar using an electric mixer or stand mixer on medium speed. Mix until the ingredients are light and fluffy, about 2 minutes. The fluffy texture helps the cookie bars maintain a soft, chewy texture.
STEP 4: ADD EGGS AND VANILLA
Add the eggs, one at a time, beating well after each addition. Then, add the vanilla extract and continue to mix until everything is well incorporated. The eggs provide structure and moisture to the cookie bars, while the vanilla enhances the overall flavor.
STEP 5: COMBINE THE DRY AND WET INGREDIENTS
Gradually add the dry ingredients to the wet ingredients, mixing on low speed until just combined. Be careful not to overmix, as this could result in dense bars. You want the dough to come together without being overworked.
STEP 6: FOLD IN THE CHOCOLATE CHIPS AND ADD-INS
Once the dough is mixed, fold in the semi-sweet chocolate chips, white chocolate chips, and any holiday-themed add-ins such as M&M’s or sprinkles. This is the fun part—feel free to add extra candy pieces or even chopped nuts, like pecans or walnuts, if you like a bit of crunch in your cookie bars.
STEP 7: PRESS THE DOUGH INTO THE PAN
Transfer the cookie dough into the prepared 9×13-inch baking pan. Use a spatula or your hands to evenly press the dough into the pan, spreading it out to the edges and smoothing the top. The dough may be a little thick, but that’s okay—it will bake perfectly once it’s in the oven.
STEP 8: BAKE THE COOKIE BARS
Place the pan in the preheated oven and bake for 30–35 minutes, or until the bars are golden brown around the edges and a toothpick inserted into the center comes out clean or with a few moist crumbs. The top of the bars should be slightly puffed, and the edges will begin to pull away from the sides of the pan.
STEP 9: COOL AND SLICE
Once baked, remove the pan from the oven and allow the cookie bars to cool in the pan for about 20 minutes. After they’ve cooled slightly, use the parchment paper to lift the bars out of the pan and onto a cutting board. Allow them to cool completely before slicing them into squares or rectangles.
How to Serve
- Perfect for Holiday Gatherings: These cookie bars are ideal for holiday parties, potlucks, or as a special treat for your Christmas dinner. Their vibrant colors make them visually appealing, and their rich flavor is sure to please everyone.
- Serve with Hot Drinks: Pair these cookie bars with a cup of hot chocolate, mulled wine, or a festive coffee drink for the ultimate holiday treat experience.
- Packaged as Gifts: These bars make great gifts! Simply slice the cooled bars and package them in cute gift boxes or tins. Add a ribbon for an extra festive touch.
Additional Tips
- Don’t Overmix: Once you add the dry ingredients to the wet ingredients, mix only until just combined. Overmixing can lead to dense, tough bars.
- Use Room Temperature Butter and Eggs: For the best results, ensure that your butter and eggs are at room temperature before starting. This helps the dough come together more easily and results in a smoother batter.
- Customize the Add-ins: Feel free to get creative with your mix-ins! You can use different types of chocolate, chopped candy canes for a peppermint twist, or even nuts for extra texture.
- Let Them Cool Before Cutting: Allow the cookie bars to cool completely before slicing them into squares. This ensures they don’t fall apart and gives them time to set.
Recipe Variations
- Peppermint Twist: Add crushed candy canes to the dough or sprinkle them on top before baking for a festive peppermint flavor.
- Nutty Version: Add chopped walnuts, pecans, or almonds to the dough for a crunchy contrast to the soft, chewy cookie bars.
- Caramel Drizzle: After baking and cooling, drizzle the cookie bars with melted caramel for an extra indulgent touch.
- Chocolate Mint: Swap the semi-sweet chocolate chips for mint chocolate chips for a refreshing minty flavor that pairs perfectly with the holidays.
- Gluten-Free Option: Use a gluten-free flour blend to make these bars gluten-free. Just be sure to check the baking time as gluten-free doughs can sometimes bake faster or slower than regular flour.
Serving Suggestions
- Side Dishes: Serve your Christmas cookie bars alongside other holiday favorites, like gingerbread cookies, sugar cookies, or a festive fruit salad.
- Beverage Pairing: These bars are perfect with a cup of spiced cider, eggnog, or a warm mug of hot chocolate.
- Kid-Friendly: Kids will love these cookie bars with their bright colors and fun, candy-filled texture. They’re easy to grab and go, making them a great choice for busy little hands.
Freezing and Storage
- Storage: Store leftover cookie bars in an airtight container at room temperature for up to 5 days. They will stay soft and fresh, and the flavors will continue to develop as they sit.
- Freezing: These cookie bars freeze beautifully! Wrap them tightly in plastic wrap and place them in a freezer-safe bag or container. They’ll keep for up to 3 months. To thaw, simply leave them at room temperature or pop them in the microwave for a few seconds.
- Freezing Dough: You can freeze the dough itself if you want to make the bars later. Shape the dough into balls, freeze them on a baking sheet, and then transfer them to a freezer bag. Bake directly from the freezer, adding a minute or two to the baking time.
FAQ Section
Can I use a different type of sugar?
Yes, you can substitute the granulated sugar with coconut sugar or use all brown sugar for a richer flavor. However, the texture may vary slightly.
Can I add more chocolate chips?
Absolutely! You can increase the chocolate chips or add a different type of chocolate, like milk chocolate or dark chocolate, for a different flavor profile.
Can I make these cookie bars ahead of time?
Yes, you can make the cookie bars a day or two ahead of time. They’ll stay fresh when stored properly in an airtight container.
Can I use non-dairy butter?
Yes, feel free to use dairy-free butter or a vegan butter substitute if you need a dairy-free version of these cookie bars.
Conclusion
Christmas cookie bars are a festive, easy-to-make treat that will brighten your holiday season. With their rich flavor, vibrant color, and fun texture, they’re sure to become a favorite holiday tradition in your home. Whether you’re baking for a crowd, gifting them to friends and family, or simply indulging in a sweet snack by the fire, these cookie bars will delight everyone who tries them.
Happy baking, and I hope you enjoy making these delicious cookie bars as much as I do! Be sure to share your creations with me on social media or in the comments—I’d love to see how they turn out. Enjoy your holiday baking!
Print
Christmas Cookie Bars: A Festive and Delicious Treat
- Total Time: 1 hour and 10 minutes
Description
Christmas Cookie Bars are festive, delicious bars that capture the spirit of the season in every bite. Made with a buttery, soft base, these bars are often filled with a medley of holiday favorites like chocolate chips, colorful sprinkles, or dried fruits. The combination of a rich, cookie dough-like texture with festive add-ins creates a treat that’s both chewy and indulgent. Sometimes topped with a dusting of powdered sugar or a drizzle of frosting, these bars are easy to cut and share, making them the perfect treat for holiday parties or gatherings.
Ingredients
- 2 1/2 cups all-purpose flour: The base for the cookie dough, giving the bars structure.
- 1/2 teaspoon baking powder: Helps the cookie bars rise slightly, giving them a soft, cake-like texture.
- 1/2 teaspoon salt: Balances the sweetness and enhances the flavors of the other ingredients.
- 1 cup unsalted butter, softened: Adds richness and flavor to the dough.
- 1 cup granulated sugar: The primary sweetener for the cookie base.
- 1/2 cup brown sugar, packed: Adds moisture and depth of flavor.
- 2 large eggs: Bind the dough together and add structure.
- 1 teaspoon vanilla extract: Enhances the flavor of the cookie dough with a touch of warmth.
- 1 cup semi-sweet chocolate chips: Adds a rich chocolate flavor to the bars.
- 1/2 cup holiday M&M’s or colorful sprinkles: For a festive touch and vibrant color.
- 1/2 cup white chocolate chips: Adds a creamy, sweet contrast to the darker chocolate chips.
Instructions
STEP 1: PREHEAT THE OVEN
Preheat your oven to 350°F (175°C) and line a 9×13-inch baking pan with parchment paper. If you don’t have parchment paper, you can lightly grease the pan with butter or nonstick spray, but parchment paper will make removing the bars easier once they’ve cooled.
STEP 2: MIX THE DRY INGREDIENTS
In a medium-sized bowl, whisk together the flour, baking powder, and salt. This ensures that the baking powder is evenly distributed, which helps the bars rise uniformly. Set this mixture aside while you work on the wet ingredients.
STEP 3: CREAM THE BUTTER AND SUGARS
In a large bowl, beat together the softened butter, granulated sugar, and brown sugar using an electric mixer or stand mixer on medium speed. Mix until the ingredients are light and fluffy, about 2 minutes. The fluffy texture helps the cookie bars maintain a soft, chewy texture.
STEP 4: ADD EGGS AND VANILLA
Add the eggs, one at a time, beating well after each addition. Then, add the vanilla extract and continue to mix until everything is well incorporated. The eggs provide structure and moisture to the cookie bars, while the vanilla enhances the overall flavor.
STEP 5: COMBINE THE DRY AND WET INGREDIENTS
Gradually add the dry ingredients to the wet ingredients, mixing on low speed until just combined. Be careful not to overmix, as this could result in dense bars. You want the dough to come together without being overworked.
STEP 6: FOLD IN THE CHOCOLATE CHIPS AND ADD-INS
Once the dough is mixed, fold in the semi-sweet chocolate chips, white chocolate chips, and any holiday-themed add-ins such as M&M’s or sprinkles. This is the fun part—feel free to add extra candy pieces or even chopped nuts, like pecans or walnuts, if you like a bit of crunch in your cookie bars.
STEP 7: PRESS THE DOUGH INTO THE PAN
Transfer the cookie dough into the prepared 9×13-inch baking pan. Use a spatula or your hands to evenly press the dough into the pan, spreading it out to the edges and smoothing the top. The dough may be a little thick, but that’s okay—it will bake perfectly once it’s in the oven.
STEP 8: BAKE THE COOKIE BARS
Place the pan in the preheated oven and bake for 30–35 minutes, or until the bars are golden brown around the edges and a toothpick inserted into the center comes out clean or with a few moist crumbs. The top of the bars should be slightly puffed, and the edges will begin to pull away from the sides of the pan.
STEP 9: COOL AND SLICE
Once baked, remove the pan from the oven and allow the cookie bars to cool in the pan for about 20 minutes. After they’ve cooled slightly, use the parchment paper to lift the bars out of the pan and onto a cutting board. Allow them to cool completely before slicing them into squares or rectangles.
- Prep Time: 20 minutes
- Baking and Cooling Time: 30 minutes baking, 20 minutes cooling
Nutrition
- Calories: 250 kcal
- Fat: 12g
- Carbohydrates: 35g
- Protein: 3g


