

Introduction
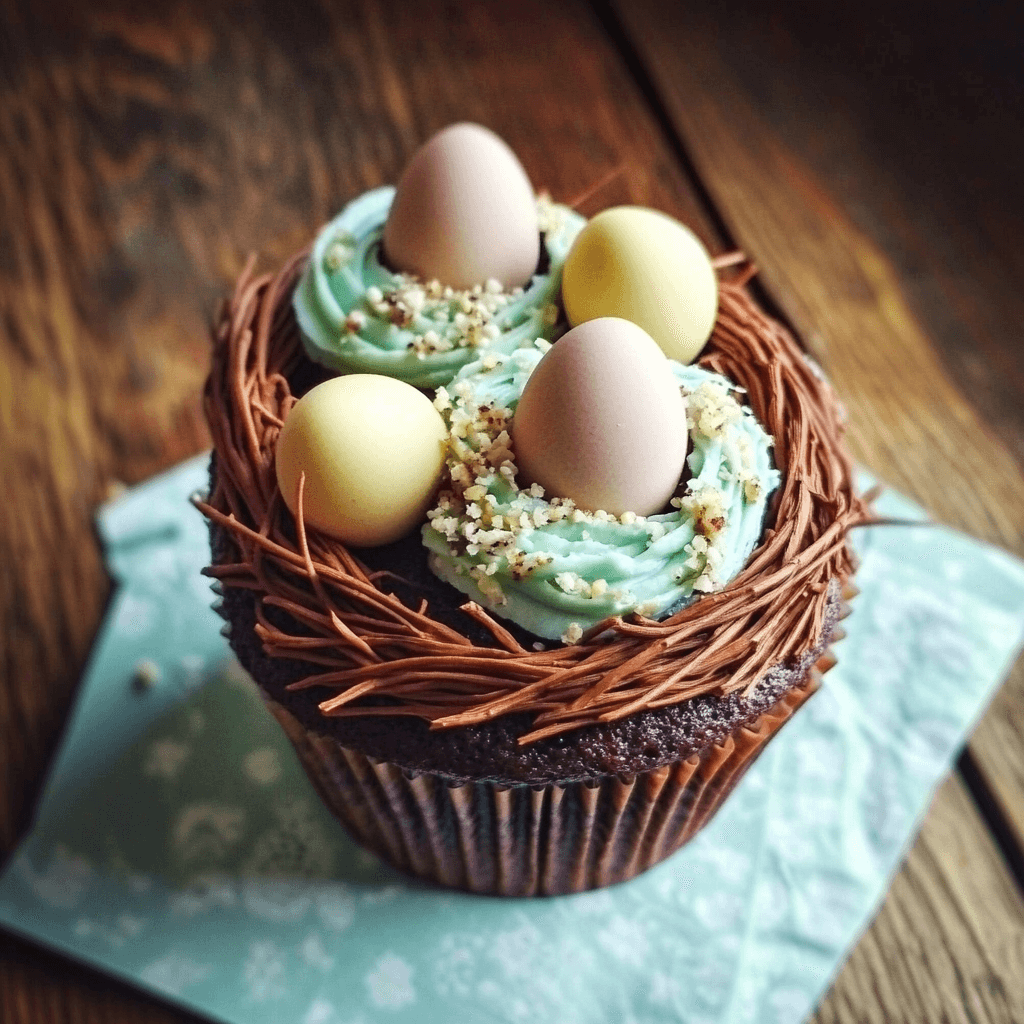
Egg Nest Cupcakes are a delightful and festive treat that bring the spirit of spring and Easter to life in the most delicious way. These cupcakes feature a soft and moist vanilla cupcake base topped with a creamy, textured nest-like decoration made from chocolate, complete with colorful candy eggs nestled inside. Not only are these cupcakes visually stunning, but they also offer a perfect balance of flavors with their fluffy cupcake, rich frosting, and the crunchy texture of the chocolate nest.
Perfect for Easter celebrations, springtime gatherings, or any event that calls for a whimsical and sweet dessert, Egg Nest Cupcakes will impress both children and adults alike. Whether you’re a seasoned baker or just beginning, this recipe is simple to follow and yields a batch of cupcakes that will brighten any occasion. In this guide, we will walk you through each step to ensure your Egg Nest Cupcakes come out beautifully and deliciously every time.
Why You’ll Love Egg Nest Cupcakes
- Cute and Creative Design: These cupcakes are visually fun and bring a springtime theme to life. The chocolate nests topped with candy eggs make for a stunning presentation that’s perfect for Easter or any celebration.
- Delicious Combination of Flavors: With a soft vanilla cupcake base, smooth frosting, and crunchy chocolate nest, the cupcakes offer an exciting mix of textures and flavors that everyone will love.
- Fun to Decorate: The nest decoration is a fun and creative process, perfect for kids to get involved in or to make an activity out of for a family baking session.
- Perfect for Special Occasions: Whether you’re making them for an Easter brunch, a birthday party, or a spring picnic, these cupcakes are sure to be the highlight of any event.
- Customizable: You can tweak the cupcake base or frosting flavors to match your preferences, making this recipe versatile for different tastes and dietary preferences.
Preparation and Cooking Time
- Total Time: 1 hour 30 minutes
- Preparation Time: 25 minutes
- Cooking Time: 18-22 minutes
- Servings: Approximately 12 cupcakes
- Calories per Serving: Around 240-270 calories per cupcake, depending on frosting and portion sizes.
Nutrition Facts (Per Serving)
- Calories: 240-270 kcal
- Fat: 12-15g
- Carbohydrates: 32-35g
- Protein: 3g
- Fiber: 1g
- Sugar: 20-25g
Ingredients
For the Vanilla Cupcakes:
- 1 ½ cups all-purpose flour
- 1 ½ teaspoons baking powder
- ¼ teaspoon salt
- ½ cup unsalted butter, softened
- 1 cup granulated sugar
- 2 large eggs
- 1 teaspoon vanilla extract
- ½ cup whole milk
For the Chocolate Nest Decoration:
- 1 cup semisweet chocolate chips
- 2 tablespoons unsalted butter
- 1 ½ cups shredded coconut (unsweetened)
- 12 small candy eggs (such as Jordan almonds, chocolate eggs, or jelly beans)
Buttercream Frosting:
- 1 cup unsalted butter, softened
- 4 cups powdered sugar
- 2 teaspoons vanilla extract
- 2-3 tablespoons heavy cream (or milk for a thinner consistency)
- Pastel food coloring (optional, for decorating)
- Optional: Sprinkles or edible glitter for extra decoration
Special Equipment
While you can make Egg Nest Cupcakes without specialized equipment, a few tools will help you achieve the best results and streamline the process:
- Electric Mixer: An electric mixer (either hand-held or stand) is ideal for creaming the butter and sugar together and ensuring the frosting is smooth and fluffy.
- Cupcake Tin: A 12-cup cupcake tin is necessary to bake the cupcakes. Be sure to line the tin with cupcake liners to make it easier to remove the cupcakes and for easier cleanup.
- Piping Bag and Tips: A piping bag fitted with a large round tip is perfect for frosting the cupcakes. You can also use a star-shaped tip for added decoration, depending on the look you want to achieve.
- Small Bowls: Use small bowls for melting chocolate and mixing shredded coconut to create the nest decoration. The smaller bowls will allow you to manage the ingredients easily.
- Cooling Rack: After baking, it’s crucial to let the cupcakes cool on a wire rack to ensure they cool evenly and maintain their structure for frosting and decoration.
- Measuring Cups and Spoons: Precise measurements are crucial in this recipe, so use standard measuring cups and spoons to ensure accuracy.
- Double Boiler or Microwave-safe Bowl: A double boiler or microwave-safe bowl is useful for melting chocolate. If using a microwave, heat in short intervals, stirring often to avoid burning.
Step-by-Step Instructions
1. Prepare the Cupcake Batter
Preheat your oven to 350°F (175°C) and line a 12-cup cupcake tin with cupcake liners.
In a medium-sized bowl, whisk together the flour, baking powder, and salt. This helps distribute the dry ingredients evenly and ensures the cupcakes will rise evenly.
In a separate large mixing bowl, use an electric mixer to cream the softened butter and granulated sugar together on medium speed. Beat until the mixture becomes light and fluffy, about 2-3 minutes. This step incorporates air into the mixture, which is essential for achieving a light and airy cupcake.
Add the eggs one at a time, beating well after each addition. This helps incorporate the eggs thoroughly, providing structure to the cupcakes. Mix in the vanilla extract, ensuring everything is fully combined.
Gradually add the dry ingredients to the wet ingredients in small portions, alternating with the milk. Begin and end with the dry ingredients. Mix until just combined, being careful not to overmix the batter, as overmixing can lead to dense cupcakes.
2. Fill the Cupcake Tin
Scoop the cupcake batter into the prepared cupcake tin. Fill each cupcake liner about 2/3 full, leaving room for the cupcakes to rise as they bake. You can use a spoon or a cookie scoop for uniform portions.
Smooth the top of the batter with a spatula to ensure even baking.
3. Bake the Cupcakes
Place the cupcake tin in the preheated oven and bake for 18-22 minutes, or until a toothpick inserted into the center of a cupcake comes out clean. The tops should be lightly golden brown and spring back when touched.
Once the cupcakes are baked, remove them from the oven and allow them to cool in the tin for 5 minutes. After that, transfer the cupcakes to a wire rack to cool completely before frosting. Cooling the cupcakes completely ensures the frosting won’t melt when applied.
4. Prepare the Chocolate Nest Decoration
While the cupcakes are cooling, make the chocolate nests. In a microwave-safe bowl or using a double boiler, melt the semisweet chocolate chips and butter together. Stir frequently to ensure the chocolate doesn’t burn.
Once melted, remove from heat and add the shredded coconut to the chocolate. Stir the coconut into the chocolate mixture until it’s evenly coated. This will form the nest-like texture that will sit atop your cupcakes.
5. Frost the Cupcakes
Once the cupcakes are completely cool, it’s time to frost them. In a large mixing bowl, use an electric mixer to beat the softened butter until creamy. Gradually add the powdered sugar, one cup at a time, mixing well after each addition.
Add the vanilla extract and 2 tablespoons of heavy cream (or milk) and continue beating until the frosting is light, fluffy, and smooth. If the frosting is too thick, add another tablespoon of heavy cream to achieve the desired consistency. If the frosting is too thin, add more powdered sugar.
Optional: Divide the frosting into separate bowls and color each bowl with different pastel food colors to create a rainbow of frosting, perfect for decorating.
Use a piping bag fitted with a round tip (or star-shaped tip for a textured look) to frost each cupcake. Pipe a generous swirl of frosting on top of each cooled cupcake.
6. Add the Chocolate Nest
Once the cupcakes are frosted, take small spoonfuls of the chocolate-coconut mixture and form them into nest shapes on top of each cupcake. You can make them as small or large as you like, but be sure to leave a small indentation in the center of each “nest” for the candy eggs.
7. Add the Candy Eggs
Place 2-3 candy eggs into each chocolate nest. You can use jelly beans, small chocolate eggs, or pastel-colored candies. This adds a cute and festive touch to the cupcakes, completing the “egg nest” look.
8. Serve and Enjoy
Your Egg Nest Cupcakes are now ready to be served! These cupcakes are perfect for Easter, spring-themed parties, or any event that calls for a fun, festive, and delicious treat. Serve them up on a platter or give them away as adorable party favors.
Tips for Perfect Egg Nest Cupcakes
- Make Sure the Cupcakes Are Fully Cooled: It’s important to allow the cupcakes to cool completely before frosting them. Otherwise, the frosting could melt.
- Use Quality Chocolate: For the best chocolate nests, use high-quality semisweet chocolate. It will melt smoother and provide a better flavor when paired with the coconut.
- Adjust the Nest Size: You can make the chocolate nest as small or as large as you like, depending on your personal preference or the look you’re going for. Just make sure the candy eggs fit comfortably in the center.
- Customize the Decorations: Feel free to add sprinkles or edible glitter on top of the frosting for extra sparkle. You can also use different colored candy eggs for a fun, colorful effect.
Variations of Egg Nest Cupcakes
- Chocolate Egg Nest Cupcakes: For a twist, try a chocolate cupcake base instead of the vanilla. This will add a deeper flavor that complements the chocolate nest.
- Carrot Cake Egg Nest Cupcakes: For a seasonal touch, use a carrot cake cupcake base and pair it with cream cheese frosting. The texture of the cake and frosting will be a delightful contrast to the crunchy chocolate nest.
- Coconut Egg Nest Cupcakes: If you’re a coconut fan, try adding a little more shredded coconut into the cupcake batter for an added coconut flavor that complements the coconut nest.
- Mini Egg Nest Cupcakes: Make mini versions of these cupcakes for a cute and bite-sized treat. The process is the same; just bake in a mini cupcake tin.
Storage and Shelf Life
Egg Nest Cupcakes are best enjoyed fresh, but they can be stored for later. Keep the cupcakes in an airtight container at room temperature for up to 2-3 days. For longer storage, you can refrigerate them for up to 5 days, though the coconut nests may lose their crunch over time.
If you need to store them for a longer period, you can freeze the cupcakes. To freeze, allow them to cool completely, then wrap them tightly in plastic wrap and place in an airtight container or freezer-safe bag. They can be stored in the freezer for up to 2 months. To thaw, simply let them sit at room temperature for about an hour.
Side Dishes and Pairings for Egg Nest Cupcakes
- Spring Fruit Salad: A fresh fruit salad with seasonal fruits like strawberries, blueberries, and kiwi is a refreshing side dish that complements the sweetness of the cupcakes.
- Lemonade or Iced Tea: Serve these cupcakes with a glass of lemonade or iced tea to balance out the sweetness with a tart or refreshing beverage.
- Vanilla Ice Cream: Egg Nest Cupcakes and a scoop of vanilla ice cream make a perfect pairing for a festive spring dessert.
Egg Nest Cupcake Recipe
- Total Time: 1 hour 30 minutes
Description
These whimsical cupcakes are topped with a nest made of chocolate shavings, holding mini candy eggs. With a soft cake and creamy frosting, they capture the essence of Easter in every bite, making them an irresistible addition to your holiday spread.
Ingredients
For the Vanilla Cupcakes:
- 1 ½ cups all-purpose flour
- 1 ½ teaspoons baking powder
- ¼ teaspoon salt
- ½ cup unsalted butter, softened
- 1 cup granulated sugar
- 2 large eggs
- 1 teaspoon vanilla extract
- ½ cup whole milk
For the Chocolate Nest Decoration:
- 1 cup semisweet chocolate chips
- 2 tablespoons unsalted butter
- 1 ½ cups shredded coconut (unsweetened)
- 12 small candy eggs (such as Jordan almonds, chocolate eggs, or jelly beans)
For the Buttercream Frosting:
- 1 cup unsalted butter, softened
- 4 cups powdered sugar
- 2 teaspoons vanilla extract
- 2–3 tablespoons heavy cream (or milk for a thinner consistency)
- Pastel food coloring (optional, for decorating)
- Optional: Sprinkles or edible glitter for extra decoration
Instructions
Preheat your oven to 350°F (175°C) and line a 12-cup cupcake tin with cupcake liners.
In a medium-sized bowl, whisk together the flour, baking powder, and salt. This helps distribute the dry ingredients evenly and ensures the cupcakes will rise evenly.
In a separate large mixing bowl, use an electric mixer to cream the softened butter and granulated sugar together on medium speed. Beat until the mixture becomes light and fluffy, about 2-3 minutes. This step incorporates air into the mixture, which is essential for achieving a light and airy cupcake.
Add the eggs one at a time, beating well after each addition. This helps incorporate the eggs thoroughly, providing structure to the cupcakes. Mix in the vanilla extract, ensuring everything is fully combined.
Gradually add the dry ingredients to the wet ingredients in small portions, alternating with the milk. Begin and end with the dry ingredients. Mix until just combined, being careful not to overmix the batter, as overmixing can lead to dense cupcakes.
Scoop the cupcake batter into the prepared cupcake tin. Fill each cupcake liner about 2/3 full, leaving room for the cupcakes to rise as they bake. You can use a spoon or a cookie scoop for uniform portions.
Smooth the top of the batter with a spatula to ensure even baking.
Place the cupcake tin in the preheated oven and bake for 18-22 minutes, or until a toothpick inserted into the center of a cupcake comes out clean. The tops should be lightly golden brown and spring back when touched.
Once the cupcakes are baked, remove them from the oven and allow them to cool in the tin for 5 minutes. After that, transfer the cupcakes to a wire rack to cool completely before frosting. Cooling the cupcakes completely ensures the frosting won’t melt when applied.
While the cupcakes are cooling, make the chocolate nests. In a microwave-safe bowl or using a double boiler, melt the semisweet chocolate chips and butter together. Stir frequently to ensure the chocolate doesn’t burn.
Once melted, remove from heat and add the shredded coconut to the chocolate. Stir the coconut into the chocolate mixture until it’s evenly coated. This will form the nest-like texture that will sit atop your cupcakes.
Once the cupcakes are completely cool, it’s time to frost them. In a large mixing bowl, use an electric mixer to beat the softened butter until creamy. Gradually add the powdered sugar, one cup at a time, mixing well after each addition.
Add the vanilla extract and 2 tablespoons of heavy cream (or milk) and continue beating until the frosting is light, fluffy, and smooth. If the frosting is too thick, add another tablespoon of heavy cream to achieve the desired consistency. If the frosting is too thin, add more powdered sugar.
Optional: Divide the frosting into separate bowls and color each bowl with different pastel food colors to create a rainbow of frosting, perfect for decorating.
Use a piping bag fitted with a round tip (or star-shaped tip for a textured look) to frost each cupcake. Pipe a generous swirl of frosting on top of each cooled cupcake.
Once the cupcakes are frosted, take small spoonfuls of the chocolate-coconut mixture and form them into nest shapes on top of each cupcake. You can make them as small or large as you like, but be sure to leave a small indentation in the center of each “nest” for the candy eggs.
Place 2-3 candy eggs into each chocolate nest. You can use jelly beans, small chocolate eggs, or pastel-colored candies. This adds a cute and festive touch to the cupcakes, completing the “egg nest” look.
Your Egg Nest Cupcakes are now ready to be served! These cupcakes are perfect for Easter, spring-themed parties, or any event that calls for a fun, festive, and delicious treat. Serve them up on a platter or give them away as adorable party favors.
- Prep Time: 25 minutes
- Cook Time: 18-22 minutes
Nutrition
- Calories: 240-270 kcal
- Fat: 12-15g
- Carbohydrates: 32-35g
- Protein: 3g
Conclusion
Egg Nest Cupcakes are the ideal springtime treat, combining a fun, festive design with delicious flavors that everyone will enjoy. With a light and fluffy cupcake base, creamy buttercream frosting, and a crunchy chocolate nest filled with colorful candy eggs, these cupcakes are perfect for Easter celebrations, spring picnics, or any event that calls for a sweet, playful dessert. Try this recipe today, and watch as your cupcakes become the star of the show at your next gathering!


