
Introduction
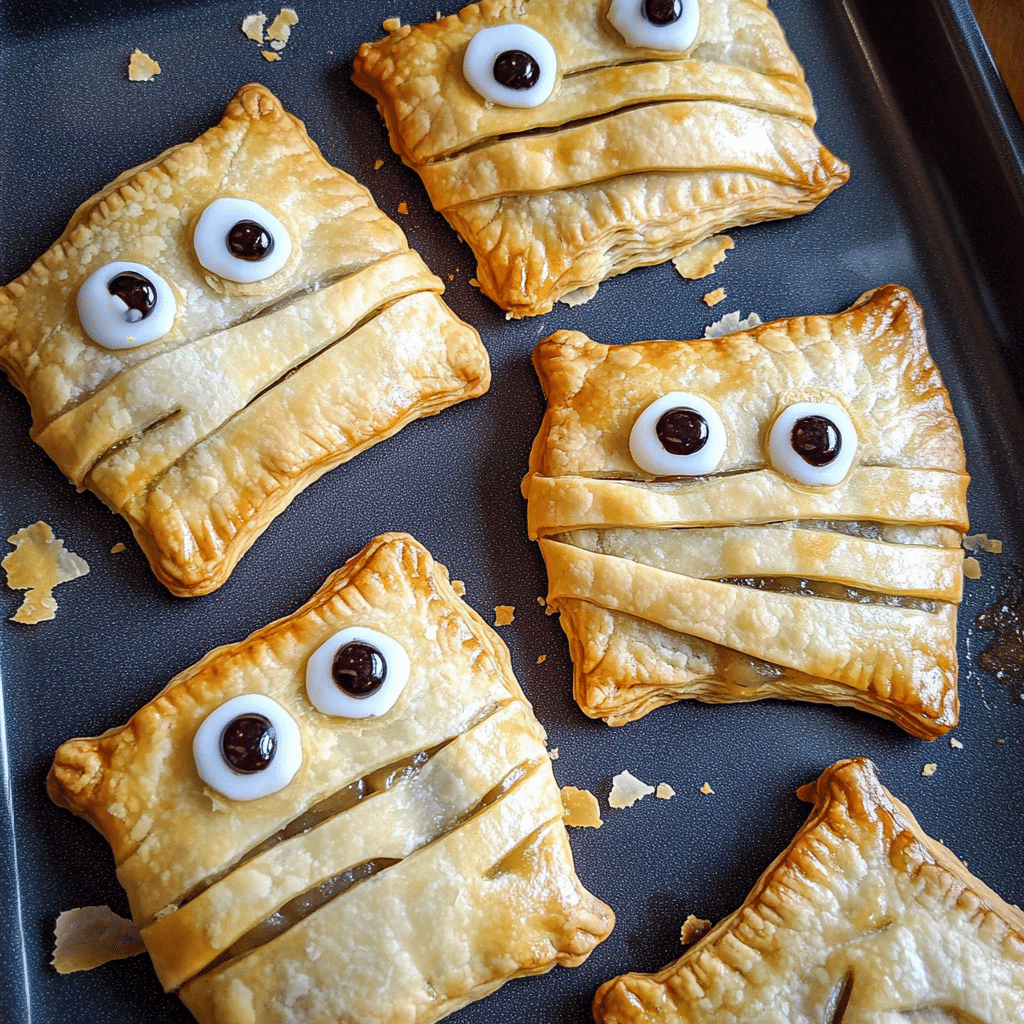
As the days grow shorter and the nights turn spookier, it’s time to embrace the Halloween spirit with some delightful treats. One of my favorite recipes to whip up during this festive season is Honey Mummy Hand Pies. These adorable little pastries are not only delicious but also bring a fun, creative twist to your Halloween celebrations. Picture this: flaky, golden pastry filled with sweet honey and fruit, all wrapped in a mummy-like appearance. They’re perfect for parties, school events, or even a cozy night in with family.
I first discovered this recipe during a Halloween-themed baking class, and I was instantly hooked. The combination of warm honey and a hint of cinnamon made the filling irresistible, while the flaky crust offered that perfect crunch. Plus, who can resist the charm of a mummy pie? Since then, they’ve become a staple in my household each October, and I love sharing them with friends and family. They not only taste amazing but also look fantastic on any dessert table.
Ready to bring some spooky fun to your kitchen? Let’s dive into this easy and delicious recipe that’s sure to impress everyone!
Why You’ll Love This Recipe
- Quick and Easy: With just 30 minutes of prep time and 20 minutes of baking, you’ll have these adorable hand pies ready in no time.
- Deliciously Sweet: The combination of honey and your choice of fruit creates a filling that’s sweet, sticky, and utterly delightful.
- Fun Presentation: These mummy hand pies are a hit with kids and adults alike. Their cute design adds a playful touch to your Halloween festivities.
- Customizable Filling: Feel free to mix and match your favorite fruits or jams for a personalized twist on this classic treat.
Imagine serving these delightful little pies at your Halloween gathering, watching as everyone marvels at their cute mummy faces and digs in for a taste. They’re sure to become a favorite!
Preparation Time and Servings
- Total Time: 50 minutes (30 minutes prep, 20 minutes baking)
- Servings: Makes about 12 hand pies
- Nutrition Facts: Approximately 200 calories per pie, with 3g protein and 30g carbohydrates.
Ingredients
- 1 package of refrigerated pie crusts (2 crusts): The flaky base for your hand pies, providing that perfect crunch.
- 1/2 cup honey: Adds natural sweetness and a beautiful glaze to the filling.
- 1 cup fruit filling (such as apple, peach, or mixed berries): This gives the pies a fruity flavor. Feel free to use homemade or store-bought filling.
- 1 teaspoon cinnamon: Enhances the flavor profile, bringing warmth to each bite.
- 1 egg (for egg wash): Helps achieve that golden-brown crust and adds a nice shine.
- Candy eyes: These are essential for creating the mummy face that will make everyone smile!
Every ingredient plays a vital role in delivering a tasty, visually stunning treat that captures the essence of Halloween.
Step-by-Step Instructions
1. Preheat the Oven
Start by preheating your oven to 400°F (200°C). This ensures that your pies bake evenly and get that lovely golden color.
2. Prepare the Filling
In a mixing bowl, combine the honey, fruit filling, and cinnamon. Stir well to make sure everything is combined. If you’re using fresh fruit, you might want to chop it into small pieces to ensure a nice texture in the pies.
3. Roll Out the Pie Crusts
On a lightly floured surface, unroll your pie crusts. Using a rolling pin, gently roll them out to smooth out any creases. You want them to be about 1/8-inch thick.
4. Cut Out Shapes
Using a round cookie cutter (or a glass), cut out circles from the pie crusts. You should be able to get about 12 circles from two crusts. Place half of the circles on a baking sheet lined with parchment paper.
5. Fill the Pies
Spoon a tablespoon of the honey-fruit mixture onto the center of each circle on the baking sheet. Be careful not to overfill; otherwise, the pies might burst open during baking.
6. Top with Second Crust
Place the remaining circles over the filled ones, pressing down the edges to seal. You can use a fork to crimp the edges for a decorative touch.
7. Cut Slits for Venting
To give your mummies their “wrappings,” use a sharp knife to cut a few thin slits on the top of each pie. This also helps steam escape while they bake.
8. Egg Wash
In a small bowl, whisk the egg and brush it over the tops of the pies. This will give them that beautiful golden color as they bake.
9. Bake
Place the baking sheet in the preheated oven and bake for about 20 minutes, or until the pies are golden brown. Keep an eye on them to ensure they don’t overbake.
10. Add the Mummy Eyes
Once the pies are out of the oven and have cooled slightly, place candy eyes on top of each pie. You can use a bit of honey to help them stick if needed.
11. Serve and Enjoy!
Allow the hand pies to cool a little more before serving. They’re perfect warm or at room temperature, and they’ll be the highlight of your Halloween spread.
Helpful Tips for Success
- Don’t Overfill: Make sure to leave enough space around the edges when filling the pies to ensure they seal properly.
- Use Cold Crust: If your pie crust is too warm or soft, it may be difficult to work with. Keep it chilled until you’re ready to use it.
- Chill Before Baking: If you have time, chill the assembled pies in the fridge for about 15 minutes before baking. This helps them hold their shape better.
- Mix and Match Fillings: Feel free to get creative with your fillings! Consider using chocolate chips, nut butter, or even savory options for a fun twist.
- Presentation Matters: Use fun platters and decorations to serve these pies. A spooky table setting can enhance the Halloween vibe!
How to Serve
These Honey Mummy Hand Pies are a fantastic addition to any Halloween gathering. Here are some fun serving suggestions:
- Platter Display: Arrange the pies on a spooky-themed platter with Halloween decorations like fake spiders or cobwebs.
- Pair with Drinks: Serve alongside apple cider, pumpkin spice lattes, or hot chocolate for a cozy touch.
- Include Dipping Sauces: Consider offering a side of caramel sauce or whipped cream for a delicious dip.
Additional Tips
- Make Ahead: You can prepare the filling a day in advance and store it in the fridge. Assemble the pies just before baking for the best results.
- Store Leftovers: Keep any leftovers in an airtight container at room temperature for up to 2 days. You can reheat them in the oven for a few minutes to restore their crispiness.
- Freeze for Later: Assemble the pies and freeze them before baking. When you’re ready to enjoy, bake them straight from the freezer, adding a few extra minutes to the baking time.
- Experiment with Shapes: Instead of round pies, you can use cookie cutters to make other fun Halloween shapes like bats or pumpkins.
- Spice It Up: Add a pinch of nutmeg or ginger to the filling for an extra layer of warmth and flavor.
Recipe Variations
- Savory Version: Swap the honey and fruit for a savory filling like cheese, spinach, and herbs for a different take on hand pies.
- Chocolate Hazelnut: Use chocolate hazelnut spread as a filling for a sweet and indulgent treat.
- Pumpkin Filling: For an autumn twist, use pumpkin puree mixed with spices and a bit of brown sugar as a filling.
Serving Suggestions
Pair these delightful hand pies with some festive side dishes and beverages:
- Side Dishes: Serve alongside a crisp salad or a warm bowl of soup to make it a full meal.
- Wine Pairing: A light, sweet dessert wine or a spiced cider would complement the flavors of the hand pies beautifully.
- Kid-Friendly Snacks: For a fun addition, serve with gummy worms or candy corn for a complete Halloween treat platter.
Freezing and Storage
- Storage: Keep any leftovers in an airtight container at room temperature for up to 2 days.
- Freezing: Unbaked hand pies can be frozen for up to 3 months. Just bake them from frozen, adding a few minutes to the baking time.
Special Equipment
- Baking Sheet: A sturdy baking sheet lined with parchment paper will help prevent sticking and ensure even baking.
- Rolling Pin: Essential for rolling out your pie crust to the right thickness.
- Cookie Cutters: Use various shapes to create fun designs for your hand pies.
FAQ Section
Can I use homemade pie crust?
Absolutely! Homemade pie crust can be even tastier and adds a personal touch.
What kind of fruit fillings work best?
You can use almost any fruit filling, but I recommend apple, cherry, or mixed berries for a classic flavor.
Can I make these gluten-free?
Yes! Use a gluten-free pie crust to make these hand pies suitable for gluten-sensitive diets.
How can I make them less sweet?
Reduce the amount of honey or opt for a less sweet fruit filling to balance.
Conclusion
And there you have it! These Honey Mummy Hand Pies are not only a fun addition to your Halloween festivities but also a delicious treat that everyone will love. The combination of flaky crust and sweet, gooey filling makes them irresistible, while their playful mummy appearance adds a delightful touch to any gathering.
I can’t wait to see how yours turn out! Don’t forget to snap some photos and share your spooky creations with me on social media. Whether you’re hosting a Halloween party or just looking for a festive snack, these hand pies are sure to bring smiles all around. Happy Halloween, and enjoy the baking!
Print
Honey Mummy Hand Pies: A Spooktacular Treat for Halloween
- Total Time: 50 minutes
Ingredients
- 1 package of refrigerated pie crusts (2 crusts): The flaky base for your hand pies, providing that perfect crunch.
- 1/2 cup honey: Adds natural sweetness and a beautiful glaze to the filling.
- 1 cup fruit filling (such as apple, peach, or mixed berries): This gives the pies a fruity flavor. Feel free to use homemade or store-bought filling.
- 1 teaspoon cinnamon: Enhances the flavor profile, bringing warmth to each bite.
- 1 egg (for egg wash): Helps achieve that golden-brown crust and adds a nice shine.
- Candy eyes: These are essential for creating the mummy face that will make everyone smile!
Instructions
1. Preheat the Oven
Start by preheating your oven to 400°F (200°C). This ensures that your pies bake evenly and get that lovely golden color.
2. Prepare the Filling
In a mixing bowl, combine the honey, fruit filling, and cinnamon. Stir well to make sure everything is combined. If you’re using fresh fruit, you might want to chop it into small pieces to ensure a nice texture in the pies.
3. Roll Out the Pie Crusts
On a lightly floured surface, unroll your pie crusts. Using a rolling pin, gently roll them out to smooth out any creases. You want them to be about 1/8-inch thick.
4. Cut Out Shapes
Using a round cookie cutter (or a glass), cut out circles from the pie crusts. You should be able to get about 12 circles from two crusts. Place half of the circles on a baking sheet lined with parchment paper.
5. Fill the Pies
Spoon a tablespoon of the honey-fruit mixture onto the center of each circle on the baking sheet. Be careful not to overfill; otherwise, the pies might burst open during baking.
6. Top with Second Crust
Place the remaining circles over the filled ones, pressing down the edges to seal. You can use a fork to crimp the edges for a decorative touch.
7. Cut Slits for Venting
To give your mummies their “wrappings,” use a sharp knife to cut a few thin slits on the top of each pie. This also helps steam escape while they bake.
8. Egg Wash
In a small bowl, whisk the egg and brush it over the tops of the pies. This will give them that beautiful golden color as they bake.
9. Bake
Place the baking sheet in the preheated oven and bake for about 20 minutes, or until the pies are golden brown. Keep an eye on them to ensure they don’t overbake.
10. Add the Mummy Eyes
Once the pies are out of the oven and have cooled slightly, place candy eyes on top of each pie. You can use a bit of honey to help them stick if needed.
11. Serve and Enjoy!
Allow the hand pies to cool a little more before serving. They’re perfect warm or at room temperature, and they’ll be the highlight of your Halloween spread.
- Prep Time: 30 minutes
- Baking Time: 20 minutes
Nutrition
- Calories: 200 kcal
- Carbohydrates: 30g
- Protein: 3g


