

Introduction
When it comes to holiday baking, few treats capture the spirit of Thanksgiving quite like iced maple leaf sugar cookies. These delightful cookies not only boast a delicious blend of flavors but also feature an eye-catching design that will impress your guests. Imagine a platter of beautifully iced leaf-shaped cookies, their sweet aroma wafting through your kitchen, inviting everyone to indulge. This recipe quickly became a cherished family tradition, perfect for sharing with friends and loved ones during the festive season.
The beauty of these cookies lies not just in their taste but also in their versatility. They can be enjoyed as a simple treat, decorated for an occasion, or even gifted as homemade favors. The process of rolling out dough and decorating cookies can be a fun activity for the whole family, creating memorable experiences that go beyond just baking. Let’s explore why you’ll love this recipe and how to create these stunning iced maple leaf sugar cookies!
Why You’ll Love This Recipe
- Delicious Flavor: The combination of maple syrup and vanilla creates a uniquely sweet and rich flavor that’s perfect for autumn. The warm, cozy taste of maple evokes the essence of fall and makes these cookies a fitting addition to any Thanksgiving feast.
- Beautiful Presentation: These cookies are shaped like maple leaves and decorated with colorful icing, making them perfect for Thanksgiving gatherings. Their vibrant colors and charming shapes add a festive touch to your dessert table, elevating your holiday spread.
- Fun to Decorate: Get creative with your icing designs! Kids and adults alike will enjoy decorating these cookies, making it a wonderful family bonding activity. You can experiment with different colors, patterns, and even edible glitter for a magical finish.
- Easy to Make: With straightforward steps and simple ingredients, this recipe is accessible for bakers of all skill levels. Whether you’re a novice baker or a seasoned pro, you’ll find the process enjoyable and rewarding.
- Perfect for Gifting: Package these cookies in decorative boxes or bags for a sweet homemade gift. They make wonderful treats for neighbors, friends, or coworkers, spreading joy and warmth during the holiday season.
Preparation Time and Servings
- Total Time: Approximately 2 hours (including cooling and decorating)
- Servings: This recipe yields about 24 cookies, making it perfect for gatherings or as a sweet treat to enjoy throughout the holiday season.
- Nutrition Facts: Calories per cookie: 150, Protein: 1g, Carbs: 22g, Fat: 7g.
Ingredients
For the Cookies:
- 2 ¾ cups all-purpose flour: The base for your cookie dough. Make sure to spoon and level the flour to avoid packing it, which can lead to dry cookies.
- 1 teaspoon baking powder: Helps the cookies rise and stay fluffy, contributing to a tender texture.
- ½ teaspoon salt: Enhances flavor, balancing the sweetness of the cookies.
- 1 cup unsalted butter, softened: Provides richness and tenderness. Make sure it’s at room temperature for easier mixing.
- 1 cup granulated sugar: For sweetness. You could also experiment with brown sugar for a deeper flavor.
- 1 large egg: Binds the ingredients together, ensuring the cookies hold their shape.
- 2 tablespoons pure maple syrup: Infuses a lovely maple flavor, making these cookies truly special.
- 1 teaspoon vanilla extract: Adds a warm, aromatic touch that complements the maple syrup.
For the Icing:
- 2 cups powdered sugar: The main ingredient for a smooth icing. Sifting it beforehand can help eliminate lumps for a better texture.
- 2 tablespoons milk: Helps achieve the right consistency for the icing. You can use dairy or non-dairy milk, depending on your preference.
- 1 teaspoon vanilla extract: For flavor, enhancing the overall sweetness of the icing.
- Food coloring (optional): For decorating; gel food coloring works best to achieve vibrant colors without watering down the icing.
Step-by-Step Instructions
STEP 1: PREPARE THE DOUGH
In a medium bowl, whisk together the flour, baking powder, and salt. Set aside. In a large mixing bowl, cream the softened butter and granulated sugar until light and fluffy, about 2-3 minutes. This step is crucial as it incorporates air into the mixture, giving the cookies a nice texture.
Add the egg, maple syrup, and vanilla extract, mixing until well combined. Gradually add the dry ingredients to the wet mixture, mixing until just combined. Be careful not to overmix; this can lead to tough cookies.
STEP 2: CHILL THE DOUGH
Form the dough into a disc, wrap it in plastic wrap, and refrigerate for at least 1 hour. Chilling the dough is essential for two reasons: it makes the dough easier to roll out, and it helps the cookies maintain their shape during baking.
STEP 3: PREHEAT THE OVEN
Preheat your oven to 350°F (175°C). Line baking sheets with parchment paper to prevent sticking. This step ensures even baking and makes cleanup easier.
STEP 4: ROLL OUT THE DOUGH
Once chilled, remove the dough from the refrigerator. On a lightly floured surface, roll out the dough to about ¼ inch thickness. Aim for uniform thickness to ensure even baking. Use a maple leaf-shaped cookie cutter to cut out cookies, placing them on the prepared baking sheets.
Gather any scraps, re-roll, and continue cutting out cookies until all the dough is used. If the dough becomes too soft while rolling, return it to the refrigerator for a few minutes to firm up.
STEP 5: BAKE THE COOKIES
Bake the cookies in the preheated oven for 8-10 minutes, or until the edges are lightly golden. Keep an eye on them to prevent over-baking; they will continue to firm up as they cool. Remove from the oven and let them cool on the baking sheets for a few minutes before transferring them to a wire rack to cool completely.
STEP 6: PREPARE THE ICING
In a medium bowl, whisk together the powdered sugar, milk, and vanilla extract until smooth. The icing should be thick but pourable; it should flow easily but hold its shape when piped. If you want to use food coloring, divide the icing into separate bowls and add your desired colors.
STEP 7: DECORATE THE COOKIES
Once the cookies are completely cool, it’s time to decorate! Use a piping bag or a small offset spatula to spread the icing over the cookies. Get creative! You can outline the cookies, fill them in, or even add details like veins on the leaves with different colors. Consider using a small brush or toothpick to create intricate designs.
STEP 8: ALLOW TO SET
Let the decorated cookies sit at room temperature for about 30 minutes to an hour to allow the icing to set completely. This will prevent smudging when you stack or package them.
How to Serve
- Presentation: Arrange the iced cookies on a festive platter for an eye-catching display. Use decorative napkins or autumn-themed tableware to enhance the presentation.
- Pairing: These cookies are delightful with a cup of hot cider, tea, or coffee. Their sweet flavor complements warm beverages perfectly, making for a cozy afternoon snack.
- Gift Packaging: Consider placing the cookies in clear bags tied with a ribbon for a charming gift. You could also include a handwritten note or a recipe card to personalize your gift.
Additional Tips
- Storage: Store the iced cookies in an airtight container at room temperature for up to one week. If you live in a humid environment, consider refrigerating them to maintain their texture.
- Make Ahead: The cookie dough can be made ahead of time and frozen for up to 3 months. Thaw in the refrigerator before rolling and baking. You can also freeze the baked cookies before icing for even longer storage.
- Experiment with Flavors: Try adding spices like cinnamon, nutmeg, or ginger to the dough for an extra layer of flavor. These spices are warm and comforting, enhancing the autumnal theme of the cookies.
- Use Different Cutters: While maple leaves are perfect for Thanksgiving, feel free to use other shapes for different occasions. Hearts for Valentine’s Day or stars for Christmas can make these cookies suitable year-round.
- Decorate with Sprinkles: Add festive sprinkles on top of the icing for a fun touch. Edible glitter can also add a magical sparkle, especially for holiday gatherings.
Recipe Variations
- Chocolate Chip Version: Fold in mini chocolate chips into the dough for a sweet twist. This variation adds a nice contrast to the maple flavor and offers a delicious texture.
- Nutty Addition: Incorporate finely chopped pecans or walnuts into the dough for a delightful crunch. Nuts add both flavor and a rustic touch to the cookies.
- Gluten-Free Option: Substitute all-purpose flour with a gluten-free flour blend for a gluten-free cookie. Ensure that the blend includes xanthan gum to help with structure.
- Maple Glaze: Instead of icing, consider a maple glaze made from powdered sugar and maple syrup for a simpler finish. This gives a beautiful sheen and an extra burst of maple flavor.
Serving Suggestions
- Complementary Desserts: Serve these cookies alongside pumpkin pie, pecan pie, or apple crisp for a delightful dessert spread. Each dessert brings its own flavor and texture, making for a well-rounded dessert table.
- Themed Parties: Perfect for autumn-themed gatherings, cookie decorating parties, or Thanksgiving dessert tables. Set up a decorating station where guests can personalize their cookies.
- Kid-Friendly Treats: Kids will love decorating these cookies, making them a fun family activity. You can also involve them in baking the cookies, teaching them valuable skills along the way.
Freezing and Storage
Storage:
Store leftover cookies in an airtight container at room temperature for up to one week. If you want to keep them longer, consider freezing.
Freezing:
To freeze, place the undecorated cookies in a single layer on a baking sheet. Once frozen, transfer them to a freezer-safe bag or container. They can be frozen for up to 3 months. Decorate after thawing for the best presentation.
Reheating:
If you prefer warm cookies, you can gently reheat them in the microwave for about 10-15 seconds, or in the oven at 350°F (175°C) for a few minutes until warm. Be careful not to overheat, as this can make them dry.
Special Equipment
- Cookie Cutters: Essential for creating fun shapes. Invest in a quality set that includes various seasonal shapes.
- Piping Bags: Helpful for precise icing applications. If you don’t have piping bags, you can use resealable plastic bags with a small corner cut off.
- Rolling Pin: For rolling out the dough to an even thickness. A marble rolling pin is excellent for keeping the dough cool.
- Cooling Rack: Ensures even cooling and prevents sogginess. This is essential for maintaining the cookies’ texture.
FAQ Section
Can I use flavored maple syrup?
Absolutely! Flavored maple syrups, such as cinnamon or vanilla, can add an interesting twist to your cookies. Experiment with different flavors to find your favorite.
How do I know when the cookies are done?
Look for lightly golden edges; they will continue to firm up as they cool. The centers may look slightly underbaked, but they will set up as they cool.
Can I freeze iced cookies?
It’s best to freeze the cookies before icing them, as icing can become soggy when frozen. Once iced, they can be stored in the refrigerator for up to a week.
What can I do if my icing is too thick?
If your icing is too thick, simply add a little more milk, a teaspoon at a time, until you reach the desired consistency. Conversely, if it’s too runny, add more powdered sugar.
Can I prepare the dough a day in advance?
Yes, you can prepare the dough in advance, wrap it tightly, and refrigerate it overnight. This can save you time on baking day.
Conclusion
I hope you’re as excited to make these Iced Maple Leaf Sugar Cookies as I am! They’re a wonderful way to bring a touch of sweetness to your Thanksgiving celebrations. Whether you’re baking with family, decorating with friends, or sharing them with loved ones, these cookies are sure to create lasting memories.
Don’t forget to share your cookie creations! I’d love to see how your iced maple leaf cookies turn out—be sure to leave a comment or tag me on social media with your delicious results. Happy baking, and may your holiday season be filled with joy, love, and plenty of sweet treats!
Print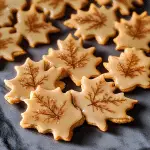
Iced Maple Leaf Sugar Cookies: A Sweet Thanksgiving Treat
- Total Time: 2 hours
Description
Iced Maple Leaf Sugar Cookies are a charming and festive treat that captures the essence of autumn in every bite. These cookies feature a tender, buttery base with the warm, inviting flavor of maple syrup. Shaped like vibrant maple leaves, they are decorated with a sweet, glossy icing that can be customized in a variety of colors. The combination of soft cookie and crisp icing creates a delightful contrast, making these cookies a perfect addition to holiday gatherings, fall celebrations, or any occasion that calls for a touch of sweetness and seasonal flair.
Ingredients
For the Cookies:
- 2 ¾ cups all-purpose flour: The base for your cookie dough. Make sure to spoon and level the flour to avoid packing it, which can lead to dry cookies.
- 1 teaspoon baking powder: Helps the cookies rise and stay fluffy, contributing to a tender texture.
- ½ teaspoon salt: Enhances flavor, balancing the sweetness of the cookies.
- 1 cup unsalted butter, softened: Provides richness and tenderness. Make sure it’s at room temperature for easier mixing.
- 1 cup granulated sugar: For sweetness. You could also experiment with brown sugar for a deeper flavor.
- 1 large egg: Binds the ingredients together, ensuring the cookies hold their shape.
- 2 tablespoons pure maple syrup: Infuses a lovely maple flavor, making these cookies truly special.
- 1 teaspoon vanilla extract: Adds a warm, aromatic touch that complements the maple syrup.
For the Icing:
- 2 cups powdered sugar: The main ingredient for a smooth icing. Sifting it beforehand can help eliminate lumps for a better texture.
- 2 tablespoons milk: Helps achieve the right consistency for the icing. You can use dairy or non-dairy milk, depending on your preference.
- 1 teaspoon vanilla extract: For flavor, enhancing the overall sweetness of the icing.
- Food coloring (optional): For decorating; gel food coloring works best to achieve vibrant colors without watering down the icing.
Instructions
STEP 1: PREPARE THE DOUGH
In a medium bowl, whisk together the flour, baking powder, and salt. Set aside. In a large mixing bowl, cream the softened butter and granulated sugar until light and fluffy, about 2-3 minutes. This step is crucial as it incorporates air into the mixture, giving the cookies a nice texture.
Add the egg, maple syrup, and vanilla extract, mixing until well combined. Gradually add the dry ingredients to the wet mixture, mixing until just combined. Be careful not to overmix; this can lead to tough cookies.
STEP 2: CHILL THE DOUGH
Form the dough into a disc, wrap it in plastic wrap, and refrigerate for at least 1 hour. Chilling the dough is essential for two reasons: it makes the dough easier to roll out, and it helps the cookies maintain their shape during baking.
STEP 3: PREHEAT THE OVEN
Preheat your oven to 350°F (175°C). Line baking sheets with parchment paper to prevent sticking. This step ensures even baking and makes cleanup easier.
STEP 4: ROLL OUT THE DOUGH
Once chilled, remove the dough from the refrigerator. On a lightly floured surface, roll out the dough to about ¼ inch thickness. Aim for uniform thickness to ensure even baking. Use a maple leaf-shaped cookie cutter to cut out cookies, placing them on the prepared baking sheets.
Gather any scraps, re-roll, and continue cutting out cookies until all the dough is used. If the dough becomes too soft while rolling, return it to the refrigerator for a few minutes to firm up.
STEP 5: BAKE THE COOKIES
Bake the cookies in the preheated oven for 8-10 minutes, or until the edges are lightly golden. Keep an eye on them to prevent over-baking; they will continue to firm up as they cool. Remove from the oven and let them cool on the baking sheets for a few minutes before transferring them to a wire rack to cool completely.
STEP 6: PREPARE THE ICING
In a medium bowl, whisk together the powdered sugar, milk, and vanilla extract until smooth. The icing should be thick but pourable; it should flow easily but hold its shape when piped. If you want to use food coloring, divide the icing into separate bowls and add your desired colors.
STEP 7: DECORATE THE COOKIES
Once the cookies are completely cool, it’s time to decorate! Use a piping bag or a small offset spatula to spread the icing over the cookies. Get creative! You can outline the cookies, fill them in, or even add details like veins on the leaves with different colors. Consider using a small brush or toothpick to create intricate designs.
STEP 8: ALLOW TO SET
Let the decorated cookies sit at room temperature for about 30 minutes to an hour to allow the icing to set completely. This will prevent smudging when you stack or package them.
- Prep Time: 30-40 minutes
- Baking Time: 10-12 minutes
Nutrition
- Calories: 150 kcal
- Fat: 7g
- Carbohydrates: 22g
- Protein: 1g


