
Introduction
There’s something magical about the combination of pumpkin and Oreo cookies that makes my heart skip a beat. Maybe it’s the creamy filling peeking out from the crunchy chocolatey exterior, or perhaps it’s the warm spices of pumpkin that create an inviting autumn aroma. Either way, these Pumpkin Oreo Pops are like little bites of joy that are perfect for any gathering, whether it’s a cozy fall get-together or a fun Halloween party.
I remember the first time I made these pops for my family. I was knee-deep in Pinterest recipes, trying to find something that would impress my picky eaters, and I stumbled upon a similar recipe. The idea of combining two beloved treats into one delightful pop had me hooked. Once I took that first bite, I knew I had struck gold! The kids couldn’t get enough of them, and they quickly became a go-to recipe for any occasion. Now, every fall, we whip up a batch to celebrate the season—and let me tell you, they disappear faster than you can say “pumpkin spice latte!”
What makes these pops so special is not just the incredible flavor, but also how simple they are to whip up. With just a few ingredients and a bit of time, you can create a dessert that feels gourmet but is surprisingly easy to make. Plus, they’re fun to decorate, so you can get the kids involved in the kitchen, making it a memorable experience for everyone.
Why You’ll Love This Recipe
- Easy to Make: With minimal prep time and simple ingredients, this recipe is perfect for even the newest cooks. You’ll be amazed at how quickly they come together!
- Family-Friendly: These pops are a hit with kids and adults alike. Everyone loves the chocolatey crunch of Oreos combined with the creamy pumpkin filling.
- Deliciously Flavorful: The blend of pumpkin, cream cheese, and spices creates a rich and satisfying flavor that’s the essence of fall. Each bite is a delightful explosion of sweetness and spice.
- Customizable: Feel free to get creative with toppings! From colorful sprinkles to crushed nuts, you can make these pops as festive as you like.
- Perfect for Any Occasion: Whether it’s a Halloween party, Thanksgiving dessert table, or just a cozy evening at home, these Pumpkin Oreo Pops are sure to brighten your day.
Preparation Time and Servings
- Total Time: 30 minutes (plus chilling time)
- Servings: Makes about 12 pops
- Nutrition Facts: Approximately 180 calories per pop, 3g protein, 22g carbs.
Ingredients
To whip up these delightful Pumpkin Oreo Pops, you’ll need the following ingredients:
- 1 package of Oreo cookies (about 14 cookies): The classic chocolate crunch provides a perfect contrast to the creamy pumpkin filling.
- 1 cup canned pumpkin puree: This adds the essential pumpkin flavor and moisture. Be sure to use pure pumpkin, not pumpkin pie filling.
- 4 oz cream cheese, softened: This adds a rich creaminess that binds the filling together and enhances the overall flavor.
- ½ cup powdered sugar: Sweetens the filling and gives it that dessert-like quality.
- 1 tsp pumpkin pie spice: A warm blend of cinnamon, nutmeg, and ginger that captures the essence of fall.
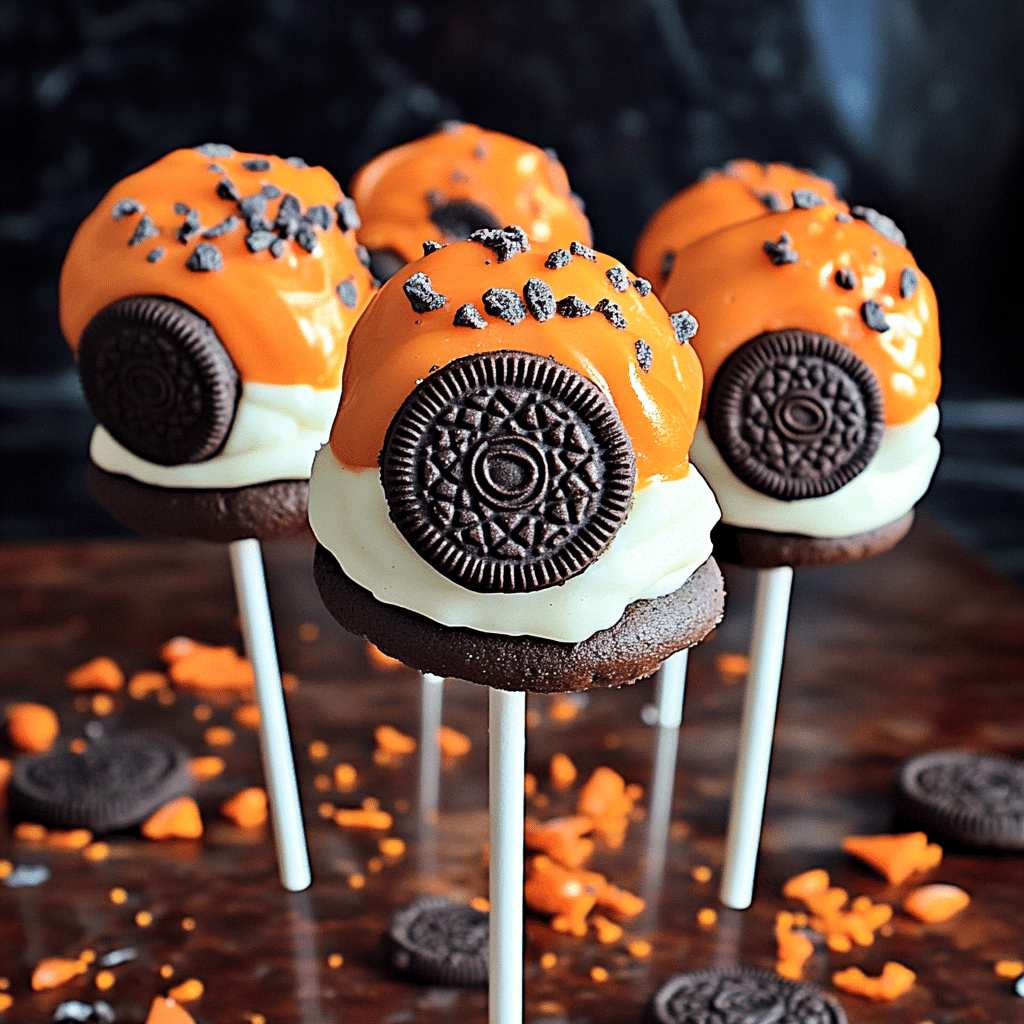
- 8 oz white chocolate chips or candy melts: For coating the pops; they add sweetness and a lovely creamy texture.
- Popsicle sticks: To turn these treats into pops!
Note: If you want to add a fun twist, consider using colored candy melts for a festive touch!
Step-by-Step Instructions
Making Pumpkin Oreo Pops is a fun and straightforward process. Let’s break it down:
- Crush the Oreos: Start by placing the Oreos in a food processor. Pulse them until they become fine crumbs. If you don’t have a food processor, you can put the cookies in a zip-top bag and crush them with a rolling pin. It’s a great way to release some stress!
- Make the Filling: In a mixing bowl, combine the crushed Oreos, canned pumpkin puree, softened cream cheese, powdered sugar, and pumpkin pie spice. Use a spatula or your hands to mix everything until fully combined. It should be a thick, moldable mixture.
- Form the Pops: Take small portions of the mixture and roll them into balls about the size of a golf ball. Once shaped, insert a popsicle stick into each ball, pressing it in gently but firmly to ensure it holds.
- Chill the Pops: Place the pops on a baking sheet lined with parchment paper and refrigerate for at least 30 minutes. This helps them firm up so they’re easier to dip in chocolate.
- Melt the Chocolate: While the pops are chilling, melt the white chocolate chips or candy melts in a microwave-safe bowl. Heat in 30-second intervals, stirring in between, until smooth. If you want, you can add a splash of vegetable oil to make the chocolate thinner for easier dipping.
- Dip the Pops: Remove the pops from the refrigerator. One at a time, dip each pop into the melted chocolate, making sure it’s fully coated. Let any excess chocolate drip off.
- Add Toppings: Before the chocolate sets, sprinkle your favorite toppings—like crushed Oreos, colorful sprinkles, or chopped nuts—over the chocolate. Get creative and make them look festive!
- Let Them Set: Place the coated pops back on the parchment-lined baking sheet. Once all the pops are dipped and decorated, return them to the fridge to allow the chocolate to harden completely.
- Serve and Enjoy: Once the chocolate has set, your Pumpkin Oreo Pops are ready to serve! Enjoy them chilled or at room temperature. They’re perfect for sharing, but you might just want to keep them all to yourself!
How to Serve
These Pumpkin Oreo Pops are adorable and versatile! Here are a few serving suggestions to make them even more delightful:
- On a Festive Platter: Arrange the pops on a decorative plate or platter for a beautiful dessert display.
- With a Side of Whipped Cream: Serve with a dollop of whipped cream or a scoop of vanilla ice cream for an extra indulgent treat.
- As Party Favors: Wrap individual pops in cellophane bags tied with twine for a sweet party favor that guests will love.
- Decorated for the Occasion: If you’re serving them for Halloween, add little googly eyes or themed sprinkles to make them extra fun!
Additional Tips
Here are five helpful tips to ensure your Pumpkin Oreo Pops turn out perfectly:
- Use Room Temperature Cream Cheese: This makes it easier to blend with the other ingredients, resulting in a smoother filling.
- Chill Before Dipping: Make sure to chill the pops thoroughly before dipping them in chocolate. This helps them hold their shape better.
- Adjust Sweetness: Feel free to taste the filling mixture and adjust the powdered sugar according to your preference. If you like it sweeter, add a bit more!
- Experiment with Flavors: Want to mix it up? Try adding a teaspoon of vanilla extract to the filling for an extra layer of flavor.
- Work Quickly with the Chocolate: White chocolate can harden quickly, so dip and decorate one pop at a time to avoid a lumpy mess.
Recipe Variations
The great thing about these Pumpkin Oreo Pops is that they’re incredibly versatile! Here are some fun variations to try:
- Chocolate Oreo Pops: Substitute the regular Oreos with chocolate-flavored Oreos for an extra chocolatey experience.
- Nutty Pops: Add finely chopped nuts (like pecans or walnuts) to the filling for a delightful crunch.
- Spicy Option: If you love heat, sprinkle a bit of cayenne pepper into the filling for a surprising kick.
- Dairy-Free Version: Use dairy-free cream cheese and dark chocolate for a vegan-friendly treat that everyone can enjoy.
Serving Suggestions
To make your dessert table even more appealing, consider these complementary side dishes and beverages:
- Side Dishes: Serve with a warm apple crisp or a light salad with citrus dressing to balance out the sweetness.
- Beverage Pairings: A hot cup of apple cider or a pumpkin spice latte pairs wonderfully with these treats.
- For Kids: Offer alongside some fresh fruit skewers or popcorn for a fun and colorful dessert spread.
Freezing and Storage
Storing leftovers or making these pops in advance is a breeze:
- Storage: Keep leftover pops in an airtight container in the fridge for up to 5 days. They’ll stay deliciously creamy and sweet!
- Freezing: If you want to make a big batch, place the pops on a baking sheet and freeze until solid. Then transfer them to a freezer-safe container for up to 3 months. When ready to enjoy, simply thaw in the fridge overnight.
Special Equipment
While this recipe doesn’t require any fancy tools, a few items will help you achieve the best results:
- Food Processor: For easily crushing the Oreos. If you don’t have one, a rolling pin and zip-top bag will work just fine!
- Parchment Paper: For lining your baking sheet to prevent sticking and make cleanup a breeze.
- Microwave-Safe Bowl: For melting your chocolate or candy melts smoothly.
FAQ Section
Can I use store-bought pumpkin puree?
Absolutely! Just make sure it’s pure pumpkin and not pumpkin
pie filling.
How can I make these pops ahead of time?
You can prep the pops a day in advance and store them in the fridge before dipping them in chocolate. They’ll be just as tasty!
What if I don’t have a food processor?
No problem! You can crush the Oreos by placing them in a zip-top bag and using a rolling pin. It’s a fun way to get your hands a little messy!
Can I freeze uncooked pops?
Yes! Simply freeze the shaped pops on a baking sheet, then transfer them to a freezer bag. They can be frozen for up to 3 months. When you’re ready to enjoy, just dip them in chocolate after thawing.
What if I want to make these gluten-free?
You can use gluten-free Oreos or another gluten-free cookie option. Just ensure all your other ingredients are gluten-free as well.
Conclusion
I can’t wait for you to try these Pumpkin Oreo Pops! They’re a fun, festive treat that’s perfect for any occasion, and I know you’ll love how easy they are to make. Whether you’re sharing them at a party, enjoying them at home with your family, or surprising your kids after school, these pops are sure to bring a smile to everyone’s face.
Once you’ve made them, I’d love to see how your Pumpkin Oreo Pops turn out! Snap a photo and tag me on Instagram—I get so excited to see your delicious creations. Happy baking, and enjoy the sweet flavors of fall!
Print
Irresistible Pumpkin Oreo Pops: A Sweet Treat for Every Occasion
- Total Time: 30 minutes
Ingredients
- 1 package of Oreo cookies (about 14 cookies): The classic chocolate crunch provides a perfect contrast to the creamy pumpkin filling.
- 1 cup canned pumpkin puree: This adds the essential pumpkin flavor and moisture. Be sure to use pure pumpkin, not pumpkin pie filling.
- 4 oz cream cheese, softened: This adds a rich creaminess that binds the filling together and enhances the overall flavor.
- ½ cup powdered sugar: Sweetens the filling and gives it that dessert-like quality.
- 1 tsp pumpkin pie spice: A warm blend of cinnamon, nutmeg, and ginger that captures the essence of fall.
- 8 oz white chocolate chips or candy melts: For coating the pops; they add sweetness and a lovely creamy texture.
- Popsicle sticks: To turn these treats into pops!
Instructions
- Crush the Oreos: Start by placing the Oreos in a food processor. Pulse them until they become fine crumbs. If you don’t have a food processor, you can put the cookies in a zip-top bag and crush them with a rolling pin. It’s a great way to release some stress!
- Make the Filling: In a mixing bowl, combine the crushed Oreos, canned pumpkin puree, softened cream cheese, powdered sugar, and pumpkin pie spice. Use a spatula or your hands to mix everything until fully combined. It should be a thick, moldable mixture.
- Form the Pops: Take small portions of the mixture and roll them into balls about the size of a golf ball. Once shaped, insert a popsicle stick into each ball, pressing it in gently but firmly to ensure it holds.
- Chill the Pops: Place the pops on a baking sheet lined with parchment paper and refrigerate for at least 30 minutes. This helps them firm up so they’re easier to dip in chocolate.
- Melt the Chocolate: While the pops are chilling, melt the white chocolate chips or candy melts in a microwave-safe bowl. Heat in 30-second intervals, stirring in between, until smooth. If you want, you can add a splash of vegetable oil to make the chocolate thinner for easier dipping.
- Dip the Pops: Remove the pops from the refrigerator. One at a time, dip each pop into the melted chocolate, making sure it’s fully coated. Let any excess chocolate drip off.
- Add Toppings: Before the chocolate sets, sprinkle your favorite toppings—like crushed Oreos, colorful sprinkles, or chopped nuts—over the chocolate. Get creative and make them look festive!
- Let Them Set: Place the coated pops back on the parchment-lined baking sheet. Once all the pops are dipped and decorated, return them to the fridge to allow the chocolate to harden completely.
- Serve and Enjoy: Once the chocolate has set, your Pumpkin Oreo Pops are ready to serve! Enjoy them chilled or at room temperature. They’re perfect for sharing, but you might just want to keep them all to yourself!
- Prep Time: 15 minutes
- Chilling Time: 15 minutes
Nutrition
- Serving Size: Per Pop
- Calories: 180 kcal
- Carbohydrates: 22g
- Protein: 3g


