

Introduction
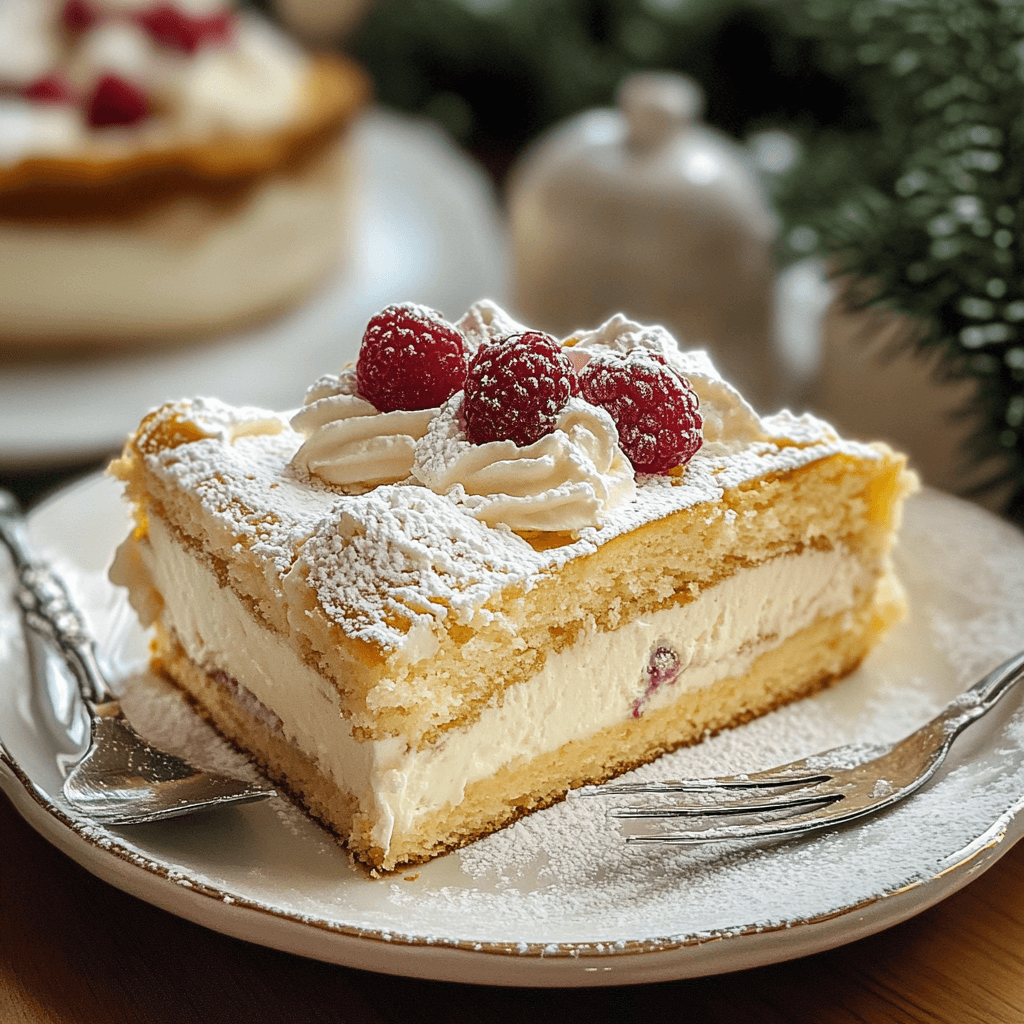
Karpatka, also known as Polish Carpathian Cream Cake, is a traditional Polish dessert that features layers of flaky, buttery puff pastry filled with a rich, creamy custard. Named after the Carpathian Mountains, its jagged, mountain-like top layers evoke the rugged beauty of the mountain range. This delicious dessert is a beloved treat in Poland, often enjoyed during festive occasions, family gatherings, and holidays. The light, delicate pastry and the luscious cream filling create the perfect balance of textures and flavors, making it a showstopper dessert.
Whether you’re new to Polish cuisine or a seasoned baker, Karpatka is sure to impress. With its layers of pastry and smooth custard filling, this cake is both visually stunning and irresistibly delicious. Though it may look intimidating, it’s relatively easy to make, and the results are well worth the effort. This recipe will guide you through each step, ensuring a perfect Karpatka every time.
Why You’ll Love Karpatka
- Traditional Polish Flavor: Karpatka is a classic Polish dessert that embodies the sweet, creamy flavors of the country’s culinary heritage. If you love custard-filled desserts, you’ll be hooked on Karpatka.
- Flaky Pastry Layers: The pastry is light, flaky, and buttery—creating a perfect contrast to the creamy filling. The slightly crunchy, golden layers are the ideal base for the smooth custard.
- Rich, Velvety Custard: The creamy custard filling is the star of the show. Made with eggs, milk, and sugar, it has a delicate sweetness and a silky texture that perfectly complements the pastry.
- Impressive Presentation: With its beautiful, rugged top layers and smooth filling, Karpatka makes a stunning dessert. It’s perfect for special occasions, parties, or when you want to impress your guests with something truly special.
- Satisfying yet Light: Despite its rich custard and buttery layers, Karpatka is surprisingly light and not overly sweet. It strikes the perfect balance, making it an ideal dessert for after a hearty meal.
Preparation and Cooking Time
- Total Time: 2 hours 30 minutes (including chilling and cooling)
- Preparation Time: 30 minutes
- Cooking Time: 1 hour (for baking the pastry)
- Servings: Approximately 12-16 servings
- Calories per Serving: Around 350-400 calories per serving, depending on the ingredients and portion size.
Nutrition Facts (Per Serving)
- Calories: 350-400 kcal
- Fat: 25-30g
- Carbohydrates: 35-40g
- Protein: 5g
- Fiber: 1g
- Sugar: 20-25g
Ingredients
For the Pastry:
- 2 cups all-purpose flour
- 1 cup unsalted butter (cold and cubed)
- 1/2 cup water
- 1 teaspoon sugar
- 1/4 teaspoon salt
- 1/2 teaspoon vanilla extract (optional)
For the Custard Filling:
- 2 cups whole milk
- 1/2 cup sugar
- 2 tablespoons all-purpose flour
- 2 tablespoons cornstarch
- 4 large egg yolks
- 1 teaspoon vanilla extract
- 1/2 cup unsalted butter (cubed and softened)
Topping:
- Powdered sugar (for dusting)
Special Equipment
To make Karpatka, there are a few essential tools that will ensure the pastry and custard turn out perfectly:
- Baking Sheet: A large baking sheet is necessary for baking the pastry layers. You’ll need enough space to spread the dough evenly.
- Parchment Paper: Lining the baking sheet with parchment paper helps prevent the pastry from sticking and makes cleanup easier.
- Mixing Bowls: You’ll need two large bowls—one for mixing the dry ingredients for the pastry and another for the custard.
- Whisk: A whisk is essential for mixing the custard ingredients and ensuring a smooth consistency.
- Saucepan: A medium-sized saucepan is needed for making the custard. You’ll need one that can hold all the liquid without spilling over when it starts to simmer.
- Electric Mixer: While you can use a hand whisk, an electric mixer will make the process of creaming the butter for the custard filling much quicker and easier.
- Cooling Rack: Once the pastry layers are baked, let them cool on a wire rack to avoid sogginess and help them retain their crispness.
Step-by-Step Instructions
1. Make the Pastry Dough
Begin by preparing the pastry dough. In a large mixing bowl, combine the all-purpose flour, salt, and sugar. Cut the cold butter into small cubes and add it to the flour mixture. Use a pastry cutter or your hands to work the butter into the flour until the mixture resembles coarse crumbs. If you don’t have a pastry cutter, a fork or your fingertips will work fine.
Next, add the water to the mixture, a little at a time, mixing with your hands or a spoon until the dough comes together. You may not need to use all of the water, so add it slowly. Once the dough forms, divide it into two equal portions. Shape each portion into a disc, wrap it in plastic wrap, and refrigerate it for 30 minutes. Chilling the dough helps make the pastry flaky.
2. Roll Out the Dough
After the dough has chilled, remove it from the refrigerator. Preheat your oven to 350°F (175°C). Line a large baking sheet with parchment paper.
Take one portion of dough and roll it out on a lightly floured surface to about the size of your baking sheet (approximately 11×15 inches). Place the rolled-out dough onto the parchment-lined baking sheet and prick it with a fork to prevent it from puffing up too much while baking.
Repeat the process with the second portion of dough, and place the second sheet of dough on a separate baking sheet. This will give you two layers of pastry, which will later be stacked with custard in between.
3. Bake the Pastry Layers
Place both baking sheets in the preheated oven and bake for 25-30 minutes, or until the pastry layers are golden brown and crispy. Keep an eye on them to ensure they don’t over-brown. Once baked, remove the sheets from the oven and allow the pastry layers to cool completely on a wire rack.
4. Make the Custard Filling
While the pastry layers are cooling, it’s time to prepare the custard filling. In a medium saucepan, heat the milk and sugar over medium heat, stirring occasionally until the sugar dissolves.
In a separate bowl, whisk together the egg yolks, flour, and cornstarch until smooth. Gradually add a little of the hot milk mixture to the egg yolk mixture, whisking constantly to temper the eggs. Slowly pour the tempered egg mixture back into the saucepan with the remaining milk and stir well.
Continue cooking over medium heat, whisking constantly, until the mixture thickens and starts to boil. Once it reaches a thick custard consistency, remove it from the heat and stir in the vanilla extract and softened butter. The butter will melt into the custard, making it rich and velvety. Allow the custard to cool to room temperature.
5. Assemble the Cake
Once the pastry layers and custard have cooled, it’s time to assemble Karpatka. Place one layer of the baked pastry onto a serving platter. Spread the custard filling evenly over the pastry layer, smoothing it out with a spatula. Be gentle to avoid tearing the delicate pastry.
Place the second pastry layer on top of the custard, pressing it down lightly to help the layers stick together. Make sure the top pastry layer is aligned with the bottom layer for a neat presentation.
6. Chill the Cake
Cover the assembled Karpatka with plastic wrap or a clean kitchen towel and refrigerate it for at least 2 hours. Chilling the cake helps the layers set and makes it easier to slice.
7. Dust with Powdered Sugar
Before serving, dust the top of the cake with a generous amount of powdered sugar. This adds a beautiful, snowy finish to the cake and enhances its appearance.
8. Serve and Enjoy
Once the cake has chilled, slice it into squares or rectangles. Serve and enjoy the delightful combination of flaky pastry and creamy custard. Karpatka is perfect for any occasion, from family gatherings to festive celebrations.
Tips for Perfect Karpatka
- Chill the Dough Properly: Chilling the dough for at least 30 minutes is essential to achieving the desired flaky texture. Don’t skip this step.
- Don’t Overbake the Pastry: Watch the pastry closely while it bakes. Overbaking can cause it to become too dry or too hard, which will affect the texture of the finished cake.
- Make Sure the Custard Is Smooth: Whisk the custard constantly while it cooks to ensure a smooth texture. Any lumps will affect the final result.
- Allow the Cake to Set: Let the cake chill in the refrigerator for a couple of hours. This will help the flavors meld together and make the cake easier to slice.
Variations of Karpatka
- Chocolate Karpatka: Add a layer of chocolate ganache or cocoa powder to the custard filling to give the dessert a chocolatey twist. The rich chocolate flavor pairs beautifully with the buttery pastry and creamy custard.
- Fruit Karpatka: Layer some fresh berries or fruit between the custard and pastry for a fruity, refreshing variation. Strawberries, raspberries, or blueberries would complement the custard filling nicely.
- Almond Karpatka: For a nutty flavor, sprinkle chopped toasted almonds on top of the cake before dusting with powdered sugar. The almonds add a pleasant crunch and a slightly nutty flavor.
Storage and Shelf Life
Karpatka is best enjoyed fresh, but you can store leftovers in the refrigerator. Keep the cake covered with plastic wrap or in an airtight container to prevent it from drying out. The cake will stay fresh for up to 3 days in the fridge.
For longer storage, you can freeze the individual layers of pastry and custard separately. Once frozen, the layers can be assembled and chilled overnight for a quick dessert when needed.
Side Dishes and Pairings for Karpatka
Pair this rich dessert with complementary treats to enhance the experience:
- Coffee or Tea: Karpatka pairs wonderfully with a cup of coffee or a strong tea. The lightness of the drink balances the richness of the cake.
- Fruit Sorbet: A refreshing fruit sorbet, like lemon or raspberry, adds a bright and tart contrast to the sweetness of the cake.
- Polish Compote: A traditional Polish fruit compote made from stewed fruits like apples or pears offers a lovely balance to the sweetness of Karpatka.
Karpatka (Polish Carpathian Cream Cake) Recipe
- Total Time: 2 hours 30 minutes (including chilling and cooling)
Description
A beloved Polish dessert with layers of flaky puff pastry and a luscious, creamy custard filling. This traditional cake offers the perfect balance of textures and flavors, making it a decadent treat for any special occasion or just a sweet indulgence.
Ingredients
For the Pastry:
-
2 cups all-purpose flour
-
1 cup unsalted butter (cold and cubed)
-
1/2 cup water
-
1 teaspoon sugar
-
1/4 teaspoon salt
-
1/2 teaspoon vanilla extract (optional)
For the Custard Filling:
-
2 cups whole milk
-
1/2 cup sugar
-
2 tablespoons all-purpose flour
-
2 tablespoons cornstarch
-
4 large egg yolks
-
1 teaspoon vanilla extract
-
1/2 cup unsalted butter (cubed and softened)
For the Topping:
-
Powdered sugar (for dusting)
Instructions
Begin by preparing the pastry dough. In a large mixing bowl, combine the all-purpose flour, salt, and sugar. Cut the cold butter into small cubes and add it to the flour mixture. Use a pastry cutter or your hands to work the butter into the flour until the mixture resembles coarse crumbs. If you don’t have a pastry cutter, a fork or your fingertips will work fine.
Next, add the water to the mixture, a little at a time, mixing with your hands or a spoon until the dough comes together. You may not need to use all of the water, so add it slowly. Once the dough forms, divide it into two equal portions. Shape each portion into a disc, wrap it in plastic wrap, and refrigerate it for 30 minutes. Chilling the dough helps make the pastry flaky.
After the dough has chilled, remove it from the refrigerator. Preheat your oven to 350°F (175°C). Line a large baking sheet with parchment paper.
Take one portion of dough and roll it out on a lightly floured surface to about the size of your baking sheet (approximately 11×15 inches). Place the rolled-out dough onto the parchment-lined baking sheet and prick it with a fork to prevent it from puffing up too much while baking.
Repeat the process with the second portion of dough, and place the second sheet of dough on a separate baking sheet. This will give you two layers of pastry, which will later be stacked with custard in between.
Place both baking sheets in the preheated oven and bake for 25-30 minutes, or until the pastry layers are golden brown and crispy. Keep an eye on them to ensure they don’t over-brown. Once baked, remove the sheets from the oven and allow the pastry layers to cool completely on a wire rack.
While the pastry layers are cooling, it’s time to prepare the custard filling. In a medium saucepan, heat the milk and sugar over medium heat, stirring occasionally until the sugar dissolves.
In a separate bowl, whisk together the egg yolks, flour, and cornstarch until smooth. Gradually add a little of the hot milk mixture to the egg yolk mixture, whisking constantly to temper the eggs. Slowly pour the tempered egg mixture back into the saucepan with the remaining milk and stir well.
Continue cooking over medium heat, whisking constantly, until the mixture thickens and starts to boil. Once it reaches a thick custard consistency, remove it from the heat and stir in the vanilla extract and softened butter. The butter will melt into the custard, making it rich and velvety. Allow the custard to cool to room temperature.
Once the pastry layers and custard have cooled, it’s time to assemble Karpatka. Place one layer of the baked pastry onto a serving platter. Spread the custard filling evenly over the pastry layer, smoothing it out with a spatula. Be gentle to avoid tearing the delicate pastry.
Place the second pastry layer on top of the custard, pressing it down lightly to help the layers stick together. Make sure the top pastry layer is aligned with the bottom layer for a neat presentation.
Cover the assembled Karpatka with plastic wrap or a clean kitchen towel and refrigerate it for at least 2 hours. Chilling the cake helps the layers set and makes it easier to slice.
Before serving, dust the top of the cake with a generous amount of powdered sugar. This adds a beautiful, snowy finish to the cake and enhances its appearance.
Once the cake has chilled, slice it into squares or rectangles. Serve and enjoy the delightful combination of flaky pastry and creamy custard. Karpatka is perfect for any occasion, from family gatherings to festive celebrations.
- Prep Time: 30 minutes
- Cook Time: 1 hour (for baking the pastry)
Nutrition
- Calories: 350-400 kcal
- Fat: 25-30g
- Carbohydrates: 35-40g
- Protein: 5g
Conclusion
Karpatka, or Polish Carpathian Cream Cake, is a rich and delicious dessert that brings together flaky pastry and smooth custard in a way that’s both satisfying and light. This traditional Polish treat is perfect for any special occasion or gathering, and with its impressive appearance and comforting flavors, it’s sure to be a hit with guests. Try making Karpatka today, and enjoy a slice of Polish culinary history!


