
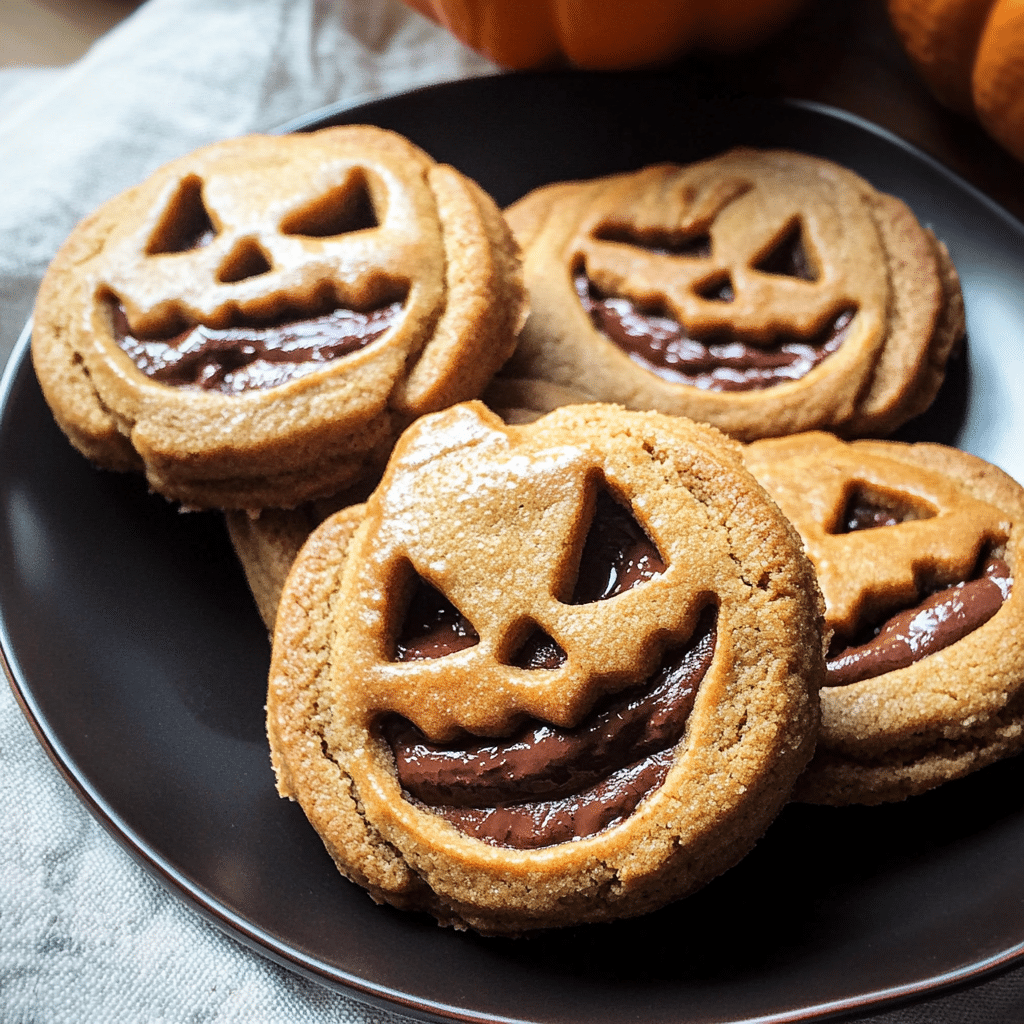
When it comes to Halloween baking, these Milk Chocolate Stuffed Jack-O’-Lantern Cookies are the perfect blend of fun and flavor! Picture this: golden, chewy cookies with a delightful surprise of gooey chocolate hidden inside. With their cute jack-o’-lantern faces, these cookies are not only a treat for your taste buds but also an eye-catching addition to any Halloween spread.
I first whipped up a batch of these cookies for a Halloween party at my kids’ school. Watching their faces light up when they saw the pumpkin designs and the ooey-gooey chocolate center was priceless! Since then, these cookies have become a Halloween staple in our home. They’re easy to make, and I love that I can involve my kids in the decorating process. Plus, they make great gifts for neighbors or friends during the spooky season!
Ready to get baking? Let’s dive into this delightful recipe that will make your Halloween celebrations even sweeter!
Why You’ll Love This Recipe
Fun and Festive Design
These cookies are shaped like jack-o’-lanterns, making them a perfect Halloween treat. The playful designs will impress both kids and adults, and they’re sure to spark joy at any gathering.
Chocolatey Surprise
The rich, melted milk chocolate tucked inside adds an indulgent twist that takes these cookies to the next level. It’s a delicious surprise that will have everyone reaching for seconds!
Simple Ingredients
Made with common pantry staples, this recipe is accessible even for novice bakers. You won’t need any fancy equipment or hard-to-find ingredients, making it a breeze to whip up.
Perfect for Sharing
These cookies are ideal for sharing at Halloween parties, handing out to trick-or-treaters, or simply enjoying at home. They’re sure to become a favorite among friends and family!
Preparation Time and Servings
- Prep Time: 20 minutes
- Cook Time: 10-12 minutes
- Total Time: 30-35 minutes
- Servings: 24 cookies
Nutrition Facts (per cookie):
- Calories: 180
- Protein: 2g
- Carbohydrates: 24g
- Fat: 9g
- Sugar: 12g
- Fiber: 1g
Ingredients
Here’s what you’ll need to create these adorable Milk Chocolate Stuffed Jack-O’-Lantern Cookies:
For the Cookie Dough:
- 2 ½ cups all-purpose flour: The main structure of your cookies.
- 1 tsp baking soda: Helps the cookies rise and stay soft.
- ½ tsp salt: Enhances the flavors.
- ¾ cup unsalted butter, softened: Provides richness and moisture.
- 1 cup granulated sugar: Sweetens the cookies and contributes to their texture.
- ½ cup brown sugar, packed: Adds depth of flavor and chewiness.
- 2 large eggs: Binds the ingredients together.
- 1 tsp vanilla extract: Enhances the overall flavor.
- 1 tsp pumpkin spice (optional): Adds a warm, seasonal touch.
For the Filling:
- 1 cup milk chocolate chips: The star of the show, creating a delicious chocolate center.
For Decoration:
- Orange and green icing: To create the jack-o’-lantern faces and stems.
- Candy eyes (optional): For an extra fun touch.
Step-by-Step Instructions
Making these Milk Chocolate Stuffed Jack-O’-Lantern Cookies is a fun and rewarding experience. Follow these easy steps to bake up a batch:
Step 1: Preheat Your Oven
Begin by preheating your oven to 350°F (175°C). Line two baking sheets with parchment paper to prevent sticking.
Step 2: Mix the Dry Ingredients
In a medium bowl, whisk together the flour, baking soda, and salt. If you’re using pumpkin spice, add it in as well. This ensures an even distribution of the leavening agent.
Step 3: Cream the Butters and Sugars
In a large mixing bowl, beat the softened butter, granulated sugar, and brown sugar together until light and fluffy, about 3-4 minutes. This is a crucial step for a soft, chewy texture.
Step 4: Add Eggs and Vanilla
Add the eggs, one at a time, mixing well after each addition. Then, stir in the vanilla extract until fully combined.
Step 5: Combine Wet and Dry Ingredients
Gradually add the flour mixture to the butter mixture, mixing just until combined. Be careful not to overmix, as this can lead to tough cookies.
Step 6: Prepare the Chocolate Filling
Using a small cookie scoop or tablespoon, portion out the milk chocolate chips. Set them aside; you’ll be using them in the next step.
Step 7: Shape the Cookies
Using a tablespoon of cookie dough, flatten it in your palm and place a few chocolate chips in the center. Then, wrap the dough around the chocolate, rolling it into a ball. Make sure the chocolate is fully enclosed.
Step 8: Place on Baking Sheet
Arrange the cookie dough balls on the prepared baking sheets, leaving space between each one for spreading.
Step 9: Bake the Cookies
Bake in the preheated oven for 10-12 minutes or until the edges are lightly golden. The centers may look slightly underbaked, but they’ll firm up as they cool.
Step 10: Cool the Cookies
Allow the cookies to cool on the baking sheet for about 5 minutes before transferring them to wire racks to cool completely.
Step 11: Decorate Your Cookies
Once the cookies are completely cool, it’s time to decorate! Using orange icing, pipe jack-o’-lantern faces on the cookies. Use green icing for the pumpkin stems. If you want to add candy eyes, now’s the time!
Step 12: Enjoy!
Your Milk Chocolate Stuffed Jack-O’-Lantern Cookies are now ready to be enjoyed! Serve them at your Halloween party or share them with friends and family.
How to Serve
These adorable cookies are perfect for any Halloween occasion! Here are some serving suggestions:
- Halloween Party Treats: Place a platter of these cookies on your dessert table for a fun and festive treat.
- Goody Bags: Wrap individual cookies in clear bags tied with a ribbon for cute party favors.
- Family Movie Night: Enjoy these cookies while watching your favorite Halloween movies for a cozy night in.
Additional Tips
Here are some tips to ensure your cookies turn out perfectly:
- Room Temperature Ingredients: Make sure your butter and eggs are at room temperature for a smoother dough.
- Chill the Dough: If the dough feels too soft to handle, chill it in the refrigerator for 15-30 minutes before shaping.
- Use Piping Bags: For decorating, piping bags make it easier to create fun designs.
- Watch the Baking Time: Keep an eye on the cookies while they bake to avoid over-baking.
- Storage: Store leftover cookies in an airtight container at room temperature for up to a week.
Recipe Variations
Want to mix things up? Here are some fun variations you can try:
- Different Fillings: Swap out the milk chocolate chips for white chocolate or butterscotch chips for a different flavor profile.
- Spiced Cookies: Add a pinch of cinnamon or nutmeg to the dough for a more autumnal flavor.
- Nutty Addition: Toss in some chopped nuts, like pecans or walnuts, for added crunch.
Serving Suggestions
Enhance your cookie experience with these complementary ideas:
- Festive Drinks: Pair your cookies with apple cider or a pumpkin spice latte for a delightful seasonal treat.
- Halloween Desserts: Serve alongside other Halloween-themed desserts like cupcakes or brownies for a dessert buffet.
- Ice Cream Sandwiches: Sandwich a scoop of vanilla or pumpkin ice cream between two cookies for an indulgent treat.
Freezing and Storage
If you want to make these cookies ahead of time or save some for later, here’s how to do it:
- Storage: Keep cookies in an airtight container at room temperature for up to 7 days.
- Freezing: Freeze unbaked cookie dough balls on a baking sheet until firm, then transfer to a freezer bag. They can be frozen for up to 3 months. Bake directly from the freezer, adding a couple of minutes to the baking time.
Special Equipment
Here’s what you’ll need to make these delicious cookies:
- Mixing Bowls: For mixing the dough and decorating.
- Baking Sheets: To bake your cookies.
- Parchment Paper: Prevents sticking and makes cleanup easier.
- Piping Bags: For decorating the cookies with icing.
- Cookie Scoop: For evenly portioned cookies.
FAQ Section
Can I use dark chocolate instead of milk chocolate?
Absolutely! Dark chocolate will add a richer flavor to the cookies.
What if I don’t have pumpkin spice?
No problem! You can simply leave it out or substitute with cinnamon or nutmeg for a different taste.
Can I make these cookies gluten-free?
Yes! Use a 1:1 gluten-free flour blend in place of all-purpose flour.
How do I know when my cookies are done baking?
Look for the edges to be lightly golden while the center looks slightly underbaked. They’ll continue to firm up as they cool.
Can I freeze baked cookies?
Yes! Once baked, let the cookies cool completely, then freeze them in an airtight container for up to 3 months.
Conclusion
These Milk Chocolate Stuffed Jack-O’-Lantern Cookies are sure to become a Halloween favorite in your home! Not only are they fun to make and decorate, but they also offer a delicious treat that everyone will love. Whether you’re baking with family, sharing with friends, or enjoying them during a spooky movie night, these cookies will add a festive touch to your celebrations.
I can’t wait for you to try this recipe! Don’t forget to share your cookie creations on social media and tag me—I love seeing how you bring these festive treats to life. Enjoy every chocolatey bite, and have a spooktacular Halloween!
Print
Milk Chocolate Stuffed Jack-O’-Lantern Cookies: Spooktacular Treats for Halloween
- Total Time: 30-35 minutes
Ingredients
For the Cookie Dough:
- 2 ½ cups all-purpose flour: The main structure of your cookies.
- 1 tsp baking soda: Helps the cookies rise and stay soft.
- ½ tsp salt: Enhances the flavors.
- ¾ cup unsalted butter, softened: Provides richness and moisture.
- 1 cup granulated sugar: Sweetens the cookies and contributes to their texture.
- ½ cup brown sugar, packed: Adds depth of flavor and chewiness.
- 2 large eggs: Binds the ingredients together.
- 1 tsp vanilla extract: Enhances the overall flavor.
- 1 tsp pumpkin spice (optional): Adds a warm, seasonal touch.
For the Filling:
- 1 cup milk chocolate chips: The star of the show, creating a delicious chocolate center.
For Decoration:
- Orange and green icing: To create the jack-o’-lantern faces and stems.
- Candy eyes (optional): For an extra fun touch.
Instructions
Step 1: Preheat Your Oven
Begin by preheating your oven to 350°F (175°C). Line two baking sheets with parchment paper to prevent sticking.
Step 2: Mix the Dry Ingredients
In a medium bowl, whisk together the flour, baking soda, and salt. If you’re using pumpkin spice, add it in as well. This ensures an even distribution of the leavening agent.
Step 3: Cream the Butters and Sugars
In a large mixing bowl, beat the softened butter, granulated sugar, and brown sugar together until light and fluffy, about 3-4 minutes. This is a crucial step for a soft, chewy texture.
Step 4: Add Eggs and Vanilla
Add the eggs, one at a time, mixing well after each addition. Then, stir in the vanilla extract until fully combined.
Step 5: Combine Wet and Dry Ingredients
Gradually add the flour mixture to the butter mixture, mixing just until combined. Be careful not to overmix, as this can lead to tough cookies.
Step 6: Prepare the Chocolate Filling
Using a small cookie scoop or tablespoon, portion out the milk chocolate chips. Set them aside; you’ll be using them in the next step.
Step 7: Shape the Cookies
Using a tablespoon of cookie dough, flatten it in your palm and place a few chocolate chips in the center. Then, wrap the dough around the chocolate, rolling it into a ball. Make sure the chocolate is fully enclosed.
Step 8: Place on Baking Sheet
Arrange the cookie dough balls on the prepared baking sheets, leaving space between each one for spreading.
Step 9: Bake the Cookies
Bake in the preheated oven for 10-12 minutes or until the edges are lightly golden. The centers may look slightly underbaked, but they’ll firm up as they cool.
Step 10: Cool the Cookies
Allow the cookies to cool on the baking sheet for about 5 minutes before transferring them to wire racks to cool completely.
Step 11: Decorate Your Cookies
Once the cookies are completely cool, it’s time to decorate! Using orange icing, pipe jack-o’-lantern faces on the cookies. Use green icing for the pumpkin stems. If you want to add candy eyes, now’s the time!
Step 12: Enjoy!
Your Milk Chocolate Stuffed Jack-O’-Lantern Cookies are now ready to be enjoyed! Serve them at your Halloween party or share them with friends and family.
- Prep Time: 20 minutes
- Cook Time: 10-12minutes
Nutrition
- Calories: 180 kcal
- Fat: 9g
- Carbohydrates: 24g
- Protein: 2g


