Description
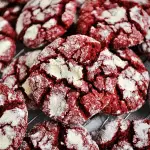
Red Velvet Crinkle Cookies are a stunning and indulgent dessert with a rich, velvety texture and a vibrant red color. These cookies have a soft, cake-like interior that melts in your mouth, and a crackly, powdered sugar-coated exterior. The subtle cocoa flavor paired with the tangy cream cheese undertones gives these cookies a distinct red velvet taste, while the crinkled surface adds to their visual appeal. Perfect for any special occasion or holiday, these cookies combine the beauty and deliciousness of red velvet cake in a bite-sized treat.
Ingredients
- 2 1/2 cups all-purpose flour: The main dry ingredient that gives structure to the cookies.
- 1 tablespoon cocoa powder: Provides the classic red velvet flavor with a subtle chocolate taste.
- 1/2 teaspoon baking powder: Helps the cookies rise, making them light and chewy.
- 1/2 teaspoon baking soda: Works in combination with the buttermilk to help the cookies spread and rise.
- 1/2 teaspoon salt: Balances the sweetness and enhances the flavor.
- 1 cup unsalted butter, softened: Adds richness and ensures a smooth dough.
- 1 cup granulated sugar: Sweetens the dough and contributes to the crisp crinkle effect.
- 1/2 cup cream cheese, softened: Gives the cookies their soft, chewy texture.
- 2 large eggs: Provide structure to the dough and help bind the ingredients together.
- 1 tablespoon red food coloring: The star ingredient that gives the cookies their bold red color.
- 1 teaspoon vanilla extract: Adds warmth and depth of flavor.
- 1/4 cup buttermilk (or milk with a splash of vinegar): Adds a slight tang and helps the cookies stay soft.
- 1/2 cup powdered sugar: Used for rolling the dough balls to create the signature crinkle effect.
Instructions
STEP 1: PREPARE THE OVEN AND COOKIE SHEET
Start by preheating your oven to 350°F (175°C). Line a baking sheet with parchment paper or a silicone baking mat to prevent the cookies from sticking and to help them bake evenly.
STEP 2: COMBINE THE DRY INGREDIENTS
In a medium bowl, whisk together the flour, cocoa powder, baking powder, baking soda, and salt. This ensures that all the dry ingredients are well mixed and that the baking powder and baking soda are evenly distributed throughout the flour. Set this mixture aside.
STEP 3: CREAM TOGETHER THE BUTTER AND CREAM CHEESE
In a large mixing bowl, beat the softened butter and cream cheese together using an electric mixer or stand mixer on medium speed until the mixture is light and fluffy. This usually takes about 2-3 minutes. The cream cheese adds a creamy texture to the cookies, making them soft and melt-in-your-mouth delicious.
STEP 4: ADD SUGAR, EGGS, AND FOOD COLORING
Add the granulated sugar to the butter-cream cheese mixture and beat until it’s fully combined and fluffy. Then, add the eggs one at a time, mixing well after each addition. Add the red food coloring and vanilla extract, and mix until the dough is a uniform red color. The amount of food coloring can be adjusted to achieve the intensity of red you desire.
STEP 5: COMBINE THE DRY AND WET INGREDIENTS
Gradually add the dry ingredient mixture to the wet ingredients, mixing on low speed until the dough comes together. The dough should be thick and slightly sticky. If it’s too soft to handle, you can chill it in the refrigerator for about 30 minutes to firm it up before proceeding.
STEP 6: ROLL THE DOUGH INTO BALLS
Once the dough has chilled (if necessary), scoop tablespoon-sized portions of dough and roll them into balls using your hands. Roll each dough ball in powdered sugar until it’s generously coated. This powdered sugar coating is what gives the cookies their signature crinkle effect when they bake.
STEP 7: BAKE
Place the sugar-coated dough balls on the prepared baking sheet, spacing them about 2 inches apart to allow room for the cookies to spread while baking. Bake in the preheated oven for 10-12 minutes, or until the edges are set but the centers are still soft. Be careful not to overbake, as the cookies should remain soft and chewy in the middle.
STEP 8: COOL AND SERVE
Let the cookies cool on the baking sheet for 5 minutes before transferring them to a wire rack to cool completely. This helps the cookies set and prevents them from breaking apart while still warm. Once they have cooled completely, they’re ready to enjoy!
- Prep Time: 25 minutes
- Baking and Chilling Time: 15 minutes baking, 30 minutes chilling
Nutrition
- Calories: 180 kcal
- Fat: 9g
- Carbohydrates: 25g
- Protein: 2g
