

Introduction
As the leaves start to turn and the air gets a little crisp, it’s time to embrace the spookiness of Halloween! One of my favorite ways to celebrate this festive season is by whipping up a Spooky Graham Cake. This dessert is not only easy to make but also incredibly fun to decorate. With its creamy layers and festive toppings, it’s the perfect treat for parties, school events, or even just a cozy night in with family.
I remember the first time I made this cake for a Halloween gathering. The kids were thrilled to help with the decorations, and it quickly became a tradition in our household. There’s something magical about creating a dessert that’s both delicious and visually captivating. We’ve had so much fun experimenting with different toppings and spooky designs. Now, every Halloween, my kitchen is filled with laughter and creativity as we bring this cake to life.
If you’re looking for a dessert that’s both fun to make and delicious to eat, this Spooky Graham Cake is the way to go. It’s simple enough for even novice bakers to tackle, and I promise it will impress everyone at your gathering. Let’s dive in and get started!
Why You’ll Love This Recipe
- Easy to Make: This cake requires no baking! With just a few simple ingredients and steps, you can create a delicious dessert.
- Kid-Friendly: Perfect for little hands to help with, making it a great family activity. Kids will love assembling the cake and getting creative with the decorations.
- Customizable: You can easily modify the flavors and toppings to suit your preferences. Whether you want to go for chocolate, vanilla, or even pumpkin flavors, the possibilities are endless!
- Visually Stunning: This cake is sure to be a showstopper at any Halloween party. Its spooky design will have everyone reaching for their cameras before they take a bite.
- Deliciously Indulgent: With layers of creamy goodness, this cake is a treat for the taste buds. The combination of flavors and textures will leave everyone wanting more.
Preparation Time and Servings
- Total Time: About 30 minutes (plus chilling time)
- Servings: Serves approximately 12
- Nutrition Facts: Approximately 200 calories per serving, 3g protein, 28g carbs.
Ingredients
Here’s what you’ll need to create your Spooky Graham Cake:
- 2 packages of graham crackers: These form the base of your cake and provide a delightful crunch.
- 1 cup of heavy cream: For whipping into fluffy whipped cream, which will add lightness and richness to the cake.
- 1 cup of powdered sugar: To sweeten the whipped cream and give it a lovely texture.
- 1 cup of cream cheese: Softened to blend smoothly with the whipped cream, adding a rich, tangy flavor.
- 1 teaspoon of vanilla extract: For a hint of sweetness and flavor.
- Food coloring (optional): To make your whipped cream spooky colors—think greens, purples, or even orange for a Halloween twist.
- Halloween-themed toppings: Think candy corn, gummy worms, chocolate sprinkles, and edible eyes to bring your spooky cake to life!
Step-by-Step Instructions
Ready to create your spooky dessert? Here’s how to make the Spooky Graham Cake step by step:
- Prepare Your Workspace: Start by gathering all your ingredients and tools. You’ll need a mixing bowl, a hand mixer (or stand mixer), and a 9×13-inch baking dish.
- Make the Whipped Cream: In a large mixing bowl, combine the heavy cream, powdered sugar, and vanilla extract. Using a hand mixer, whip the mixture until soft peaks form. Be careful not to overbeat it; you want it to be light and fluffy.
- Add the Cream Cheese: In another bowl, beat the softened cream cheese until smooth. Gradually fold the whipped cream into the cream cheese until well combined. This will create a luscious filling for your cake.
- Color the Whipped Cream (Optional): If you want to add some color to your whipped cream, separate a portion into small bowls and add a few drops of food coloring. Get creative! You could make green “slime” or purple “spookiness.”
- Layer the Cake: Start by placing a layer of graham crackers at the bottom of your baking dish. Spread a layer of the cream mixture over the crackers. Repeat the layers until you’ve used all your ingredients, finishing with a layer of the cream mixture on top.
- Chill the Cake: Cover the dish with plastic wrap and place it in the refrigerator. Let the cake chill for at least 4 hours, or ideally overnight. This helps the flavors meld together and allows the graham crackers to soften into a delicious cake-like texture.
- Decorate the Cake: Once chilled, it’s time to get spooky! Use the remaining whipped cream to create a fun design on top. Scatter your Halloween-themed toppings to create a festive look. Use candy corn for ghosts, gummy worms for creepy critters, and edible eyes for an extra fun touch.
- Serve and Enjoy: Slice the cake into squares and serve it to your guests. Watch as their faces light up at the spooky design and delicious flavors!
How to Serve
This Spooky Graham Cake is perfect for Halloween gatherings, but it can also be enjoyed at any festive occasion. Here are some fun serving ideas:
- Spooky Dessert Table: Include your cake on a dessert table filled with other Halloween treats, like cookies, cupcakes, and candy. Add some Halloween-themed decorations to enhance the festive vibe.
- Individual Portions: For a fun twist, you can serve the cake in individual cups or jars. Layer the graham crackers and cream mixture in small cups for easy serving.
- Accompanied by Beverages: Serve your cake alongside some festive beverages, like apple cider or a spooky punch. Add some floating gummy eyeballs for a fun touch!
Additional Tips
To ensure your Spooky Graham Cake turns out perfectly, consider these helpful tips:
- Use Fresh Ingredients: Make sure your heavy cream and cream cheese are fresh for the best flavor and texture. This will make a noticeable difference in the final product.
- Soften the Cream Cheese: Let the cream cheese sit at room temperature for about 30 minutes before using it. This will help it blend smoothly into the whipped cream.
- Chill for Best Results: Don’t skip the chilling time! Allowing the cake to chill helps the flavors meld together and creates a firmer texture, making it easier to slice.
- Customize Your Toppings: Get creative with your decorations! Use whatever Halloween candies you love, and don’t be afraid to think outside the box.
- Make Ahead: This cake can be made a day or two in advance, making it a great option for busy Halloween schedules. Just store it covered in the fridge until you’re ready to serve.
Recipe Variations
There are plenty of ways to customize your Spooky Graham Cake! Here are some fun variations to try:
- Chocolate Graham Crackers: Swap regular graham crackers for chocolate ones for a richer flavor. The combination of chocolate and creamy filling is sure to delight!
- Pumpkin Spice Cream: Add some pumpkin puree and pumpkin pie spice to your cream mixture for a seasonal twist. This will make your cake even more festive for fall!
- Fruit Layers: Incorporate layers of sliced strawberries or bananas between the graham cracker layers for added flavor and freshness. This will add a lovely fruity contrast to the creamy filling.
- Ghostly Topping: Instead of traditional toppings, use whipped cream to pipe little ghost shapes on top of your cake. Use chocolate chips for the eyes!
Serving Suggestions
To complement your Spooky Graham Cake, consider these fun side treats and beverages:
- Halloween Cookies: Pair with themed cookies, like sugar cookies decorated as pumpkins or bats. They’ll add variety to your dessert spread.
- Spooky Milkshakes: Serve with spooky milkshakes made with chocolate or vanilla ice cream. Top with whipped cream and Halloween sprinkles for a festive touch!
- Ghoulish Fruit: Add a platter of seasonal fruits, like apples and pears, which are perfect for dipping into caramel sauce. This adds a healthier option to your dessert table.
Freezing and Storage
If you have any leftovers (which is unlikely!), here’s how to store or freeze them:
- Storage: Keep your Spooky Graham Cake covered in the refrigerator for up to 3 days. It tastes great chilled, and the flavors will continue to meld.
- Freezing: While I recommend enjoying this cake fresh, you can freeze individual slices. Just wrap them tightly in plastic wrap and then in aluminum foil. They can be frozen for up to a month. Thaw in the refrigerator before serving.
Special Equipment
You won’t need much equipment for this dessert, but here are a couple of handy items that can help:
- Mixing Bowls: Having a few different sizes on hand makes it easier to mix your ingredients.
- Hand Mixer or Stand Mixer: This will make whipping the cream and blending the cream cheese a breeze.
- 9×13-inch Baking Dish: For layering your cake. If you want to make individual servings, small cups or jars work great!
FAQ Section
Can I use whipped topping instead of heavy cream?
Yes! You can substitute whipped topping for the heavy cream to save time, but the texture and flavor will differ slightly.
What if I don’t have cream cheese?
You can replace cream cheese with mascarpone or Greek yogurt for a different flavor profile, though it may alter the taste a bit.
Can I make this cake gluten-free?
Yes! Use gluten-free graham crackers to make this cake suitable for a gluten-free diet.
How do I make it less sweet?
You can reduce the amount of powdered sugar in the whipped cream mixture or use a sugar substitute that works for your needs.
Can I use store-bought whipped cream?
Absolutely! Store-bought whipped cream can save time, but making it fresh gives a richer flavor.
Conclusion
I’m so excited for you to try this Spooky Graham Cake! It’s a fun and easy dessert that brings a touch of magic to your Halloween celebrations. With its creamy layers and spooky decorations, it’s sure to be a hit with kids and adults alike.
Once you’ve made your cake, I’d love to see how it turns out! Snap a picture and tag me on social media. Happy Halloween, and enjoy every spooky bite of your delicious creation! Here’s to making memories with loved ones and enjoying the sweetness of the season!
Print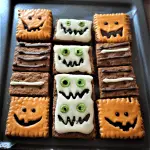
Spooky Graham Cake: A Delightfully Easy Halloween Dessert
- Total Time: 30 minutes
Ingredients
- 2 packages of graham crackers: These form the base of your cake and provide a delightful crunch.
- 1 cup of heavy cream: For whipping into fluffy whipped cream, which will add lightness and richness to the cake.
- 1 cup of powdered sugar: To sweeten the whipped cream and give it a lovely texture.
- 1 cup of cream cheese: Softened to blend smoothly with the whipped cream, adding a rich, tangy flavor.
- 1 teaspoon of vanilla extract: For a hint of sweetness and flavor.
- Food coloring (optional): To make your whipped cream spooky colors—think greens, purples, or even orange for a Halloween twist.
- Halloween-themed toppings: Think candy corn, gummy worms, chocolate sprinkles, and edible eyes to bring your spooky cake to life!
Instructions
- Prepare Your Workspace: Start by gathering all your ingredients and tools. You’ll need a mixing bowl, a hand mixer (or stand mixer), and a 9×13-inch baking dish.
- Make the Whipped Cream: In a large mixing bowl, combine the heavy cream, powdered sugar, and vanilla extract. Using a hand mixer, whip the mixture until soft peaks form. Be careful not to overbeat it; you want it to be light and fluffy.
- Add the Cream Cheese: In another bowl, beat the softened cream cheese until smooth. Gradually fold the whipped cream into the cream cheese until well combined. This will create a luscious filling for your cake.
- Color the Whipped Cream (Optional): If you want to add some color to your whipped cream, separate a portion into small bowls and add a few drops of food coloring. Get creative! You could make green “slime” or purple “spookiness.”
- Layer the Cake: Start by placing a layer of graham crackers at the bottom of your baking dish. Spread a layer of the cream mixture over the crackers. Repeat the layers until you’ve used all your ingredients, finishing with a layer of the cream mixture on top.
- Chill the Cake: Cover the dish with plastic wrap and place it in the refrigerator. Let the cake chill for at least 4 hours, or ideally overnight. This helps the flavors meld together and allows the graham crackers to soften into a delicious cake-like texture.
- Decorate the Cake: Once chilled, it’s time to get spooky! Use the remaining whipped cream to create a fun design on top. Scatter your Halloween-themed toppings to create a festive look. Use candy corn for ghosts, gummy worms for creepy critters, and edible eyes for an extra fun touch.
- Serve and Enjoy: Slice the cake into squares and serve it to your guests. Watch as their faces light up at the spooky design and delicious flavors!
- Prep Time: 15 minutes
- Chilling Time: 15 minutes
Nutrition
- Serving Size: Per Serving
- Calories: 200 kcal
- Carbohydrates: 28g
- Protein: 3g


