
Introduction
When the weather heats up, few desserts are as refreshing and delightful as a Strawberry Shortcake Fridge Cake. With its creamy filling, fresh strawberries, and soft, moist cake layers, this no-bake dessert is the perfect choice for summer gatherings or any occasion when you want something easy, indulgent, and utterly delicious. Forget about the oven and the long baking times; this recipe is all about convenience and flavor.
Strawberry shortcake has long been a beloved dessert, celebrated for its simplicity and deliciousness. But this fridge cake takes it a step further by transforming the classic into a no-bake treat that’s as perfect for a warm evening as it is for a holiday party. With layers of whipped cream, cream cheese, and sweet strawberries paired with soft graham crackers or sponge cake, this dessert has everything you could want: texture, flavor, and a bit of elegance.
Whether you’re making it for a birthday, a family barbecue, or a casual weeknight treat, this Strawberry Shortcake Fridge Cake will quickly become a crowd favorite. Let’s dive into what makes this recipe so special, why you’ll love it, and how to make it perfectly every time.
Why You’ll Love This Recipe
- No-Bake Convenience: One of the best parts of this recipe is that it requires no baking, making it a perfect choice for hot summer days when you don’t want to turn on the oven.
- Perfect for Summer: The combination of cool cream, fresh strawberries, and light layers makes this the ideal dessert to serve during warmer months. It’s refreshing, satisfying, and light without being overly heavy.
- Simple Ingredients: This recipe uses just a few basic ingredients. You don’t need to hunt for specialty items—everything is easy to find at your local grocery store.
- Easy to Make: Despite looking like an elegant dessert, this fridge cake is incredibly easy to assemble. No complicated steps or advanced baking skills are required, making it accessible for cooks of all levels.
- Customizable: While strawberries are the star here, you can mix it up by using other fruits or even different types of cookies or cakes. This means you can make this dessert work for any season or occasion.
- Impressive Yet Simple: With its creamy layers and fresh fruit garnish, this cake has a beautiful, professional-looking finish—perfect for impressing your guests without spending hours in the kitchen.
- Make-Ahead Option: This cake is an ideal dessert for busy days. You can prepare it in advance, letting it set in the fridge overnight, so when it’s time to serve, you’re stress-free.
Preparation Time and Servings
- Total Time: 4 hours (with chilling time)
- Servings: 8-10 people
- Nutrition Facts (per serving): Calories: 350, Protein: 4g, Carbs: 40g, Fat: 22g
Ingredients
For the Cake:
- 1 1/2 pounds fresh strawberries (about 3 cups), hulled and sliced
- 2 cups heavy whipping cream
- 8 oz cream cheese (softened)
- 1/2 cup powdered sugar (adjust to taste)
- 1 teaspoon vanilla extract
- 1 box (about 10-12 oz) graham crackers or sponge cake (you can also use ladyfingers)
- 1/2 cup milk (for soaking the cookies)
For the Topping:
- Fresh strawberries (additional for garnish, sliced)
- Mint leaves (optional, for garnish)
- Extra whipped cream (optional, for garnish)
Step-by-Step Instructions
Step 1: Prepare the Strawberries
The first step in this delicious recipe is to prepare the fresh strawberries. Start by hulling them—removing the green leaves and stems. You can do this easily by using a small paring knife or a strawberry huller. Once hulled, slice the strawberries into thin, even slices. These slices will be layered throughout the dessert, so uniformity is key for both presentation and taste.
If your strawberries aren’t very sweet, you can sprinkle a tablespoon of sugar over the slices and let them sit for 10-15 minutes. This step helps the strawberries release their natural juices, creating a sweet syrup that will soak into the layers of cake, enhancing the flavor. It’s a simple trick to ensure that your dessert is perfectly sweet, even if the berries are a little tart.
Step 2: Make the Creamy Filling
Next, it’s time to prepare the luscious cream filling that will be the base of your cake. Begin by softening the cream cheese. This is an important step, as cold cream cheese can result in lumps when mixed. You can soften it by leaving it out at room temperature for 30 minutes or gently microwaving it for 10-15 seconds.
Once softened, place the cream cheese in a large mixing bowl. Add the powdered sugar and vanilla extract. Use a hand mixer or stand mixer to beat these ingredients together until the mixture is smooth and fluffy. The cream cheese should blend seamlessly with the sugar and vanilla, creating a soft, creamy base.
In a separate bowl, whip the heavy cream using an electric mixer until soft peaks form. This can take anywhere from 3-5 minutes, depending on the temperature of the cream. If you’re using a hand whisk, it will take longer, but it’s still worth the effort! Once whipped, gently fold the whipped cream into the cream cheese mixture, using a spatula. The result should be a fluffy, airy, and thick cream filling that holds its shape.
Step 3: Assemble the Cake
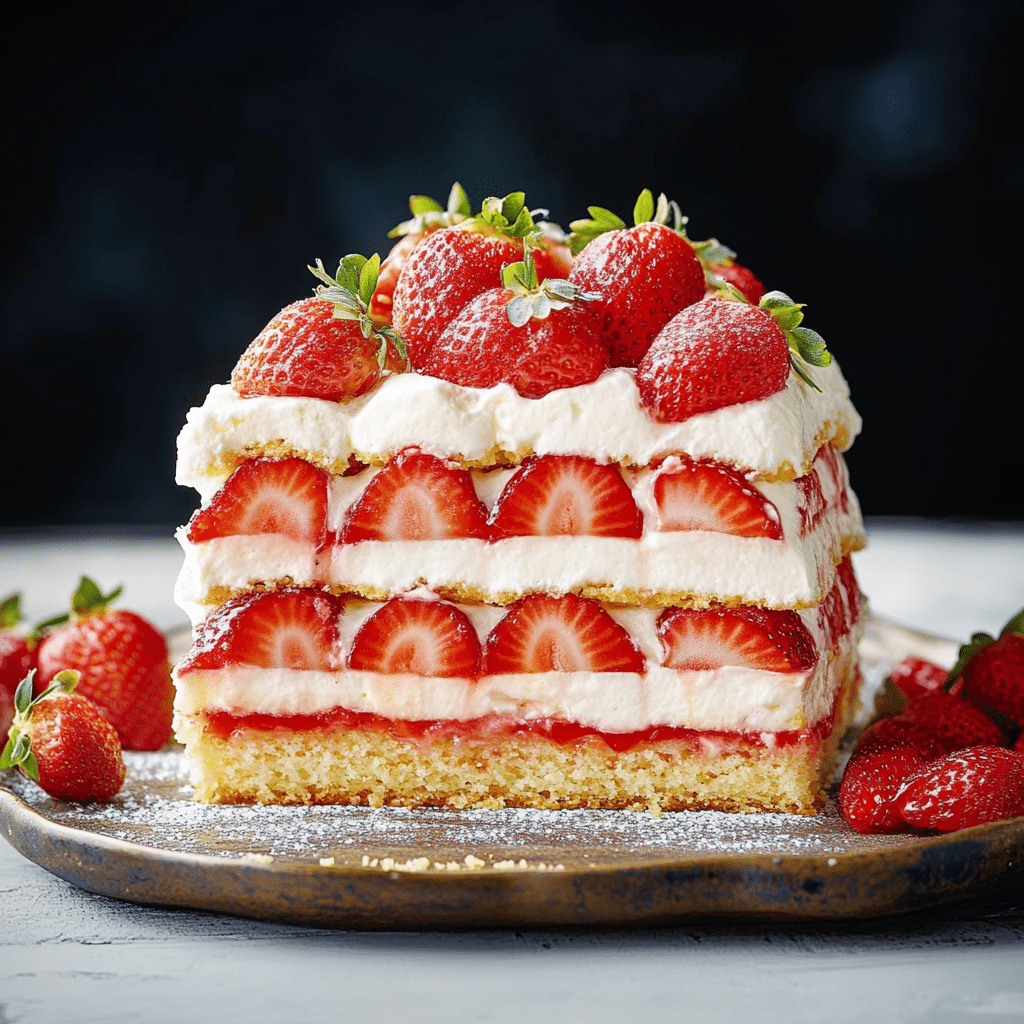
Now comes the fun part—assembling your fridge cake. Start by dipping the graham crackers or sponge cake pieces in the milk. Don’t soak them too long; a quick dip is enough to moisten them. You want them soft but not soggy. Arrange a single layer of these cookies at the bottom of a 9×13-inch baking dish, making sure the base is completely covered.
Next, spread half of the cream filling evenly over the layer of cookies. Use a spatula to smooth it out so it covers the cookies in a thick, even layer. This cream layer should act as the “glue” that holds everything together and adds to the richness of the dessert.
Now, take one-third of the sliced strawberries and layer them on top of the cream filling. Arrange the strawberry slices neatly, overlapping them slightly for a beautiful visual effect. You’ll want each bite to have a perfect balance of cream and fresh fruit.
Repeat the layering process by adding another layer of dipped graham crackers (or sponge cake), followed by the remaining cream filling. Spread the cream out evenly again, making sure the dessert stays balanced.
Add the remaining strawberry slices on top, covering the dessert with a beautiful red layer of fresh fruit. You can use as many strawberries as you like, but make sure to leave some for garnish.
Step 4: Refrigerate the Cake
Once the cake is assembled, cover it tightly with plastic wrap or a lid, and place it in the fridge. The cake needs to chill for at least 4 hours to allow the flavors to meld together and for the layers to set. However, for best results, let it chill overnight. The longer the cake sits, the better the layers will hold together, and the flavors will deepen.
This waiting time is one of the key benefits of this dessert. Since it’s made ahead of time, you can prepare it at your leisure and simply enjoy the event without worrying about dessert preparation at the last minute.
Step 5: Garnish and Serve
After chilling, it’s time to serve. Carefully slice the fridge cake into squares or rectangles. For a beautiful presentation, garnish each piece with fresh strawberry slices and mint leaves. A dollop of extra whipped cream on top also adds a touch of elegance.
Serve immediately or keep it chilled until you’re ready to enjoy it. The cake will hold together well and can be enjoyed at your own pace, making it an excellent make-ahead dessert.
How to Serve
- At Summer Barbecues: This dessert is perfect for an outdoor picnic or barbecue. The cool, refreshing flavors balance out heavier grilled foods, and its vibrant colors make it a crowd-pleaser.
- For Birthdays or Holidays: Whether it’s a birthday party, Mother’s Day, or a casual family dinner, this fridge cake is a versatile dessert that works for any occasion.
- Picnics and Potlucks: Because it’s so easy to transport and can be made ahead, this dessert is ideal for a potluck or picnic. You don’t have to worry about refrigeration once it’s set—just keep it in the cooler until you’re ready to serve.
- As a Light Dessert for a Special Meal: If you’ve just had a rich or heavy dinner, this dessert offers a refreshing and light conclusion without being too filling.
Additional Tips
- Make-Ahead Magic: This cake actually improves as it sits in the fridge. The graham crackers or cake layers will absorb some of the cream filling and strawberry juice, making them wonderfully soft and flavorful. It’s ideal for preparing a day in advance.
- Use Other Fruits: While strawberries are the traditional fruit, this cake can be customized with a variety of fruits. Consider blueberries, raspberries, or even peaches. In the winter months, try using citrus slices or pomegranate seeds for a festive look.
- Swapping the Cream: For a lighter version, you can substitute some of the whipped cream with Greek yogurt or use light whipped topping. You can even try dairy-free whipped cream for a vegan-friendly option.
Variations on the Recipe
- Chocolate Strawberry Shortcake: Add some chocolate shavings or a layer of chocolate ganache between the cream layers. This will give a richer, more decadent twist to the traditional recipe.
- Tropical Shortcake: Swap out the strawberries for tropical fruits like mango, pineapple, and coconut for a bright, tropical dessert that’s perfect for a beach party or luau.
- Peanut Butter Shortcake: If you’re a fan of peanut butter, add a layer of peanut butter mousse or mix a bit of peanut butter into the cream filling for a savory-sweet combo.
Conclusion
The Strawberry Shortcake Fridge Cake is a fantastic dessert that blends the best of summer’s flavors with an easy, no-bake approach. It’s refreshing, indulgent, and easy to make ahead, making it perfect for gatherings, celebrations, or just a casual weeknight treat. With its light, creamy layers and sweet strawberries, this dessert will leave your guests craving more.
Whether you stick to the classic recipe or put your own spin on it, this no-bake cake is sure to become a staple in your recipe collection. Happy baking (or should we say, assembling?), and enjoy every bite!
Print
Strawberry Shortcake Fridge Cake: A No-Bake Delight for Every Occasion
- Total Time: 4 hours
Description
Strawberry Shortcake Fridge Cake is a refreshing, no-bake dessert that captures the essence of summer in every bite. This chilled dessert features layers of soft, moist cake or graham crackers, topped with a luscious, creamy filling made from whipped cream and cream cheese, and crowned with fresh, juicy strawberries. It’s a light yet indulgent treat that’s perfect for warm weather gatherings, potlucks, or simply when you want a dessert that’s both easy to make and beautiful to serve.
What makes this fridge cake so special is its simplicity—no baking required, and minimal ingredients are needed to create a dessert that looks and tastes impressive. The graham cracker or sponge cake layers soak up the creamy filling and strawberry juices, making each bite a perfect balance of sweetness, creaminess, and freshness. It’s a dessert that can be prepared in advance, allowing the flavors to meld together beautifully while saving you time on the day of your event.
Whether you’re celebrating a special occasion, having a family dinner, or just looking for a refreshing summer treat, Strawberry Shortcake Fridge Cake is guaranteed to please everyone at the table. Its versatility allows you to customize it with your favorite fruits or toppings, and it’s easy to adjust for dietary preferences or seasonal changes. This no-bake cake is the ultimate in convenience without sacrificing flavor, making it a must-try dessert for any occasion.
Ingredients
For the Cake:
- 1 1/2 pounds fresh strawberries (about 3 cups), hulled and sliced
- 2 cups heavy whipping cream
- 8 oz cream cheese (softened)
- 1/2 cup powdered sugar (adjust to taste)
- 1 teaspoon vanilla extract
- 1 box (about 10-12 oz) graham crackers or sponge cake (you can also use ladyfingers)
- 1/2 cup milk (for soaking the cookies)
For the Topping:
- Fresh strawberries (additional for garnish, sliced)
- Mint leaves (optional, for garnish)
- Extra whipped cream (optional, for garnish)
Instructions
Step 1: Prepare the Strawberries
The first step in this delicious recipe is to prepare the fresh strawberries. Start by hulling them—removing the green leaves and stems. You can do this easily by using a small paring knife or a strawberry huller. Once hulled, slice the strawberries into thin, even slices. These slices will be layered throughout the dessert, so uniformity is key for both presentation and taste.
If your strawberries aren’t very sweet, you can sprinkle a tablespoon of sugar over the slices and let them sit for 10-15 minutes. This step helps the strawberries release their natural juices, creating a sweet syrup that will soak into the layers of cake, enhancing the flavor. It’s a simple trick to ensure that your dessert is perfectly sweet, even if the berries are a little tart.
Step 2: Make the Creamy Filling
Next, it’s time to prepare the luscious cream filling that will be the base of your cake. Begin by softening the cream cheese. This is an important step, as cold cream cheese can result in lumps when mixed. You can soften it by leaving it out at room temperature for 30 minutes or gently microwaving it for 10-15 seconds.
Once softened, place the cream cheese in a large mixing bowl. Add the powdered sugar and vanilla extract. Use a hand mixer or stand mixer to beat these ingredients together until the mixture is smooth and fluffy. The cream cheese should blend seamlessly with the sugar and vanilla, creating a soft, creamy base.
In a separate bowl, whip the heavy cream using an electric mixer until soft peaks form. This can take anywhere from 3-5 minutes, depending on the temperature of the cream. If you’re using a hand whisk, it will take longer, but it’s still worth the effort! Once whipped, gently fold the whipped cream into the cream cheese mixture, using a spatula. The result should be a fluffy, airy, and thick cream filling that holds its shape.
Step 3: Assemble the Cake
Now comes the fun part—assembling your fridge cake. Start by dipping the graham crackers or sponge cake pieces in the milk. Don’t soak them too long; a quick dip is enough to moisten them. You want them soft but not soggy. Arrange a single layer of these cookies at the bottom of a 9×13-inch baking dish, making sure the base is completely covered.
Next, spread half of the cream filling evenly over the layer of cookies. Use a spatula to smooth it out so it covers the cookies in a thick, even layer. This cream layer should act as the “glue” that holds everything together and adds to the richness of the dessert.
Now, take one-third of the sliced strawberries and layer them on top of the cream filling. Arrange the strawberry slices neatly, overlapping them slightly for a beautiful visual effect. You’ll want each bite to have a perfect balance of cream and fresh fruit.
Repeat the layering process by adding another layer of dipped graham crackers (or sponge cake), followed by the remaining cream filling. Spread the cream out evenly again, making sure the dessert stays balanced.
Add the remaining strawberry slices on top, covering the dessert with a beautiful red layer of fresh fruit. You can use as many strawberries as you like, but make sure to leave some for garnish.
Step 4: Refrigerate the Cake
Once the cake is assembled, cover it tightly with plastic wrap or a lid, and place it in the fridge. The cake needs to chill for at least 4 hours to allow the flavors to meld together and for the layers to set. However, for best results, let it chill overnight. The longer the cake sits, the better the layers will hold together, and the flavors will deepen.
This waiting time is one of the key benefits of this dessert. Since it’s made ahead of time, you can prepare it at your leisure and simply enjoy the event without worrying about dessert preparation at the last minute.
Step 5: Garnish and Serve
After chilling, it’s time to serve. Carefully slice the fridge cake into squares or rectangles. For a beautiful presentation, garnish each piece with fresh strawberry slices and mint leaves. A dollop of extra whipped cream on top also adds a touch of elegance.
Serve immediately or keep it chilled until you’re ready to enjoy it. The cake will hold together well and can be enjoyed at your own pace, making it an excellent make-ahead dessert.
Nutrition
- Calories: 350 kcal
- Fat: 22g
- Carbohydrates: 40g
- Protein: 4g


