
Introduction
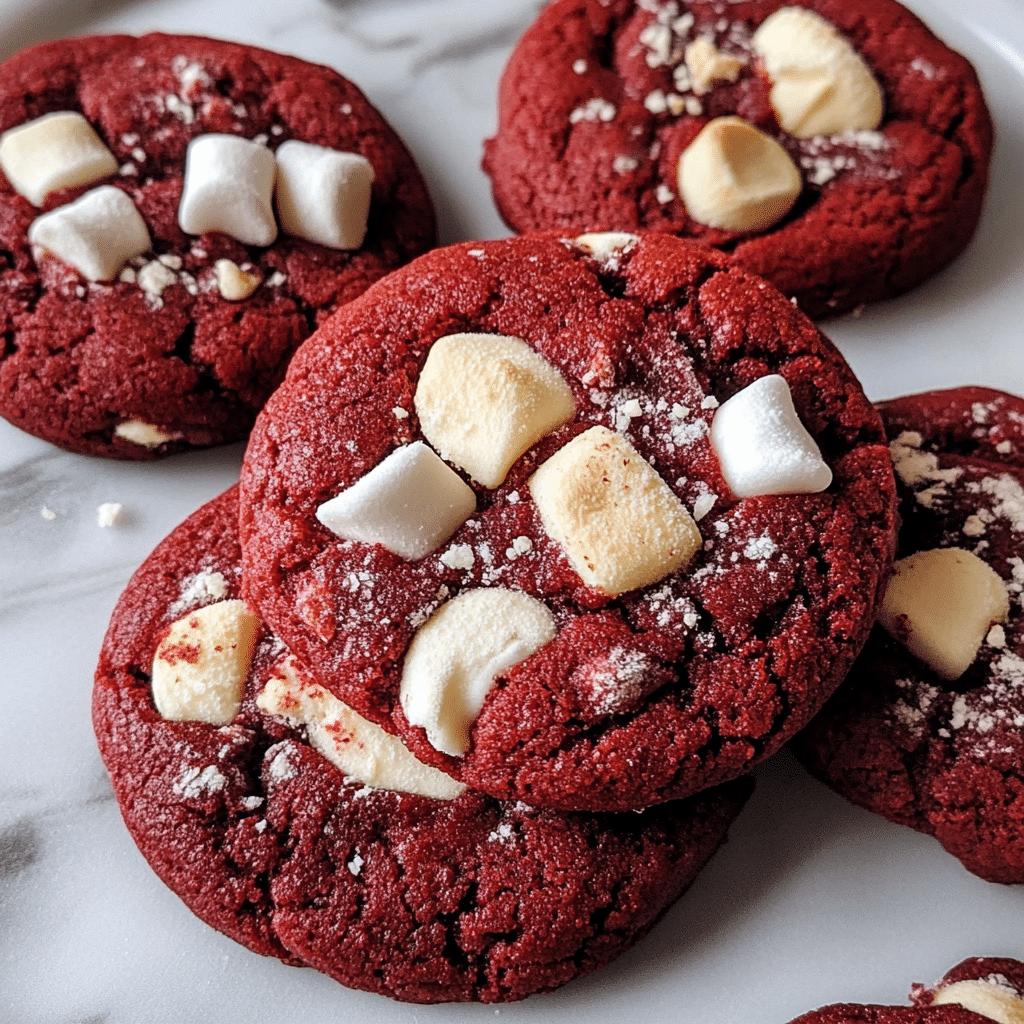
Toasted Marshmallow Red Velvet Cookies are a deliciously unique dessert that brings together the richness of red velvet cake and the smoky sweetness of toasted marshmallows. These cookies are a perfect blend of chewy, soft red velvet dough with a slightly crispy, golden marshmallow topping, making them visually stunning and irresistible to eat. The deep red color and the fluffy marshmallows create a treat that is both beautiful and mouthwatering.
Ideal for special occasions, holiday gatherings, or a fun weekend bake, Toasted Marshmallow Red Velvet Cookies combine two beloved flavors into one decadent dessert. The cookie dough itself is rich and soft, with hints of cocoa, and the toasted marshmallows on top add a fun and flavorful finishing touch. This easy-to-follow guide will walk you through each step of the process, offer helpful tips for achieving the perfect cookie, and suggest a few fun variations to explore.
Why You’ll Love Toasted Marshmallow Red Velvet Cookies
- Rich Red Velvet Flavor: These cookies offer the deep, cocoa-infused flavor of traditional red velvet cake. The subtle tanginess from the buttermilk and the richness of the cocoa powder make each bite a flavor-packed experience.
- Perfect Texture: The combination of soft, chewy centers and slightly crispy edges makes these cookies irresistible. The marshmallow topping adds a delightful contrast of sweetness and texture, with a crisp, golden exterior and a soft, gooey interior.
- Visually Stunning: With their bright red color and toasted marshmallow topping, these cookies are visually striking. Whether you’re baking for a party, holiday gathering, or just because, these cookies are sure to impress with their gorgeous appearance and delightful flavor.
- Simple Ingredients: Made with common pantry staples such as flour, sugar, cocoa powder, and marshmallows, these cookies are straightforward to prepare. You don’t need to be an expert baker to make them—they come together quickly and easily.
- Fun and Customizable: The marshmallow topping is not only fun to make but also customizable. You can toast the marshmallows to your desired level of crispness, and even add different flavors to the dough or marshmallows to make them uniquely yours.
Preparation and Cooking Time
- Total Time: 1 hour 10 minutes
- Preparation Time: 15 minutes
- Cooking Time: 10-12 minutes (plus 2-3 minutes for toasting marshmallows)
- Servings: Approximately 24 cookies
- Calories per Serving: Around 180-210 calories per cookie, depending on the ingredients and portion sizes.
Nutrition Facts (Per Serving)
- Calories: 180-210 kcal
- Fat: 9-11g
- Carbohydrates: 26-30g
- Protein: 2g
- Fiber: 1g
- Sugar: 18-20g
Ingredients
For the Toasted Marshmallow Red Velvet Cookies:
- 1 cup (2 sticks) unsalted butter, softened
- 1 cup granulated sugar
- 1 large egg
- 1 teaspoon vanilla extract
- 2 teaspoons red gel food coloring
- 2 cups all-purpose flour
- 2 tablespoons unsweetened cocoa powder
- 1 teaspoon baking soda
- ½ teaspoon salt
- 1 tablespoon buttermilk powder (or 2 tablespoons liquid buttermilk)
- 1 cup mini marshmallows (for topping)
- Optional: ½ cup white chocolate chips (for added sweetness)
Step-by-Step Instructions
1. Preheat the Oven and Prepare the Baking Sheets
Preheat your oven to 350°F (175°C). Line two baking sheets with parchment paper or silicone baking mats to ensure the cookies bake evenly and don’t stick. This also makes for easier cleanup. While the oven is heating up, you can start preparing the cookie dough.
2. Cream the Butter and Sugar
In a large mixing bowl, cream together the softened butter and granulated sugar using an electric mixer or a hand whisk. Beat on medium speed for about 2-3 minutes, or until the mixture is light and fluffy. This step helps incorporate air into the dough, which will result in a softer, fluffier cookie.
3. Add the Wet Ingredients
Once the butter and sugar are creamed together, add the egg and vanilla extract to the bowl. Beat until well combined. Then, add the red gel food coloring, which will give the cookies their vibrant red hue. Mix until the dough is evenly colored, and the food coloring is fully incorporated.
4. Combine the Dry Ingredients
In a separate bowl, whisk together the all-purpose flour, cocoa powder, baking soda, salt, and buttermilk powder. The cocoa powder gives the dough its rich chocolate flavor, while the baking soda helps the cookies rise slightly. The buttermilk powder adds the signature tang of red velvet.
Gradually add the dry ingredients to the wet ingredients, mixing until just combined. Be careful not to overmix the dough, as this can lead to tough cookies. The dough should be soft, slightly sticky, and vibrant red.
5. Chill the Dough
To make the dough easier to handle and help the cookies hold their shape, cover the dough with plastic wrap and refrigerate it for at least 30 minutes. Chilling the dough is an essential step to prevent the cookies from spreading too much during baking, and it ensures they hold a nice, round shape.
6. Roll the Dough into Balls
After the dough has chilled, use a cookie scoop or tablespoon to portion out small amounts of dough. Roll each portion into a ball using your hands. Place the dough balls about 2 inches apart on the prepared baking sheets. The cookies will spread a little during baking, so be sure to give them enough space.
7. Bake the Cookies
Place the baking sheets in the preheated oven and bake for 10-12 minutes. The cookies should look set around the edges but still soft in the center. If you prefer a slightly firmer cookie, you can bake for an extra minute or two. However, be careful not to overbake them, as this can affect the texture.
Once the cookies are done, remove them from the oven and let them cool on the baking sheets for a few minutes before transferring them to a wire rack to cool completely. While they are cooling, you can prepare the marshmallow topping.
8. Toast the Marshmallows
Once the cookies are completely cooled, it’s time to add the marshmallow topping. Place mini marshmallows on top of each cookie. If you’d like to add a bit more sweetness, you can also sprinkle the marshmallows with a few white chocolate chips.
To toast the marshmallows, you have a few options. You can place the cookies under the broiler for 1-2 minutes, but be sure to watch them carefully as they can burn quickly. Alternatively, you can use a kitchen torch to toast the marshmallows individually, giving them a perfectly golden, crispy exterior. Either method will give you that wonderful toasted flavor and texture.
9. Serve the Cookies
Once the marshmallows are toasted to your liking, transfer the cookies to a serving platter and serve them immediately. The marshmallow topping will be warm and gooey, while the red velvet cookie remains soft and chewy underneath.

Tips for Perfect Toasted Marshmallow Red Velvet Cookies
- Use Gel Food Coloring: Gel food coloring is more concentrated than liquid food coloring, which means you’ll need less of it to achieve a vibrant red color without affecting the consistency of the dough.
- Chill the Dough: Don’t skip the chilling step. It helps the cookies hold their shape and prevents them from spreading too much in the oven.
- Watch the Marshmallows Closely: Toasting the marshmallows can be a delicate process. Keep a close eye on them while broiling or using a kitchen torch to avoid burning. You want them golden brown, not charred.
- Add White Chocolate Chips: For extra sweetness, fold some white chocolate chips into the dough before baking. They complement the red velvet flavor and add a creamy element to the cookies.
- Don’t Overbake: These cookies should have soft centers. If you prefer a slightly chewier texture, err on the side of underbaking by 1-2 minutes. The cookies will continue to firm up as they cool.
Variations of Toasted Marshmallow Red Velvet Cookies
- Nutella-Stuffed Red Velvet Cookies: For a chocolatey surprise inside, try stuffing the cookies with a teaspoon of Nutella before baking. The Nutella melts inside, creating a gooey center that pairs beautifully with the red velvet flavor.
- Chocolate Chip Red Velvet Cookies: If you’re a fan of chocolate chips, you can add ½ cup of semi-sweet chocolate chips to the dough before baking. This adds an extra layer of chocolate flavor to the cookies.
- Coconut Red Velvet Cookies: For a tropical twist, add shredded coconut to the dough before baking. The coconut pairs nicely with the red velvet flavor and adds a pleasant texture.
- Caramel Drizzle: After toasting the marshmallows, drizzle the cookies with warm caramel sauce for an extra indulgent treat. The caramel adds sweetness and richness to the already delicious cookies.
- Peanut Butter Red Velvet Cookies: For a salty-sweet combo, add ¼ cup of peanut butter to the dough or swirl it into the cookie dough before baking. The peanut butter flavor complements the rich red velvet base and adds a fun twist.
Storage and Shelf Life
Toasted Marshmallow Red Velvet Cookies are best enjoyed fresh, but they can be stored for later. Store any leftover cookies in an airtight container at room temperature for up to 3-4 days. Keep in mind that the marshmallow topping will lose its crispness over time, so they’re best enjoyed within a day or two of making them.
For longer storage, you can freeze the cookies. Place the cooled cookies in a single layer on a baking sheet and freeze until solid. Once frozen, transfer them to a freezer-safe bag or container. Frozen cookies can be stored for up to 2-3 months. To thaw, simply leave the cookies at room temperature
for about 30 minutes or reheat them in a 300°F (150°C) oven for a few minutes.
Side Dishes and Pairings for Toasted Marshmallow Red Velvet Cookies
These Toasted Marshmallow Red Velvet Cookies are rich enough to stand on their own, but they can be paired with complementary treats for an even more indulgent experience:
- Milk: A glass of cold milk is a classic pairing with any cookie, and it works perfectly with these rich, sweet cookies.
- Hot Chocolate: For an extra chocolaty experience, serve these cookies with a warm mug of hot chocolate. The creamy drink complements the marshmallow and red velvet flavors.
- Vanilla Ice Cream: Serve these cookies alongside a scoop of vanilla ice cream for a delightful dessert combination. The cool, creamy ice cream balances the warm, chewy cookies.
- Fruit Platter: A refreshing fruit platter, such as strawberries, raspberries, or citrus fruits, offers a tart contrast to the sweetness of the cookies and helps cleanse your palate.

Toasted Marshmallow Red Velvet Cookies Recipe
- Total Time: 1 hour 10 minutes
Description
Soft, chewy red velvet cookies with mini marshmallows toasted to gooey perfection. These sweet, colorful treats bring the best of red velvet and toasted marshmallow into every bite!
Ingredients
For the Toasted Marshmallow Red Velvet Cookies:
- 1 cup (2 sticks) unsalted butter, softened
- 1 cup granulated sugar
- 1 large egg
- 1 teaspoon vanilla extract
- 2 teaspoons red gel food coloring
- 2 cups all-purpose flour
- 2 tablespoons unsweetened cocoa powder
- 1 teaspoon baking soda
- ½ teaspoon salt
- 1 tablespoon buttermilk powder (or 2 tablespoons liquid buttermilk)
- 1 cup mini marshmallows (for topping)
- Optional: ½ cup white chocolate chips (for added sweetness)
Instructions
1. Preheat the Oven and Prepare the Baking Sheets
Preheat your oven to 350°F (175°C). Line two baking sheets with parchment paper or silicone baking mats to ensure the cookies bake evenly and don’t stick. This also makes for easier cleanup. While the oven is heating up, you can start preparing the cookie dough.
2. Cream the Butter and Sugar
In a large mixing bowl, cream together the softened butter and granulated sugar using an electric mixer or a hand whisk. Beat on medium speed for about 2-3 minutes, or until the mixture is light and fluffy. This step helps incorporate air into the dough, which will result in a softer, fluffier cookie.
3. Add the Wet Ingredients
Once the butter and sugar are creamed together, add the egg and vanilla extract to the bowl. Beat until well combined. Then, add the red gel food coloring, which will give the cookies their vibrant red hue. Mix until the dough is evenly colored, and the food coloring is fully incorporated.
4. Combine the Dry Ingredients
In a separate bowl, whisk together the all-purpose flour, cocoa powder, baking soda, salt, and buttermilk powder. The cocoa powder gives the dough its rich chocolate flavor, while the baking soda helps the cookies rise slightly. The buttermilk powder adds the signature tang of red velvet.
Gradually add the dry ingredients to the wet ingredients, mixing until just combined. Be careful not to overmix the dough, as this can lead to tough cookies. The dough should be soft, slightly sticky, and vibrant red.
5. Chill the Dough
To make the dough easier to handle and help the cookies hold their shape, cover the dough with plastic wrap and refrigerate it for at least 30 minutes. Chilling the dough is an essential step to prevent the cookies from spreading too much during baking, and it ensures they hold a nice, round shape.
6. Roll the Dough into Balls
After the dough has chilled, use a cookie scoop or tablespoon to portion out small amounts of dough. Roll each portion into a ball using your hands. Place the dough balls about 2 inches apart on the prepared baking sheets. The cookies will spread a little during baking, so be sure to give them enough space.
7. Bake the Cookies
Place the baking sheets in the preheated oven and bake for 10-12 minutes. The cookies should look set around the edges but still soft in the center. If you prefer a slightly firmer cookie, you can bake for an extra minute or two. However, be careful not to overbake them, as this can affect the texture.
Once the cookies are done, remove them from the oven and let them cool on the baking sheets for a few minutes before transferring them to a wire rack to cool completely. While they are cooling, you can prepare the marshmallow topping.
8. Toast the Marshmallows
Once the cookies are completely cooled, it’s time to add the marshmallow topping. Place mini marshmallows on top of each cookie. If you’d like to add a bit more sweetness, you can also sprinkle the marshmallows with a few white chocolate chips.
To toast the marshmallows, you have a few options. You can place the cookies under the broiler for 1-2 minutes, but be sure to watch them carefully as they can burn quickly. Alternatively, you can use a kitchen torch to toast the marshmallows individually, giving them a perfectly golden, crispy exterior. Either method will give you that wonderful toasted flavor and texture.
9. Serve the Cookies
Once the marshmallows are toasted to your liking, transfer the cookies to a serving platter and serve them immediately. The marshmallow topping will be warm and gooey, while the red velvet cookie remains soft and chewy underneath.
- Prep Time: 15 minutes
- Cook Time: 10-12 minutes
Nutrition
- Calories: 180-210 kcal
- Fat: 9-11g
- Carbohydrates: 26-30g
- Protein: 2g
Conclusion
Toasted Marshmallow Red Velvet Cookies are a fun and indulgent twist on a classic flavor combination. With their vibrant red color, rich red velvet flavor, and perfectly toasted marshmallow topping, these cookies are sure to impress at any gathering or special occasion.
With easy-to-follow steps and simple ingredients, you can make these cookies at home and enjoy them fresh out of the oven. The tips, variations, and storage ideas provided ensure that your cookies will be perfect every time. So grab your ingredients, preheat your oven, and enjoy these delectable cookies that bring together the best of red velvet cake and toasted marshmallows in one delicious treat.


