
Introduction
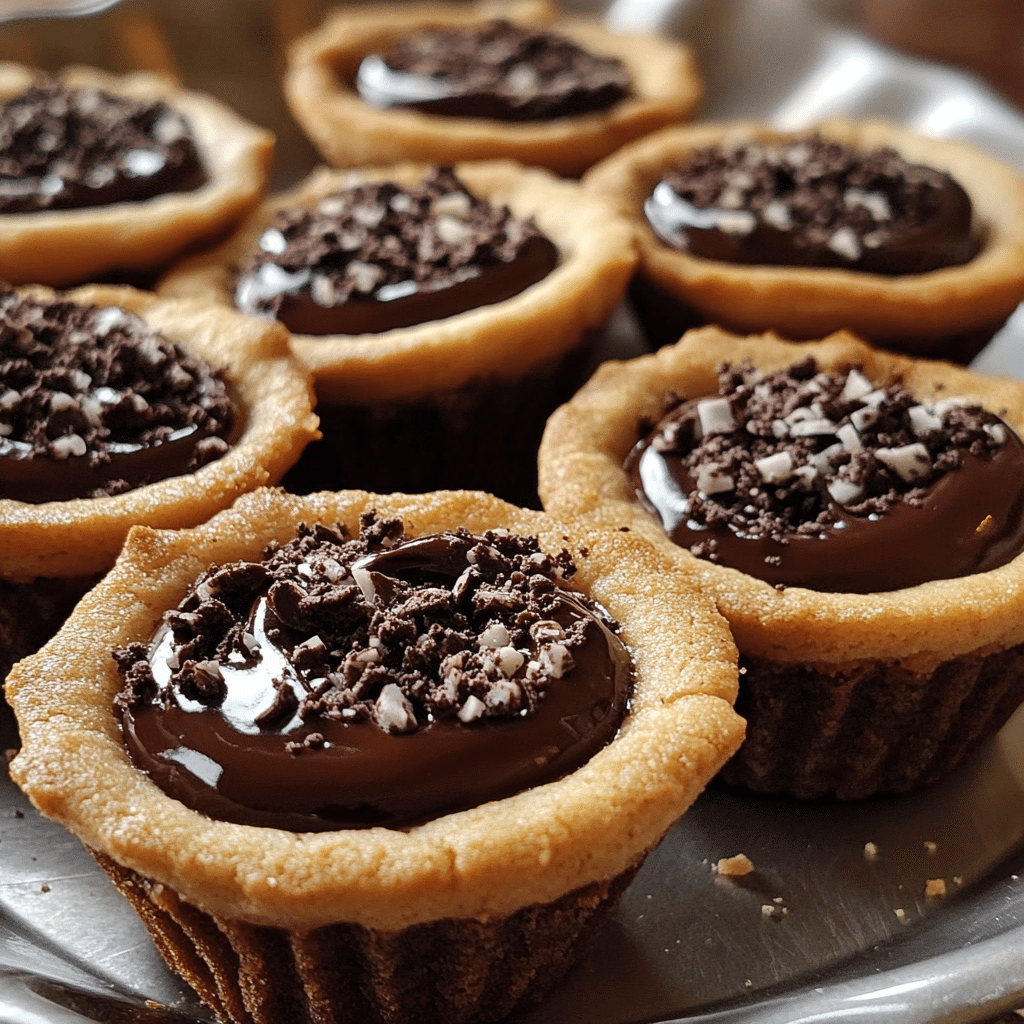
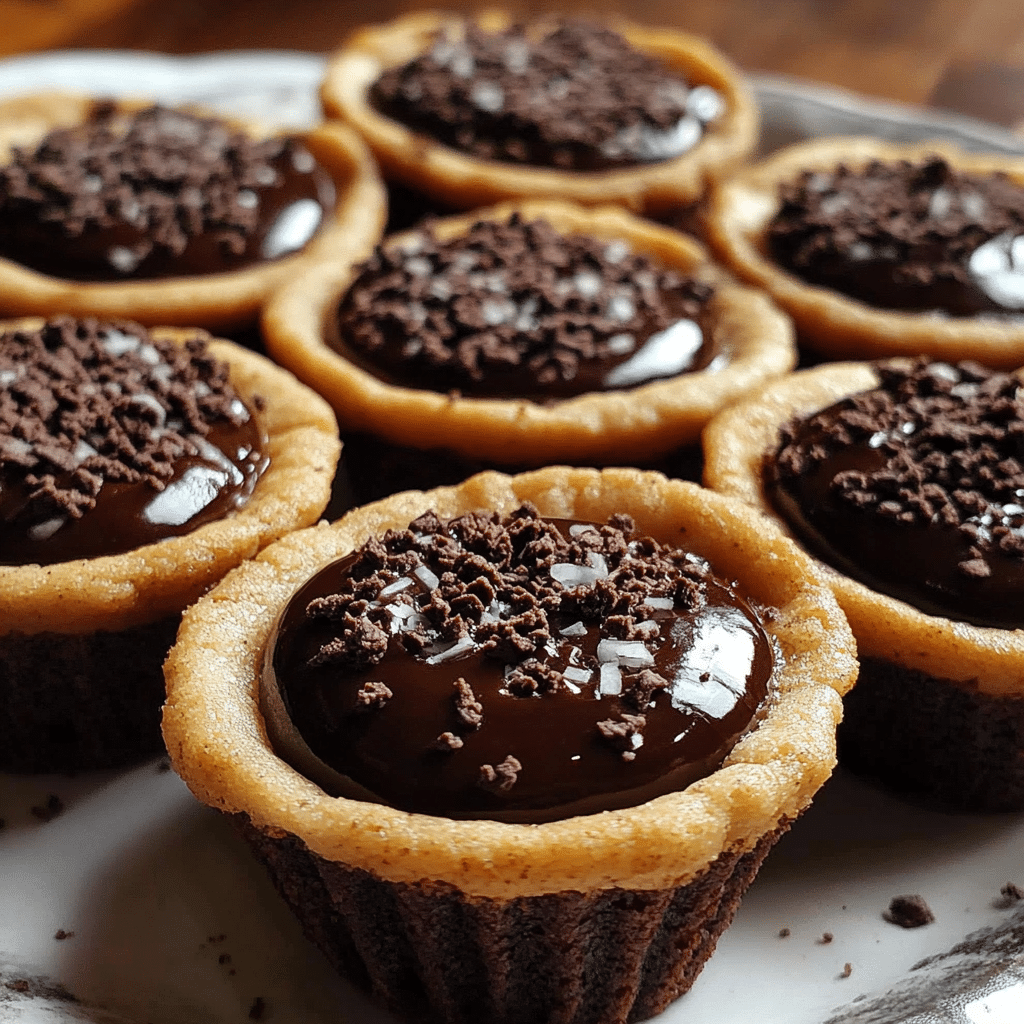
Truffle-Filled Cookie Tarts are an indulgent, bite-sized dessert that combines the best of both worlds: the delicious crunch of a buttery cookie crust and the rich, melt-in-your-mouth smoothness of chocolate truffle filling. These tarts offer a delightful balance of textures, with a crisp, golden cookie base and a decadent, velvety center that’s sure to satisfy your sweet cravings. Whether you’re preparing them for a special occasion, a holiday treat, or just because, these tarts are a perfect way to impress your guests and indulge your chocolate desires.
Truffle-Filled Cookie Tarts are easy to make but pack a punch in terms of flavor. The truffle filling is made with premium chocolate, cream, and a touch of flavoring (like vanilla or liqueur), while the cookie crust is buttery and slightly sweet, complementing the rich chocolate center. These tarts are perfect for those who love chocolate and cookies and want to enjoy both in one delightful bite.
This recipe will guide you through every step of the process, from preparing the cookie dough to making the silky truffle filling, ensuring that you can recreate this treat at home with ease. Let’s dive into the details and learn how to make these irresistible Truffle-Filled Cookie Tarts.
Why You’ll Love Truffle-Filled Cookie Tarts
- Decadent Chocolate Truffle Center: The heart of these tarts is the rich chocolate truffle filling. Smooth, creamy, and indulgent, it creates a melt-in-your-mouth experience that pairs perfectly with the crunchy cookie crust.
- Perfect Balance of Textures: The contrast between the crispy, buttery cookie base and the soft, gooey chocolate center creates an irresistible combination that’s sure to please any dessert lover.
- Impressive Yet Easy to Make: While these tarts look elegant and sophisticated, they’re surprisingly simple to prepare. With a few basic ingredients and some patience, you can make a batch of these show-stopping treats.
- Versatile and Customizable: You can customize the flavor of the truffle filling with different types of chocolate, flavor extracts, or even a splash of your favorite liqueur. You can also experiment with different cookie crusts for a unique twist.
- Perfect for Special Occasions: These tarts make a fantastic addition to any dessert table. Whether you’re hosting a party, celebrating a holiday, or enjoying a cozy evening at home, Truffle-Filled Cookie Tarts are sure to impress.
- A Great Make-Ahead Dessert: The tarts can be prepared in advance, making them a great option for busy bakers or those looking to get ahead of time. Simply refrigerate or freeze them until ready to serve.
Preparation and Cooking Time
- Total Time: 1 hour 30 minutes
- Preparation Time: 30 minutes
- Cooking Time: 15-20 minutes
- Chilling Time: 1 hour (for the cookie tarts to set)
- Servings: Approximately 18-24 tarts
- Calories per Serving: Around 180-220 calories per tart, depending on the ingredients and portion sizes.
Nutrition Facts (Per Serving)
- Calories: 180-220 kcal
- Fat: 12-15g
- Carbohydrates: 20-24g
- Protein: 2g
- Fiber: 1g
- Sugar: 15-18g
Ingredients
For the Cookie Crust:
- 1 ½ cups all-purpose flour
- ½ cup unsalted butter, softened
- ½ cup granulated sugar
- 1 large egg
- 1 teaspoon vanilla extract
- ¼ teaspoon salt
- 2 tablespoons milk (if needed)
For the Truffle Filling:
- 8 ounces semi-sweet or dark chocolate, chopped
- ½ cup heavy cream
- 1 teaspoon vanilla extract
- 1 tablespoon unsalted butter
- 1 tablespoon liqueur (optional, such as Baileys, Kahlúa, or Grand Marnier)
For the Garnish (optional):
- Shaved chocolate, cocoa powder, or chopped nuts (such as pistachios or hazelnuts)
- A light dusting of powdered sugar
Step-by-Step Instructions
1. Prepare the Cookie Crust
Start by preheating your oven to 350°F (175°C) and lightly greasing a 12-cup mini tart pan or muffin tin. You can also line the tin with paper cupcake liners for easy removal.
In a large mixing bowl, cream together the softened butter and granulated sugar until light and fluffy. This should take about 2-3 minutes with an electric mixer on medium speed. The creaming process is essential for creating a smooth, tender cookie crust.
Add the egg and vanilla extract to the mixture, beating well to combine. The egg acts as a binder, helping the crust hold together, while the vanilla enhances the overall flavor of the dough.
Next, in a separate bowl, whisk together the all-purpose flour and salt. Gradually add the dry ingredients to the wet ingredients, mixing just until combined. If the dough is too dry or crumbly, add a tablespoon of milk at a time until the dough comes together.
Once the dough is ready, scoop out small portions and press them into the bottom of the prepared tart pan, creating a thin, even layer in each cup. Use your fingers or the back of a spoon to press the dough into the corners of each tart cup. You can also use a fork to poke a few holes in the dough to prevent it from puffing up while baking.
2. Bake the Cookie Crusts
Place the tart pan into the preheated oven and bake for 12-15 minutes, or until the cookie crusts are golden brown and firm. Keep a close eye on the tarts towards the end of the baking time, as they can burn quickly. Once done, remove the pan from the oven and allow the crusts to cool completely in the pan.
3. Prepare the Truffle Filling
While the cookie crusts are cooling, prepare the truffle filling. In a medium saucepan, heat the heavy cream over medium heat until it begins to simmer. You’ll see small bubbles forming around the edges of the cream, but don’t let it come to a full boil.
Remove the saucepan from the heat and immediately add the chopped chocolate to the cream. Let the mixture sit for about 2-3 minutes to allow the chocolate to melt. Then, whisk the mixture gently until smooth and creamy. Stir in the butter and vanilla extract, and add a tablespoon of liqueur if desired, for an extra layer of flavor.
Once the truffle filling is smooth and glossy, let it cool slightly before filling the cooled cookie crusts. The mixture should be thick but still pourable. If it’s too runny, you can refrigerate it for a few minutes to thicken it up, but be careful not to let it harden completely.
4. Fill the Cookie Tarts
Once the cookie crusts have cooled, spoon the truffle filling into each tart shell. Fill each tart almost to the top, leaving just a small gap at the edge. The truffle filling will settle and firm up as it cools, creating a smooth, velvety surface.
After filling all of the tarts, gently tap the tart pan on the counter to settle the filling and remove any air bubbles. This ensures that the filling is evenly distributed and creates a smooth finish.
5. Chill the Tarts
Place the filled tarts in the refrigerator for at least 1 hour to allow the truffle filling to set. The truffles should become firm and smooth, holding their shape when you remove them from the pan.
6. Garnish and Serve
Once the tarts have set, you can garnish them with a variety of toppings for added flavor and visual appeal. Some great options include:
- Shaved chocolate or chocolate curls for a luxurious touch.
- A light dusting of cocoa powder for a classic look.
- Chopped nuts like pistachios, hazelnuts, or almonds for texture and flavor contrast.
- A sprinkling of powdered sugar for a festive finish.
Once garnished, the tarts are ready to serve. Arrange them on a platter or in individual serving dishes for an elegant presentation.
Tips for Perfect Truffle-Filled Cookie Tarts
- Use Good Quality Chocolate: Since the truffle filling is the star of the show, using high-quality chocolate will make a big difference in flavor. Opt for semi-sweet or dark chocolate with at least 60% cocoa for a rich, balanced flavor.
- Let the Cookie Crusts Cool Completely: Make sure the cookie crusts are completely cooled before adding the truffle filling. If they’re still warm, the filling may melt or become too runny.
- Chill the Tarts Long Enough: Allowing the tarts to chill for at least 1 hour helps the truffle filling firm up and ensures the tarts hold their shape when you serve them.
- Customize the Flavor: Feel free to experiment with different flavor extracts, such as almond or orange, to infuse your truffle filling with a unique twist. You can also add a splash of your favorite liqueur to the filling for a more sophisticated flavor.
- Be Gentle with the Dough: Phyllo dough or overly thick dough might not work well for this recipe, so ensure your cookie dough is soft and workable, but not sticky.
Variations of Truffle-Filled Cookie Tarts
- Salted Caramel Truffle Tarts: Add a spoonful of homemade or store-bought caramel sauce to the truffle filling and sprinkle a pinch of flaky sea salt on top for a sweet and salty combination.
- Peanut Butter Truffle Tarts: Mix in some smooth peanut butter into the chocolate truffle filling for a deliciously nutty twist. You can also top the tarts with crushed peanuts for added texture.
- White Chocolate Raspberry Tarts: Swap out the dark chocolate for white chocolate and add a spoonful of raspberry jam or fresh raspberries to the filling. This fruity variation offers a refreshing contrast to the rich chocolate.
- Mint Chocolate Truffle Tarts: Add a few drops of peppermint extract to the chocolate truffle filling for a cool, minty flavor that pairs wonderfully with the rich cookie crust.
Storage and Shelf Life
Truffle-Filled Cookie Tarts are best enjoyed within 3-4 days of making them. Store them in an airtight container in the refrigerator to keep the truffle filling firm and fresh. You can also freeze the tarts for up to 1 month. To freeze, place the tarts in a single layer on a baking sheet and freeze until solid. Then, transfer them to a freezer-safe container or bag.
Side Dishes and Pairings for Truffle-Filled Cookie Tarts
These tarts are rich and indulgent on their own, but they pair beautifully with the following beverages and sides:
- Coffee or Espresso: The deep, bold flavor of coffee or espresso perfectly complements the rich chocolate filling of the tarts.
- Vanilla Ice Cream: A scoop of vanilla ice cream adds a cool, creamy contrast to the warm, smooth truffle filling.
- Berry Compote: Serve the tarts with a drizzle of fresh berry compote, such as raspberry or strawberry, for a tart and refreshing balance to the sweetness of the truffles.
- Champagne or Dessert Wine: The bubbles and crispness of champagne or a sweet dessert wine can be an elegant and celebratory pairing for these rich tarts.

Truffle-Filled Cookie Tarts Recipe
- Total Time: 1 hour 30 minutes
Description
Buttery, melt-in-your-mouth cookie tarts filled with decadent chocolate truffle centers. These indulgent treats are a delightful combination of rich chocolate and sweet, crumbly cookie crust.
Ingredients
For the Cookie Crust:
- 1 ½ cups all-purpose flour
- ½ cup unsalted butter, softened
- ½ cup granulated sugar
- 1 large egg
- 1 teaspoon vanilla extract
- ¼ teaspoon salt
- 2 tablespoons milk (if needed)
For the Truffle Filling:
- 8 ounces semi-sweet or dark chocolate, chopped
- ½ cup heavy cream
- 1 teaspoon vanilla extract
- 1 tablespoon unsalted butter
- 1 tablespoon liqueur (optional, such as Baileys, Kahlúa, or Grand Marnier)
For the Garnish (optional):
- Shaved chocolate, cocoa powder, or chopped nuts (such as pistachios or hazelnuts)
- A light dusting of powdered sugar
Instructions
1. Prepare the Cookie Crust
Start by preheating your oven to 350°F (175°C) and lightly greasing a 12-cup mini tart pan or muffin tin. You can also line the tin with paper cupcake liners for easy removal.
In a large mixing bowl, cream together the softened butter and granulated sugar until light and fluffy. This should take about 2-3 minutes with an electric mixer on medium speed. The creaming process is essential for creating a smooth, tender cookie crust.
Add the egg and vanilla extract to the mixture, beating well to combine. The egg acts as a binder, helping the crust hold together, while the vanilla enhances the overall flavor of the dough.
Next, in a separate bowl, whisk together the all-purpose flour and salt. Gradually add the dry ingredients to the wet ingredients, mixing just until combined. If the dough is too dry or crumbly, add a tablespoon of milk at a time until the dough comes together.
Once the dough is ready, scoop out small portions and press them into the bottom of the prepared tart pan, creating a thin, even layer in each cup. Use your fingers or the back of a spoon to press the dough into the corners of each tart cup. You can also use a fork to poke a few holes in the dough to prevent it from puffing up while baking.
2. Bake the Cookie Crusts
Place the tart pan into the preheated oven and bake for 12-15 minutes, or until the cookie crusts are golden brown and firm. Keep a close eye on the tarts towards the end of the baking time, as they can burn quickly. Once done, remove the pan from the oven and allow the crusts to cool completely in the pan.
3. Prepare the Truffle Filling
While the cookie crusts are cooling, prepare the truffle filling. In a medium saucepan, heat the heavy cream over medium heat until it begins to simmer. You’ll see small bubbles forming around the edges of the cream, but don’t let it come to a full boil.
Remove the saucepan from the heat and immediately add the chopped chocolate to the cream. Let the mixture sit for about 2-3 minutes to allow the chocolate to melt. Then, whisk the mixture gently until smooth and creamy. Stir in the butter and vanilla extract, and add a tablespoon of liqueur if desired, for an extra layer of flavor.
Once the truffle filling is smooth and glossy, let it cool slightly before filling the cooled cookie crusts. The mixture should be thick but still pourable. If it’s too runny, you can refrigerate it for a few minutes to thicken it up, but be careful not to let it harden completely.
4. Fill the Cookie Tarts
Once the cookie crusts have cooled, spoon the truffle filling into each tart shell. Fill each tart almost to the top, leaving just a small gap at the edge. The truffle filling will settle and firm up as it cools, creating a smooth, velvety surface.
After filling all of the tarts, gently tap the tart pan on the counter to settle the filling and remove any air bubbles. This ensures that the filling is evenly distributed and creates a smooth finish.
5. Chill the Tarts
Place the filled tarts in the refrigerator for at least 1 hour to allow the truffle filling to set. The truffles should become firm and smooth, holding their shape when you remove them from the pan.
6. Garnish and Serve
Once the tarts have set, you can garnish them with a variety of toppings for added flavor and visual appeal. Some great options include:
- Shaved chocolate or chocolate curls for a luxurious touch.
- A light dusting of cocoa powder for a classic look.
- Chopped nuts like pistachios, hazelnuts, or almonds for texture and flavor contrast.
- A sprinkling of powdered sugar for a festive finish.
Once garnished, the tarts are ready to serve. Arrange them on a platter or in individual serving dishes for an elegant presentation.
- Prep Time: 30 minutes
- Chilling Time: 1 hour
- Cook Time: 15-20 minutes
Nutrition
- Calories: 180-220 kcal
- Fat: 12-15g
- Carbohydrates: 20-24g
- Protein: 2g
Conclusion
Truffle-Filled Cookie Tarts are the perfect combination of buttery cookie, rich chocolate, and silky truffle filling. They’re elegant, indulgent, and incredibly satisfying, making them the perfect treat for any occasion. Whether you’re baking for a party, a holiday, or just a special dessert to enjoy at home, these tarts are sure to become a favorite in your baking repertoire. With a few simple ingredients and easy steps, you can create a dessert that looks as beautiful as it tastes. Enjoy the luxury of these delicious tarts—they’re bound to impress your guests and satisfy your sweet tooth every time.


